
Subscribe to Our Youtube Channel
Related Manuals for Austin Hughes ATS-02-S


Summary of Contents for Austin Hughes ATS-02-S
- Page 1 Inspired by Your Data Center User Manual ATS-02-S GUI & SNMP for Intelligent ATS Designed and manufactured by Austin Hughes UM-IP-ATS-Q318V1 www.austin-hughes.com...
- Page 2 Legal Information First English printing, July 2018 Information in this document has been carefully checked for accuracy; however, no guarantee is given to the correctness of the contents. The information in this document is subject to change without notice. We are not liable for any injury or loss that results from the use of this equipment.
-
Page 3: Table Of Contents
< 1.6 > ATS-02-S GUI ........ -
Page 4: Ats Key Features
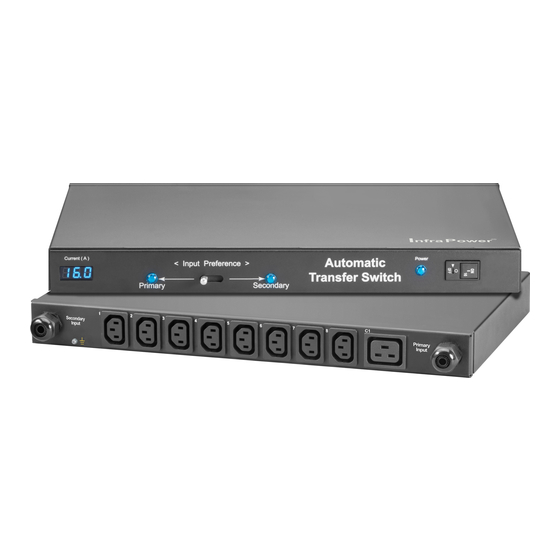
< 1.1 > ATS Key Features Main 15.8 15.8 3.62 Volt 228.0 Secondary Primary 1.8" color LCD IP Port Input Preference Switch Power LED - primary input Power LED - secondary input Circuit Breaker Primary Input attached with 3M cord & inlet plug Secondary Input attached with 3M cord &... -
Page 5: How To Switch Power Input
< 1.2 > How to switch power input 1. By Manual - Press the local input switch button on the front panel - Set the input preference via WEBUI / SNMP remotely 2. By Auto Switch automatically when the preferred input source is powered off Once ATS current loading is over the rated input current, input switching is not allowed either by local or remote. -
Page 6: Hardware Specifi Cation
< 1.3 > Hardware Specifi cation 230V Nominal input voltage 200 ~ 230V Electrical Acceptable input voltage ±10% nominal Input frequency 50 / 60Hz Inlet plug & cord 2 x C14 / C20 / EN 60309 / BS1363 / CEE7 plug w/ 3M cord Outlet connectors C13 / C13+C19 / C19 / IEC309 / UK / Schuko / FR Local meter... - Page 7 < 1.3 > Hardware Specifi cation 208V Nominal input voltage 208V Electrical Acceptable input voltage ±10% nominal Input frequency 50 / 60Hz Inlet plug & cord 2 x L620 / L630 plug w/ 3M cord Outlet connectors C13 / C13+C19 / C19 / IEC309 Local meter 1.8"...
- Page 8 < 1.3 > Hardware Specifi cation 110V Nominal input voltage 110V Electrical Acceptable input voltage ±10% nominal Input frequency 50 / 60Hz Inlet plug & cord 2 x 515 / L520 / L530 plug w/ 3M cord Outlet connectors NEMA 5-20R Local meter 1.8"...
-
Page 9: Ats Gui Ats-02-S Key Features
< 1.4 > ATS GUI ATS-02-S Key Features InfraPower Manager ATS-02-S is a FREE built-in GUI of each intelligent ATS which allows remotely monitoring over IP. InfraPower ATS-02-S Features IP Dongle Group Capacity ATS Number Concurrent User Input Source Selection... -
Page 10: Ip Confi Guration
< 1.5 > IP Confi guration The following steps show the static IP setting only. For DHCP setting, please refer to < 1.8 > DHCP Setting Step 1. Prepare a notebook computer to download the IP setup utilities from the link : http://www.austin-hughes.com/support/utilities/infrapower/IPdongleSetup.msi Step 2. -
Page 11: Ats-02-S Gui
< 1.6 > ATS-02-S GUI Each ATS provides a FREE built-in GUI, ATS-02-S, which allows user, via a web browser, to monitor the ATS status over a TCP / IP Ethernet network remotely. Each web browser window supports only one ATS. If you install more ATS, multi windows will be required. - Page 12 < 1.6 > ATS-02-S GUI In < >, Status - View the installed ATS status - View aggregate current & energy consumption of the ATS - Select the preferred “ Input Switch “ - Change “ Name “ & “ Location “ of ATS & Click “ Apply “...
- Page 13 < 1.6 > ATS-02-S GUI In < >, Outlet Setting - Change the outlet name & Click “ Apply “ to make the change effective In < >, System - Change the ATS name & location - Change the IP address, subnet mask & gateway. ( For static IP setting only ) - Select “...
-
Page 14: Snmp Setup
< 1.7 > SNMP Setup The intelligent ATS has SNMP ( v1/v2 or v3 ) function which is capable of integration of 3rd party DCIM to achieve centralized monitoring for power, cooling and environment factors across facilities and IT systems. ( I ). - Page 15 < 1.7 > SNMP Setup Step 7. Click “ Enable “ in “ SNMP agent “ to start the SNMP agent service Step 8. Select “ v1/v2 “ in “ SNMP version “ Step 9. Input “ SNMP port “. Default is 161. Step 10.
- Page 16 < 1.7 > SNMP Setup The following steps summarize how to enable the ATS for SNMP v3 support. Step 1. Connect the ATS to a computer. ( Please refer to < 1.4 > IP confi guration ) Step 2. Open the Internet Explorer ( I.E. ) version 11.0 Step 3.
- Page 17 < 1.7 > SNMP Setup Step 7. Click “ Enable “ in “ SNMP agent “ to start the SNMP agent service Step 8. Select “ v3 “ in “ SNMP version “ & the SNMP v3 settings window appears as below : Step 9.
-
Page 18: Ats Firmware Upgrade
< 1.8 > ATS Firmware Upgrade < Firmware Upgrade > For function enhancement of ATS WEB UI, please take the following steps to remotely upgrade the ATS fi rmware : Step 1. Click the following link to go to the mangement software download page : http://www.austin-hughes.com/downloads/IPDL/IPDfi... - Page 19 < 1.8 > ATS Firmware Upgrade Step 8. The fi rmware upgrade window appears as below : Step 9. Click “ Browse ” and select the fi rmware fi le ( xxx.img ) from the specifi c path in the pop up window and Click “...
-
Page 20: Dhcp Setting
< 1.9 > DHCP Setting Step 1. Connect the intelligent ATS to the computer ( Please refer to < 1.4 > IP confi guration ) Step 2. Open the Internet Explorer ( I.E. ) version 11.0 Step 3. Enter the default IP address of the Intelligent ATS into the I.E. address bar. Default IP address is “... - Page 21 < 1.9 > DHCP Setting Step 7. Select “ Firmware “ from the left navigation pane Step 8. Record the “ Device MAC address “ Step 9. Assign an IP address to the Intelligent ATS from your DHCP server. Complete UM-IP-ATS-Q318V1 P.18 www.austin-hughes.com...
-
Page 22: Command Line Interface ( Cli ) Access
< 1.10 > Command Line Interface ( CLI ) Access Command Line Interface ( CLI ) allows you access the ATS via Telnet or Secure Shell ( SSH ) to confi gure the system settings and login settings. By default, CLI access via Telnet and SSH are both enabled whereas Telnet can be disabled. Telnet provides the basic security of authentication by user name and password, but not the high- security benefi... - Page 23 UM-IP-ATS-Q318V1 P.20 www.austin-hughes.com...
- Page 24 The company reserves the right to modify product specifi cations without prior notice and assumes no responsibility for any error which may appear in this publication. All brand names, logo and registered trademarks are properties of their respective owners. Copyright 2018 Austin Hughes Electronics Ltd. All rights reserved. UM-IP-ATS-Q318V1 P.21...
Need help?
Do you have a question about the ATS-02-S and is the answer not in the manual?
Questions and answers