
Related Manuals for OLIMEX PIC32-PINGUINO-MX220


Summary of Contents for OLIMEX PIC32-PINGUINO-MX220
- Page 1 PIC32-PINGUINO-MX220 development board USER’S MANUAL Initial release, March 2012 Designed by OLIMEX Ltd, 2011 All boards produced by Olimex LTD are ROHS compliant...
- Page 2 This document is intended only to assist the reader in the use of the product. OLIMEX Ltd. shall not be liable for any loss or damage arising from the use of any information in this document or any error or omission in such information or any incorrect use of the product.
-
Page 3: Table Of Contents
Chapter 2........................8 Introduction to arduino/pinguino/maple..............8 2. What is Arduino?........................8 2.1 First steps with Pinguino IDE....................9 CHAPTER 3 ......................10 SETTING UP THE PIC32-PINGUINO-MX220 BOARD........10 3. Introduction to the chapter.....................10 3.1 Electrostatic warning......................10 3.2 Requirements.........................10 3.3 Powering the board........................10 3.4 Prebuilt software........................11 CHAPTER 4.......................12... - Page 4 OLIMEX© 2012 PIC32-PINGUINO-MX220 User's Manual 7.4 Arduino shield pin holes......................19 7.5 USB mini connector.......................20 7.7 Jumper description........................20 7.9 Additional hardware components..................21 CHAPTER 8.......................22 MEMORY AND BLOCK DIAGRAM..............22 8. Introduction to the chapter.....................22 8.1 Memory organization......................23 CHAPTER 9.......................24 SCHEMATICS......................24 9. Introduction to the chapter.....................24 9.1 Eagle schematic........................24...
-
Page 5: Chapter 1
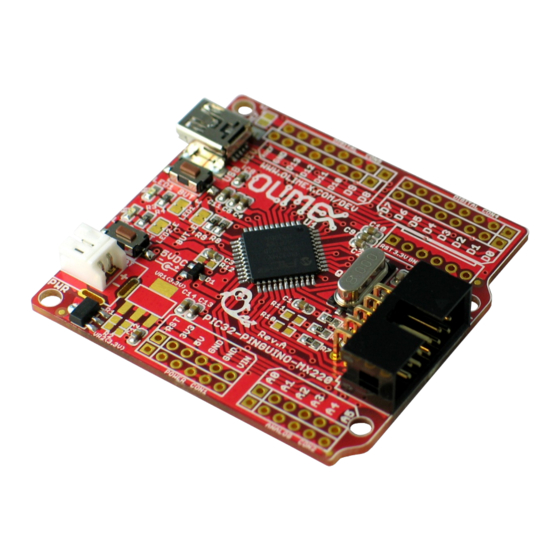
OVERVIEW 1. Introduction to the chapter Thank you for choosing the PIC32-PINGUINO-MX220 development board from Olimex! This document provides a User’s Guide for the Olimex PIC32-PINGUINO-MX220 development board. As an overview, this chapter gives the scope of this document and lists the board’s features. The document’s organization is then detailed. -
Page 6: Organization
YES 4 Channel UEXT PIC32-PINGUINO-MX220 is a powerful considering its low price but yet a starter board for the PINGUINO family. If you are searching for powerful Pinguino board with a faster processor, more memory, more peripherals, wider range of options be sure to check the PIC32-PINGUINO-OTG: http://olimex.com/dev/pic32-pinguino-otg.html... - Page 7 OLIMEX© 2012 PIC32-PINGUINO-MX220 User's Manual – Chapter 7 covers the connector pinout, peripherals and jumper description – Chapter 8 shows the processor diagram and memory map – Chapter 9 provides the schematics – Chapter 10 contains the revision history Page 7 of 28...
-
Page 8: Chapter 2
OLIMEX© 2012 PIC32-PINGUINO-MX220 User's Manual CHAPTER 2 INTRODUCTION TO ARDUINO/PINGUINO/MAPLE 2. What is Arduino? Arduino is an open-source electronics prototyping platform, designed to make the process of using electronics in multidisciplinary projects easily accessible. The hardware consists of a simple open hardware design for the Arduino board with an Atmel AVR processor and on-board I/O support. -
Page 9: First Steps With Pinguino Ide
Download the latest Pinguino IDE distribution depending on your operation system and install it. Connect your device in bootloader mode to the computer (for PIC32-PINGUINO-MX220 hold BUT and press RST after connected). Start the IDE from it's shortcut. From Preferences choose board (for PIC32-PINGUINO-MX220 that would be PIC32-Pinguino_220). -
Page 10: Chapter 3
KIT3 programmer for custom programming without PINGUINO IDE. 3.3 Powering the board The PIC32-PINGUINO-MX220 board is self-powered by the miniUSB if it is connected to a USB hub of a computer. To enter the bootloader mode hold the button BUT and then connect the miniUSB. Or after plugging the miniUSB hold the button BUT and then press RST. -
Page 11: Prebuilt Software
OLIMEX© 2012 PIC32-PINGUINO-MX220 User's Manual On powering the board the AND starting bootloader mode LED1 and LED2 should start blinking consecutively. 3.4 Prebuilt software The board comes with prebuilt PINGUINO bootloader. To enter this mode hold BUT and press RST then release BUT. Or connect the USB when BUT is pressed and then release BUT. -
Page 12: Chapter 4
4. Introduction to the chapter Here you get acquainted with the main parts of the board. Note the names used on the board differ from the names used to describe them. For the actual names check the PIC32-PINGUINO-MX220 board itself. -
Page 13: Chapter 5
CHAPTER 5 THE PIC32MX220F032D MICROCONTROLLER 5. Introduction to the chapter In this chapter is located the information about the heart of PIC32-PINGUINO-MX220 – its microcontroller. The information is a modified version of the datasheet provided by its manufacturers. 5.1 The microcontroller Operating Conditions •... - Page 14 OLIMEX© 2012 PIC32-PINGUINO-MX220 User's Manual Advanced Analog Features • ADC Module: - 10-bit 1.1 Msps rate with one S&H - 13 analog inputs • Flexible and independent ADC trigger sources • Charge Time Measurement Unit (CTMU): - Supports mTouch™ capacitive touch sensing...
- Page 15 OLIMEX© 2012 PIC32-PINGUINO-MX220 User's Manual • Class B Safety Library, IEC 60730 Debugger Development Support • In-circuit and in-application programming • 4-wire MIPS® Enhanced JTAG interface • Unlimited program and six complex data breakpoints • IEEE 1149.2-compatible (JTAG) boundary scan For comprehensive information on the microcontroller visit the Microchip's web page for a datasheet.
-
Page 16: Control Circuity
Here you can find information about reset circuit, power circuit and quartz crystal locations. 6.1 Reset PIC32-PINGUINO-MX220 reset circuit includes R8 (4.7 KΩ), PIC32MX220F032D pin 18 (#MCLR) and a RESET button. Note that it also can be found at the ICSP header pin 1. -
Page 17: Chapter 7
OLIMEX© 2012 PIC32-PINGUINO-MX220 User's Manual CHAPTER 7 HARDWARE 7. Introduction to the chapter In this chapter are presented the connectors that can be found on the board all together with their pinout. Proto area is shown. Jumpers functions are described. Notes and info on specific peripherals are presented. -
Page 18: Uext
OLIMEX© 2012 PIC32-PINGUINO-MX220 User's Manual 7.3 UEXT PIC32-PINGUINO-MX220 board has UEXT connector and can interface Olimex's UEXT modules. For more information on our UEXT modules please visit: http://www.olimex.com/dev/OTHER/UEXT.pdf Pin # Signal Name +3.3V U1TX U2RX SCL1 SDA1 SDI1 SDO1 SCK1... -
Page 19: Arduino Shield Pin Holes
OLIMEX© 2012 PIC32-PINGUINO-MX220 User's Manual 7.4 Arduino shield pin holes For your convenience the pads are named individually near each of them. Please take extra care about the numbering but consider that there might be offset. Also note that the board comes with no connectors soldered on the pin holes. Before being able to connect with a shield you have to solder connecters yourself. -
Page 20: Usb Mini Connector
OLIMEX© 2012 PIC32-PINGUINO-MX220 User's Manual 7.5 USB mini connector Note that the USB is confiugred only as device. Pin # Signal Name Not connected 7.7 Jumper description D10_E If open disconnects D10 (on CON5 from the ARDUINO shield connector), so you can use ICSP programming Default state is closed. -
Page 21: Additional Hardware Components
BUT_E If closed excludes button BUT. Default state is open. 7.9 Additional hardware components The components below are mounted on the PIC32-PINGUINO-MX220 board but are not discussed above. They are listed here for completeness: General purpose button 2 LEDs Page 21 of 28... -
Page 22: Chapter 8
OLIMEX© 2012 PIC32-PINGUINO-MX220 User's Manual CHAPTER 8 MEMORY AND BLOCK DIAGRAM 8. Introduction to the chapter Below is located the block diagram of the processor and on the next page you can find a memory map for this family of processors. It is strongly recommended to refer to the original datasheet (DS61168D) released by Microchip for ones of higher quality. -
Page 23: Memory Organization
OLIMEX© 2012 PIC32-PINGUINO-MX220 User's Manual 8.1 Memory organization Page 23 of 28... -
Page 24: Chapter 9
In this chapter are located the schematics describing logically and physically PIC32-PINGUINO- MX220. 9.1 Eagle schematic PIC32-PINGUINO-MX220 schematic is visible for reference here. You can also find them on the web page for PIC32-PINGUINO-MX220 at our site: http://www.olimex.com/dev/PIC32- PINGUINO-MX220.html. They are located in HARDWARE section. - Page 25 OLIMEX© 2012 PIC32-PINGUINO-MX220 User's Manual Page 25 of 28...
-
Page 26: Physical Dimensions
OLIMEX© 2012 PIC32-PINGUINO-MX220 User's Manual 9.2 Physical dimensions Note that all dimensions are in inches. Page 26 of 28... -
Page 27: Chapter 10
OLIMEX© 2012 PIC32-PINGUINO-MX220 User's Manual CHAPTER 10 REVISION HISTORY 10. Introduction to the chapter In this chapter you will find the current and the previous version of the document you are reading. Also the web-page for your device is listed. Be sure to check it after a purchase for the latest available updates and examples. -
Page 28: Web Page Of Your Device
PINGUINO-MX220.html. There you can find more info and some examples. ORDER CODES: PIC32-PINGUINO-MX220 - completely assembled and tested PIC-KIT3 + PIC-ICSP – PIC programmer + adapter for different types of ICSP connectors SHIELD-LOL – Duino compatible shield with a matrix of LEDs SHIELD-EKG-EMG –... - Page 29 Mouser Electronics Authorized Distributor Click to View Pricing, Inventory, Delivery & Lifecycle Information: Olimex Ltd. PIC32-PINGUINO-MX220...
Need help?
Do you have a question about the PIC32-PINGUINO-MX220 and is the answer not in the manual?
Questions and answers