Sign In
Upload
Download
Table of Contents
Contents
Add to my manuals
Delete from my manuals
Share
URL of this page:
HTML Link:
Bookmark this page
Add
Manual will be automatically added to "My Manuals"
Print this page
×
Bookmark added
×
Added to my manuals
Manuals
Brands
Hioki Manuals
Test Equipment
ST5540
Instruction manual
Hioki ST5540 Instruction Manual
Leak current hitester
Hide thumbs
1
2
Table Of Contents
3
4
5
6
7
8
9
10
11
12
13
14
15
16
17
18
19
20
21
22
23
24
25
26
27
28
29
30
31
32
33
34
35
36
37
38
39
40
41
42
43
44
45
46
47
48
49
50
51
52
53
54
55
56
57
58
59
60
61
62
63
64
65
66
67
68
69
70
71
72
73
74
75
76
77
78
79
80
81
82
83
84
85
86
87
88
89
90
91
92
93
94
95
96
97
98
99
100
101
102
103
104
105
106
107
108
109
110
111
112
113
114
115
116
117
118
119
120
121
122
123
124
125
126
127
128
129
130
131
132
133
134
135
136
137
138
139
140
141
142
143
144
145
146
147
148
149
150
151
152
153
154
155
156
157
158
159
160
161
162
163
164
165
166
167
168
169
170
171
172
173
174
175
176
177
178
179
180
181
182
183
184
185
186
187
188
189
190
191
192
193
194
195
196
197
198
199
200
201
202
203
204
205
206
207
208
209
210
211
212
213
214
215
216
217
218
219
220
221
222
223
224
225
226
227
228
229
230
231
232
233
234
235
236
237
238
239
240
241
242
243
244
245
246
247
248
249
250
251
252
253
254
255
256
257
258
259
260
261
262
263
264
265
266
267
268
269
270
271
272
273
274
275
276
277
278
279
280
281
282
283
284
285
286
287
288
289
290
291
292
293
294
295
296
297
298
299
300
301
302
303
304
305
306
307
308
309
310
311
312
313
314
315
316
317
318
319
320
321
322
323
324
325
326
page
of
326
Go
/
326
Contents
Table of Contents
Troubleshooting
Bookmarks
Table of Contents
Table of Contents
Measurement Flowchart
Checking the Contents of the Package
Inspection
Introduction
Safety Notes
Usage Notes
Chapter 1 Overview
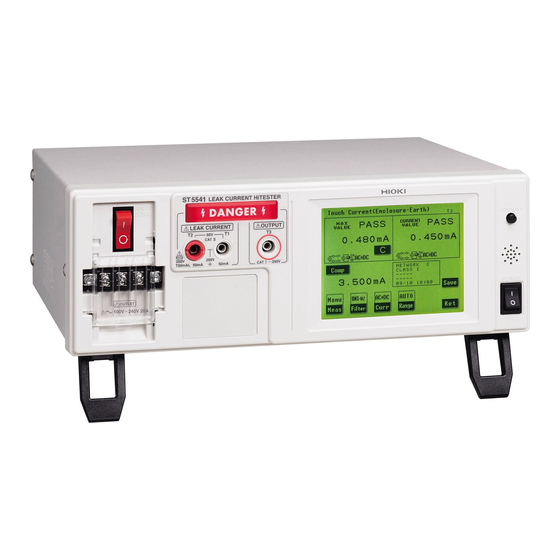
Instrument Overview
Features
What Is Leakage Current
Leakage Current Measurement Complying with Standards
Types of Leakage Current
Types of Leakage Current Measurement
Chapter 2 Instrument Labels
And Screens
Instrument Labels and Functions
2.1 Instrument Labels and Functions
2.1 Instrument Labels and Functions
Screen Configuration Outline
About the Touch Panel
Chapter 3 Setting
Preparations
Power Switch, Breaker ON/OFF
Connecting the Power Cord 3
Connecting the Instrument Power Cord
Connecting the Power Cord of the Equipment under Test
Making Connections to Terminals S10, S12 and S13
Connecting Equipment under Test to the Instrument
Connect the Terminal
Turning Power on and off
Turning Power on
Turning Power off
Pre-Test Inspection
Checking Measurement Frequency
Chapter 4 Settings
Selecting a Network
Selecting the Grounding Class of Equipment under Test
Registering an Equipment Name/Control Number
Selecting a Measurement Mode (Opens the Measurement Screen)
4.3 Selecting a Measurement Mode
Setting the Measurement Range (Auto/Hold)
Setting the Filter
Setting the Allowable Value
Turning Lower Limit Values on and off for Specific Leakage Current Measurements
Selecting the Type of Target Current
Changing the Measurement Method (Auto/Manual)
Setting Automatic Measurement Items
Setting the Measurement Delay (Delay Time)
Setting the Measuring Time
Chapter 5 Measurement Preparations
Connecting the Test Lead
Using L2200 Test Lead
Using the 9195 Enclosure Probe (for Measuring Enclosure Leakage Current)
Using Alligator Clips
Or Three Test Leads)
Chapter 6 Measurements
Making Manual Measurements
Making Automatic Measurements
Measurement Examples
Earth Leakage Current Measurement
Patient Leakage Current Measurement* (Patient Connection - Earth)
Patient Leakage Current Measurement* (External Voltage on a SIP/SOP)
Patient Leakage Current Measurement* (External Voltage on a Specific F-Type Applied Part)
Patient Leakage Current Measurement* (External Voltage on Metal Accessible Part Not Protectively Earthed)
Total Patient Leakage Current Measurement* (Patient Connection - Earth)
Free Current Measurement (Enclosure - Enclosure)
Saving Measurement Data (as Required)
Checking Saved Measurement Data
Displaying Saved Measurement Data
Selecting Saved Measurement Data
Deleting Saved Data
Saving Measurement Conditions (Panel Save Function) (as Required)
Printing Measurement Data (as Required)
Setting up and Connecting a Printer
Chapter 7 Instrument System Settings
System Screen Configuration
Setting the Mode (to Use the Instrument as a Voltmeter)
Panel Load(Loading Saved Measurement Conditions)
Initializing the Instrument
Setting the Display Language
Checking Fuses(During Earth Leakage Current and Protective Conductor Current Measurements)
Self-Test
Power on Polarity Switching (to Keep Equipment under Test on During Polarity Switching)
Connect the Isolation Transformer
Setting Power on Polarity Switching
Relay Check 2
Auto Measure Setting (Set Instrument Status)
Setting Lower Limit Values (Factor)
Setting Indication Unit
Setting Date and Time
Interface Setting (for Communication and Printing)
Setting the Beep Sound
Setting the Backlight
Chapter 8 Controlling the
USB Interface)
ST5540/ST5541 Remote Interface Overview (USB Connection)
Connect and be Sure to Tighten the Screws on the Connector
Installation and Operation Procedures
Specifications of RS-232C
Specifications of USB
Setting Communication Conditions on the Hitester
Command Message Description
Message Format
Output Queue and Input Buffer
Event Registers
Initialization Items
Message Reference
Common Messages
Messages Specific to the Hitester
Command Message Description
Common Messages
Specific Commands
To Transfer All Saved Data to a Computer
Troubleshooting
Chapter 9 External Control
Description of Signals
Connecting to the EXT I/O Terminal
Electrical Specifications
Internal Circuit Configuration
Timing Chart
Panel Load Function at EXT I/O Start
Example of Output Signal Connection
Chapter 10 Specifications255
Basic Functions
Auxiliary Measurement Functions
Measurement System
Accuracy
Current Measurement Section
Network Section
Other Functions
System-Related Functions
User Interface
Ext I/O
Relay Output for Medical Equipment (Only ST5540)
PC Interfaces
Printer
General Specifications
Compliant Standards
Measurement Networks
Network a (for Electrical Appliance and Material Safety Law)
Network B1 (for JIS T 0601-1:1999)
Network B2 (for IEC 60601-1:2005 3Rd)
Network C (for IEC 60990)
Network D (for UL)
Network E (General-Purpose 1)
Network F (General-Purpose 2)
Network G (for IEC61010-1)
Chapter 11 Maintenance and Service
Cleaning and Storage
Repair and Servicing
Replacing Fuses
Instrument Disposal
Appendix A1
Appendix1Terminology
Other Test Condition and Special Test Condition
Appendix3List of Default Settings
Appendix4External Dimensions
Advertisement
Quick Links
Download this manual
ST5540
ST5541
LEAK CURRENT HiTESTER
July 2016 Revised edition 7
ST5540A981-07 16-07H
Instruction Manual
EN
Table of
Contents
Previous
Page
Next
Page
1
2
3
4
5
Advertisement
Table of Contents
Need help?
Do you have a question about the ST5540 and is the answer not in the manual?
Ask a question
Questions and answers
Related Manuals for Hioki ST5540
Test Equipment Hioki ST5541 Instruction Manual
Leak current hitester (326 pages)
Test Equipment Hioki ST5520-01 Instruction Manual
(201 pages)
Test Equipment Hioki ST4030 Instruction Manual
Impulse winding tester (246 pages)
Test Equipment Hioki ST4030A Instruction Manual
Impulse winding tester (256 pages)
Test Equipment Hioki ST4030 Manual
Impulse winding tester (48 pages)
Test Equipment Hioki ST5680 Startup Manual
Dc hipot tester (44 pages)
Test Equipment Hioki ST5680 Instruction Manual
Dc hipot tester (253 pages)
Test Equipment Hioki ST5680 Instruction Manual
Dc hipot tester (136 pages)
Test Equipment Hioki ST4200 Instruction Manual
Partial discharge detector (298 pages)
Test Equipment Hioki SS7012 Operation Manual
Dc signal source (20 pages)
Test Equipment Hioki SM7810 Instruction Manual
Super mo hitester (69 pages)
Test Equipment Hioki SR-2 Instruction Manual
Standard resistor (16 pages)
Test Equipment Hioki 3444 Instruction Manual
Temperature hitester (86 pages)
Test Equipment Hioki 8860-50 Manual
Memory hicorder (16 pages)
Test Equipment hioki 3288 Instruction Manual
Clamp on ac/dc hitester (1 page)
Test Equipment Hioki 3153 Instruction Manual
Automatic insulation/ withstanding hitester (255 pages)
This manual is also suitable for:
St5541
Table of Contents
Print
Rename the bookmark
Delete bookmark?
Delete from my manuals?
Login
Sign In
OR
Sign in with Facebook
Sign in with Google
Upload manual
Upload from disk
Upload from URL


Need help?
Do you have a question about the ST5540 and is the answer not in the manual?
Questions and answers