Table of Contents
Advertisement
Advertisement
Table of Contents

Related Manuals for Bizerba BRS 38


Summary of Contents for Bizerba BRS 38
- Page 1 OPERATING INSTRUCTIONS BREAD SLICER BRS 38 Type 6.009.98.5.10.02...
- Page 2 Alle Rechte vorbehalten All rights reserved Tous droits réservés Reservados todos los derechos Tutti i diritti riservati 2004 Bizerba GmbH & Co. KG 72336 Balingen Postfach 10 01 64 72301 Balingen/Germany Tel. (07433) 12--0, Fax (07433) 122696 E--mail: marketing@bizerba.de Internet: http://www.bizerba.com...
- Page 3 Any modification made to the machine Any modification made to the machine described above without the prior Definition: Bread Slicer permission of Bizerba will render this permission of Bizerba will render this declaration invalid. Type: BRS 38 Notified body, verifying and certifying body...
- Page 4 6.009.98.5.10.02 BRS 38 OPERATING INSTRUCTIONS...
-
Page 5: Table Of Contents
CONTENTS PAGE PAGE GENERAL ....... OPERATING ELEMENTS ....Warranty . - Page 6 ........Cleaning plan BRS 38 ......
-
Page 7: General
Training should be repeated. S Equipment should not be started up before S BIZERBA does not accept any liability for the requirements of the Bizerba operating damage arising as a result of installation by conditions are met. -
Page 8: Warning Notice
Do not remove, change or bodily injury. bypass them. It may result in serious bodily S Contact the relevant BIZERBA after--sales injury. service if you cannot eliminate occuring S Operate concentrated. -
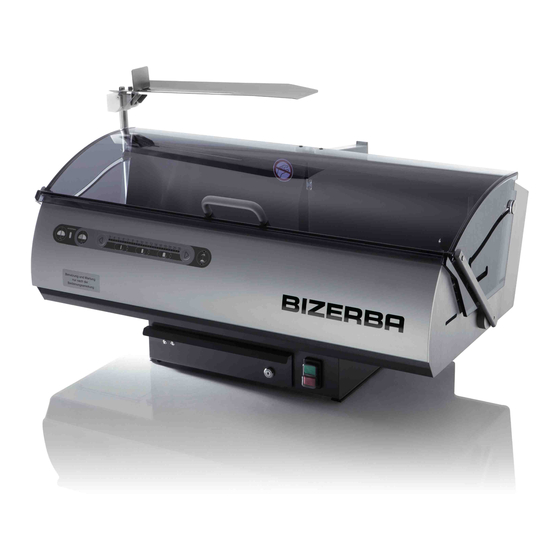
Page 9: Overview/Component Description
Product clamp Blade in blade guard Slice holder Bread chute Slice thickness setting Main switch Operating foil Front cover Collecting bin for crumbs Specification plate / CE symbol GS plate Accessory kit (not illustrated) containing cloth, handbrush. BIZERBA oiler 6.009.98.5.10.02... -
Page 10: Dimensional Drawing/Technical Data
6.009.98.5.10.02 Dimensional drawing/technical data The most important technical data Weight = approximately 63 kg Blade diameter = 250 mm Number of blade revolutions = 700 U/min. Max. height of product --round = 300 mm --oval = 300 x 380 mm LENGTH WIDTH Max. -
Page 11: Machine Description Bread Slicer
GENERAL Machine description Bread Slicer The Bizerba Bread Slicer is a universal device The complete machine housing is made of for slicing bakery products like bread-- also stainless steel, the front plate of anodized Eco--breads with a hard and thick bread crust. -
Page 12: Products To Be Cut/Application/Environmental Influences
6.009.98.5.10.02 Products to be cut /application / environmental influences Products permitted for cutting by taking Application In order to not damage the into account the permitted size: machine and to prevent the risk of S The slicer is designed for application in bodily injury and also for sanitary salerooms. -
Page 13: Installation
Electrical connection the packaging. S Compare the voltage of outlet with that on the specification plate. S Do not connect the machine in case of non--conformity. Contact BIZERBA after--sales service! S The connector should meet country--specific standards (section 7.2) 6.009.98.5.10.02... -
Page 14: Test Run
6.009.98.5.10.02 Test run View from right side Test run or checking the direction of rotation (in the case of three--phase current) S Protective cover must be closed S Switch on machine by means of the main switch (keys “One cut” and “Individual slices” flash). S Open the protective cover shortly and close it again ( the flashing stops). -
Page 15: Operating Elements
OPERATION ELEMENTS Keyboard Key function dscription for BRS 38 Key “One cut” Bread is cut once (either halved or quartered) Key “Individual slices” Whole bread or part of it is cut into individual slices Thickness of bread slices reduced gradually - -... -
Page 16: Slice Thickness Setting
6.009.98.5.10.02 Main switch ON (green) The machine is switched on before operation. The keys “One cut” and “Individual slices” flash slowly (if protective cover is closed). The flashing stops when the protective cover is opened -- the BS 38 is ready for operation. LAMP (white) Indicates that machine is ready for operation. - Page 17 OPERATION ELEMENTS With pre- - set key S Furthermore, it is possible to cut thin, medium--cut or thick bread slices by means of the pre--set key. S These are the pre--set values ex work: thin -- 8 mm medium--cut -- 10 mm thick -- 12 mm.
- Page 18 6.009.98.5.10.02 Assigning of memory keys If required, the factory--set slice thicknesses may be changed and stored as fixed values: S Press the keys “Reduce slice thickness --” and “Increase slice thickness +” simulta- neously and hold them down for 1 second. (all 3 memory keys flash) S Press selected memory key.
-
Page 19: Product Clamp
OPERATION ELEMENTS Product clamp The product clamp is only used when slices are cut. It clamps the product to be cut. After closing the protective cover and pressing the key” Individual slices” it moves to the left, according to the set slice thickness. Slice holder The slice holder as well is only used when sli- ces are cut. -
Page 20: Bread Holder For Easy Bagging
6.009.98.5.10.02 Bread holder for easy bagging S Simplifies the bagging of sliced bread S The sliced bread is manually positioned on the movable stop unit of the bread holder. Pull the bag over the bread and the bread holder. Remove bagged bread from bread holder. Collecting bin for crumbs S To collect bread crumbs. -
Page 21: Operation/Slicing
OPERATION/SLICING Cutting of bread 4.1.1 Halving of bread S Open protective cover as far as it will go. S The product clamp is at the rightmost (it is out of order when cutting bread). S The slice holder is at the leftmost. Positioning of product S Place the bread on the wall of the bread chute, so that the blade can halve the bread. - Page 22 6.009.98.5.10.02 Cutting of product S Press key “One cut”. S After finishing the cutting process -- the blade must now be in the blade guard -- open the protective cover. S Remove both bread halves. Protective cover cannot be opened during cutting process.
-
Page 23: Quartering Of Bread
OPERATION/SLICING 4.1.2 Quartering of bread S Open protective cover as far as it will go. S The product clamp is at the rightmost (it is out of order when cutting bread). S The slice holder is at the leftmost. Positioning of product S Place the bread halve on the wall of the bread chute, so that the blade can quarter the bread. - Page 24 6.009.98.5.10.02 Cutting of product S Press key “One cut” S After finishing the cutting process -- the blade must now be in the blade guard -- open the protective cover. S Remove the bread quarters. Protective cover cannot be opened during cutting process.
-
Page 25: Cutting Of Bread Into Individual Slices
OPERATION/SLICING Cutting of bread into slices 4.2.1 Whole loaf of bread S Open protective cover as far as it will Positioning of product S Place the bread in a way that the blade guard is positioned on the left side of the bread. - Page 26 6.009.98.5.10.02 Cutting of product S Set required slice thickness by pressing e.g. “Reduce slice thickness” (may also be changed during the cutting process). S Press key “Individual slices”. (light emitting diode flashes) S Cutting process is stopped, if the -- sensor at the product clamp signals “End” -- key “Individual slices”...
-
Page 27: Bagging
OPERATION/SLICING Bagging S The sliced bread is manually positioned on the movable stop unit of the bread holder. S Pull the bag over the bread and the bread holder. 6.009.98.5.10.02... - Page 28 6.009.98.5.10.02 Bagging S Remove bagged bread from bread holder. OPERATION/ BLADE RE- OPERATING OPERATING GENERAL INSTALLATION CLEANING ACCESSORIES SLICING PLACE- ELEMENTS CONDITIONS MENT...
-
Page 29: Single Slices
OPERATION/SLICING 4.2.2 Individual slices S Open protective cover as far as it will Positioning of product S Place the bread in a way that the blade guard is positioned on the left side of the bread. S Clamp the bread by means of the product clamp. - Page 30 6.009.98.5.10.02 Cutting of product S You may chose among the slice thicknesses “thin”, “medium” and “thick”. S Hold down key of required slice thickness, e.g. “medium” and simultaneously press key “One cut” . S One slice is cut off. protective cover cannot be opened during S If you want to cut 3 slices, press key “One cut”...
-
Page 31: Cleaning
CLEANING Preparing for cleaning S Close protective cover. S Hold down simultaneously keys “thin” and “medium” for 3 seconds. S The blade goes slowly into cleaning position. (all slice thickness LEDs flash) Thoroughly clean machine before initial operation and after each use. If necessary, clean several times a day. - Page 32 6.009.98.5.10.02 Blade cleaning S Clean balde by pressing a humid (not wet!!) disposable cloth against the blade surface and slowly wiping from the center outward. S Blade can be rotated manually. S Do not use any abrasive cleaning tools. They damage the Teflon coating of the blade! VERY IMPORTANT! Caution!
- Page 33 CLEANING Interior S Switch machine when protective cover is open. S Disconnect the power plug. Interior S Remove bread crumbs by means of the brush. S Clean the interior by using a humid (not wet!!) disposable cloth. 6.009.98.5.10.02...
- Page 34 S Re--insert bin completely into the machine. S Switch on machine by means of the main switch. BRS 38 is again ready for operation. No cutting possible if collecting bin for crumbs is missing or not inserted com- pletely.
-
Page 35: Cleaning Plan Brs
CLEANING Cleaning plan BRS 38 Attention should be paid to the operating instructions) Steps Hints and tips Procedure Cleaning equipment Close protective cover Hold down keys “thin” + “medium” 1 Blade in cleaning position simultaneously for 3 seconds Open protective cover... - Page 36 6.009.98.5.10.02 Steps Hints and tips Procedure Cleaning equipment 7 Checking visual cleanliness Cover machine when the environs are being cleaned with water under pressure or likely to splash. 8 Precautions: OPERATION/ BLADE RE- OPERATING OPERATING GENERAL INSTALLATION CLEANING ACCESSORIES SLICING PLACE- ELEMENTS CONDITIONS...
-
Page 37: Accessories
ACCESSORIES Sanitizing / maintenance / servicing Replace the blade as soon as the slicing quality Blade replacement is unsatisfactory. S Bring blade into cleaning position (see sec- tion 5, page 28). S switch off machine, disconnect power plug, put on protective gloves! S Loosen the 4 screws, lift blade . -
Page 38: Disturbances
6.009.98.5.10.02 Disturbances Immediately switch off the machine if there is any rough operation or obstruction. Contact the relevant BIZERBA after--sales service if you cannot eliminate occurring malfunctions yourself. Display Significance, possible cause Remedial action 5 Slice thickness LEDs flash Output stage overheated... -
Page 39: Operating Conditions
International Electrotechnical Commission Bizerba equipment manufactured connection of BIZERBA equipment must be (IEC) according to VDE protection class I and must carried out in compliance with the national be connected to a ground wire. European Committee for Electrotechnical... -
Page 40: Air Convection
Permitted tolerance of power supply (static) normal: the user may take the following precautions: At 100 to 400V + 6% to -- 10% of nominal value Provide a separate power supply to BIZERBA Power frequency: 50 (60) Hz equipment. Install a capacity--decoupled...
Need help?
Do you have a question about the BRS 38 and is the answer not in the manual?
Questions and answers