Advertisement
Table of Contents
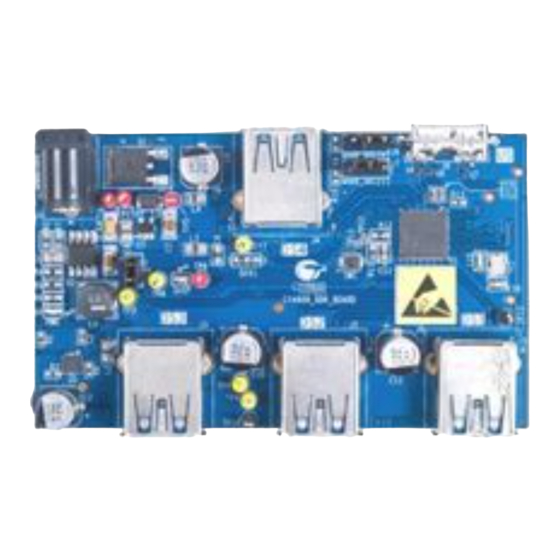
HX3 USB 3.0 HUB REFERENCE DESIGN KIT (RDK)
J6
Configuration
J7
mode select
jumpers
Pin 3
Pin 2
Pin 1
Step 1: Con guring the HX3 Board
• Unpack the kit contents which includes RDK board, 5-V 4-A
AC-DC adapter and the USB 3.0 A to micro-B cable
• Ensure that the configuration mode select jumpers (J6
and J7) are set for default operation, as shown above
USB cable
connected to
upstream port
Suspend
Status
LED (SUSP)
Step 3: Connecting the HX3 Board to a USB 3.0 PC / Laptop
• Connect the micro-B end of the USB cable to the board's
upstream port; connect the other end to the USB 3.0
receptacle on a PC / laptop. The SUSP LED* turns off
(on a PC / laptop running Windows 7 operating system)
Battery charging
through a
downstream port
Step 5: Demonstrating Battery Charging
• Connect an Apple device or an USB battery charging
device to any of the downstream ports. The HX3 board
will charge the connected device
* The behavior of the SUSP LED varies across operating systems.
For e.g, in Windows 8, the SUSP LED turns off momentarily and turns
on again when there is no further USB activity on the board
CY4609 QUICK START GUIDE
Indicates the version of
HX3 Silicon. "C"
indicates HX3 *C Silicon
Note: Kits with HX3 *C
Silicon supports
internal ROM Boot.
Install jumpers on pins
1 and 2 of Jumpers
J6 and J7 to
boot from
1
Internal ROM
USB 3.0
port on the
PC/Laptop
3
5
DC Supply
Jack (J1)
Power
LED (PWR)
Suspend Status
LED (SUSP)
Step 2: Powering the HX3 Board
• Plug the AC-DC adapter into an AC wall power receptacle.
Connect the power supply plug to the board's DC supply
jack. The power LED (PWR) glows green to indicate that
the board is powered and the suspend status LED (SUSP)
glows amber to indicate that the hub is in suspend mode
Step 4: Demonstrating USB 3.0 Data Transfer
• Get a USB 3.0 certified flash drive and store a 2 GB file.
Connect the flash drive to one of the downstream ports
• Copy the 2 GB file from the flash drive to the PC / laptop
to transfer data in USB 3.0 mode
Step 6: Demonstrating Ghost Charging
• Disconnect the USB cable from the upstream port to detach
the board from the PC / laptop. The device connected to
the downstream port continues to be charged using the
Ghost Charging
feature
TM
Note: When the Ghost Charging feature is enabled, charging
of the device stops momentarily and resumes in 1-2 seconds
2
USB 3.0 flash drive connected
to a downstream port
4
6
TM
Advertisement
Table of Contents

Subscribe to Our Youtube Channel
Related Manuals for Cypress HX3 CY4609


Summary of Contents for Cypress HX3 CY4609
- Page 1 CY4609 QUICK START GUIDE HX3 USB 3.0 HUB REFERENCE DESIGN KIT (RDK) DC Supply Indicates the version of Jack (J1) HX3 Silicon. "C" indicates HX3 *C Silicon Note: Kits with HX3 *C Silicon supports Power internal ROM Boot. Install jumpers on pins LED (PWR) Configuration 1 and 2 of Jumpers...
- Page 2 Kit Operation: CY4609 is the reference design kit for CYUSB3304-68LTXC, a 4-port USB 3.0 hub controller from Cypress. The hub controller supports Low-Speed (LS), Full-Speed (FS), Hi-Speed (HS) and SuperSpeed (SS) peripherals on all the four downstream ports. It goes into Suspend state to save power when the upstream port is not connected to a PC / laptop.
Need help?
Do you have a question about the HX3 CY4609 and is the answer not in the manual?
Questions and answers