
Related Manuals for YOKOGAWA ROTAMASS Total Insight


Summary of Contents for YOKOGAWA ROTAMASS Total Insight
- Page 1 User's Manual MASS ROTA Total Insight Coriolis Mass Flow and Density Meter General Instruction Manual IM 01U10B00-00EN-R IM 01U10B00-00EN-R, 3rd edition, 2018-07-09...
-
Page 2: Table Of Contents
Table of contents Table of contents Introduction..............................Scope of application ......................... Target group ............................. Applicable documents........................Explanation of safety instructions and symbols ................Safety................................Intended use ............................. Technical conditions ......................... General safety instructions ....................... Warranty ..............................Product specification ..........................10 Scope of delivery .......................... - Page 3 Table of contents Installation check list......................... Wiring ................................. 42 General wiring rules.......................... Grounding connections and sensor circuits..................Connecting cable installation ......................7.3.1 Connection terminals ......................46 7.3.2 Connecting the connecting cable to sensor ................. 49 7.3.3 Connecting the connecting cable to transmitter ..............50 Transmitter............................
-
Page 4: Introduction
▪ Rotamass Giga ▪ Rotamass Prime ▪ Rotamass Intense ▪ Rotamass Hygienic ▪ Rotamass Total Insight transmitter in combination with any Rotamass Total Insight sensor. 1.2 Target group The following persons are the target group of this manual: ▪ Technicians ▪... -
Page 5: Explanation Of Safety Instructions And Symbols
General Instruction Manual Introduction Explanation of safety instructions and symbols 1.4 Explanation of safety instructions and symbols Signal words Warning notices are intended to alert users to potential hazards when working with the flow meter. There are four hazard levels that can be identified by the signal word: Signal word Meaning Identifies a high-risk hazard resulting in death or severe injury... -
Page 6: Safety
Details can be obtained from the responsible Yokogawa sales organization. Operational safety cannot be ensured in the event of any improper or not intended use. Rota Yokogawa is not liable for damage arising from such use. -
Page 7: General Safety Instructions
/ or environmental harm. ▶ Yokogawa will not take any liability regarding damage caused by corrosion / erosion. ▶ If corrosion / erosion may happen, the user has to check periodically if the necessary wall thickness is still in place. - Page 8 Other work must be first autho- rized by Rota Yokogawa. Rota Yokogawa does not assume liability for damage caused by unauthorized work on the flow meter or by improper use.
-
Page 9: Warranty
Please contact the Yokogawa sales organization if the device needs to be repaired. The warranty terms for this device are described in the quotation. If a defect for which Yokogawa is responsible occurs in the device during the warranty period, Yokogawa will repair that defect at its own cost. -
Page 10: Product Specification
General Instruction Manual Product specification Scope of delivery 4 Product specification 4.1 Scope of delivery The scope of delivery of the flow meter must be checked for completeness using the fol- lowing list: Integral type Remote type Sensor 1 unit 1 unit Transmitter 1 unit... -
Page 11: Measuring Principle And Flow Meter Design
General Instruction Manual Product specification Measuring principle and flow meter design 4.2 Measuring principle and flow meter design 4.2.1 Measuring principle The measuring principle is based on the generation of Coriolis forces. For this purpose, a driver system (E) excites the two measuring tubes (M1, M2) in their first resonance fre- quency. - Page 12 General Instruction Manual Product specification Measuring principle and flow meter design The small deformation overlying the fundamental vibration is recorded by means of pick- offs (S1, S2) attached at suitable measuring tube locations. The resulting phase shift Δ φ between the output signals of pick-offs S1 and S2 is proportional to the mass flow. The output signals generated are further processed in a transmitter.
-
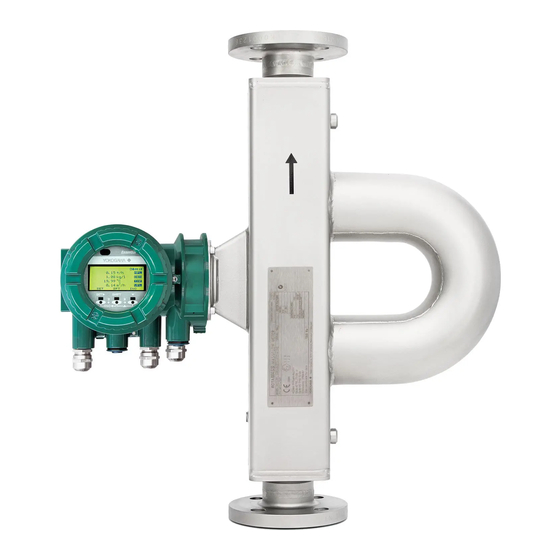
Page 13: Flow Meter
4.2.2 Flow meter The Rotamass Total Insight Coriolis mass flow and density meter is offered in several families (Nano, Supreme, Giga, Prime, Intense and Hygienic). It consists of the following main components: ▪... -
Page 14: Identification
Product specification Identification General All available properties of the Rotamass Total Insight Coriolis mass flow and density me- specifications ter are specified by means of a model code. The position of the model code relevant to the respective property is depicted and high- lighted in blue. - Page 15 General Instruction Manual Product specification Identification Additional sensor nameplate 16.8 Calibration constants of sensor Warning that requires reading the documentation Customer-Device location Space for Ex marking (see Explo- identification (option BG) sion Proof Type Manual) Transmitter Main transmitter nameplate RCES34S-50BD40-OE70- -4-JA1 1234567 2015 24VAC or 100...240VAC, 50/60Hz...
- Page 16 General Instruction Manual Product specification Identification Label transmitter Transmitter Transmitter back cover Label SERIAL No.: D1xxxxxxxx Ex works: Update 1: Update 2: CPU FW : xx.xx.xx DSP FW : xx.xx.xx HMI FW : xx.xx.xx HW : xx.xx.xx Date : 2016-03-15 Serial number Indicator software revision Main software revision...
-
Page 17: Model Code
Flow meter components 4.3.2 Model code The model code of the Rotamass Total Insight is explained below. Items 1 through 14 are mandatory entries and must be specified at the time of ordering. Device options (item 15) can be selected and specified individually by separating them with slashes. -
Page 18: Mechanical Specification
General Instruction Manual Product specification Mechanical specification Remote type Process connections Terminal box Cable entry for connecting cable Display cover Sensor connection cover Back cover for inputs and outputs, and power supply Blind plug Inputs/outputs cable entry Power supply cable entry Connecting cable 4.5 Mechanical specification Mechanical specifications are defined in the related General Specifications (GS):... -
Page 19: Transport And Storage
General Instruction Manual Transport and storage Transport 5 Transport and storage 5.1 Transport The following rules apply when transporting the flow meter: ▶ Observe the transport-related instructions on packaging. ▶ In order to avoid damage, do not unpack the flow meter until it is at the installation site. -
Page 20: Storage
General Instruction Manual Transport and storage Storage 5.2 Storage Please note the following rules apply when storing the flow meter: Risk of damage to the flow meter due to storage in a damp environment NOTICE ▶ Protect flow meter from rain and humidity. ▶... -
Page 21: Installation
6.1.1 Installation dimensions Dimensions and installation lengths of sensor and transmitter are listed in the General Specifications of the corresponding Rotamass Total Insight family in the chapter Mechan- ical specification. 6.1.2 Installation site In order to ensure stability while operating the flow meter, the following rules regarding... -
Page 22: Instructions
General Instruction Manual Installation Installation instructions ▶ When installing in a hazardous area, the separate Explosion Proof Type Manual must be considered. ▶ Install flow meter away from magnetic compasses as it contains no precaution to pre- vent it from causing compass deviations. ▶... -
Page 23: Installation Position
Installation instructions 6.1.4 Installation position Rotamass Total Insight Coriolis mass flow and density meters can be mounted horizon- tally, vertically and at an incline. The measuring tubes should be completely filled with the fluid during this process as accumulations of air or formation of gas bubbles in the mea- suring tube may result in errors in measurement. -
Page 24: Sanitary Installation
General Instruction Manual Installation Installation instructions Fig. 13: Risk of solid matter and/or gas accumulation Vertical installation ▶ Draining the pipe is easier in case of maintenance, production start or product (recommended) change. ▶ Allows gas bubbles to escape more easily. ▶... - Page 25 General Instruction Manual Installation Installation instructions 3-A compliant installation Remote transmitter ▶ For compliance with 3-A sanitary standards, remote transmitter is restricted to hang- installation ing installation, as shown in figure below. Fixation of the transmitter NOTICE For fixation of the transmitter at the bracket either hexagon head srews (M6x10) or socket head screws with rubber cap must be used.
-
Page 26: Installation Instructions
General Instruction Manual Installation Installation instructions ▶ For Cleaning-In-Place (CIP) application, the standard minimum flow velocity of 1.5 m/s shall be used for cleaning the sensor. Volumetric flow shall be determined by using the cross-sectional area at process connection. Notes on fittings ▶... -
Page 27: Sensor Installation
General Instruction Manual Installation Sensor installation 6.3 Sensor installation 6.3.1 General installation rules Risk of injury due to escaping fluids, if pipe connection is faulty DANGER ▶ Correct slope and mismatch of pipe connections before inserting the sensor. Fig. 19: Avoid: Slope and mismatch ▶... -
Page 28: Installation In Pipe
General Instruction Manual Installation Sensor installation 6.3.2 Installation in pipe Depending on process connections, the sensor is connected to the pipe by means of flanges, terminals or thread. The model code provides information on the process connections selected. Risk of injury due to escaping fluids and damage, if fixing materials are in- DANGER appropriate or not professionally installed ▶... - Page 29 General Instruction Manual Installation Sensor installation Fixing the flange ▶ Use screws and nuts suitable for the flanges. ▶ In case the nominal width of the piping deviates from the flow meter, use the appropri- ate reductions. ▶ Inner gasket diameters should not fall below the inner diameters of the flange. Fig. 22: Fixing the flange Pipe flange Gasket...
-
Page 30: Installation Rotamass Nano (Option Pd)
General Instruction Manual Installation Sensor installation Use of seal tape for installation NOTICE In case of process connection with internal thread NPT you have to use a seal tape for in- stallation. 6.3.3 Installation Rotamass Nano (Option PD) For the Rotamass Nano the sensor can be installed on a DN50 (2") pipe by using a bracket and U-bolt assy (model code position 15, option PD). -
Page 31: Installation Recommendation For Viscosity Measurements
Pressure taps ⑤ HART communication ③ Rotamass Total Insight x = approx. 4 to 5 x D Flow line upstream or downstream of the Rotamass Total Insight sensor Inner diameter of process line IM 01U10B00-00EN-R, 3rd edition, 2018-07-09 31 / 90... -
Page 32: Insulation And Heat Tracing
General Instruction Manual Installation Insulation and heat tracing 6.4 Insulation and heat tracing 6.4.1 Heat tracing The majority of applications do not require or provide insulation or heat tracing for the sensor. Product versions with insulation and/or heat tracing are available for specific technical applications, see applicable General Specifications. -
Page 33: Transmitter Installation
General Instruction Manual Installation Transmitter installation 6.5 Transmitter installation 6.5.1 Rotating and replacing the display The transmitter display can be oriented in line with the flow meter installation position. The following instruction must only be performed at the following ambient conditions: NOTICE ▶... - Page 34 General Instruction Manual Installation Transmitter installation 5. Remove the display from housing by pulling forward. 6. Rotate display and push back into housing in the orientation desired. The display can be removed and replaced by loosening the connector. NOTICE IM 01U10B00-00EN-R, 3rd edition, 2018-07-09 34 / 90...
- Page 35 General Instruction Manual Installation Transmitter installation 7. Tighten screws. 8. Screw display cover back onto transmitter housing. 9. Using an Allen wrench (size: 3.0), turn the locking screw on display screw plug counter-clockwise to tighten. IM 01U10B00-00EN-R, 3rd edition, 2018-07-09 35 / 90...
-
Page 36: Rotating Transmitter Housing (Integral Type)
General Instruction Manual Installation Transmitter installation 6.5.2 Rotating transmitter housing (integral type) The transmitter housing can be installed in any one of four orientations. Short-circuit hazard caused by penetrating water WARNING Failure of measuring electronics ▶ In order to prevent any water from penetrating the flow meter by way of the cable, install the transmitter in a way so that the cable gland is not pointed upward. - Page 37 General Instruction Manual Installation Transmitter installation 3. Rotate transmitter housing at angles of 90°, 180° or 270°. 4. Place transmitter housing. 5. Tighten the four fixing screws. IM 01U10B00-00EN-R, 3rd edition, 2018-07-09 37 / 90...
-
Page 38: Rotating The Terminal Box (Remote Type)
General Instruction Manual Installation Transmitter installation 6.5.3 Rotating the terminal box (remote type) The terminal box can be installed in any one of four orientations. 1. Loosen the four fixing screws and remove the cover. 2. Remove the cables so that none of the cables inside can accidentally become trapped and damaged. -
Page 39: Installing Transmitter On Pipe (Remote Type)
General Instruction Manual Installation Transmitter installation 6.5.4 Installing transmitter on pipe (remote type) Risk of overheating the transmitter due to increased ambient temperature WARNING Failure of measuring electronics ▶ Observe the maximum allowable ambient temperature for the transmitter. ▶ Install the transmitter at a sufficient distance from heat sources. Also note the tem- perature of the fixing pipe. - Page 40 General Instruction Manual Installation Transmitter installation 1. Screw angle bracket to bottom of transmitter. 2. Place retaining clip around pipe and slide through drill holes on angle bracket. 3. Fasten retaining clip to bracket using the nuts. IM 01U10B00-00EN-R, 3rd edition, 2018-07-09 40 / 90...
-
Page 41: Installation Check List
General Instruction Manual Installation Installation check list 6.6 Installation check list The following checks must be performed once the flow meter is installed in the pipe: Check Performed? State and specification of device ▪ Flow meter checked for external damage? ▪... -
Page 42: Wiring
General Instruction Manual Wiring General wiring rules 7 Wiring 7.1 General wiring rules Be sure to handle the transmitter cover carefully so that there are no damages and for- eign matter adhesion at its thread and O-ring when it is opened or attached. Life-threatening injuries from electric shock DANGER ▶... - Page 43 General Instruction Manual Wiring General wiring rules Risk of injury due to electrical shock, as well as damage to the flow meter WARNING due to insufficient clamping of the connecting wires ▶ Completely open connection terminal by using the operating tool. ▶...
-
Page 44: Grounding Connections And Sensor Circuits
General Instruction Manual Wiring Grounding connections and sensor circuits 7.2 Grounding connections and sensor circuits Risk of injury from electrical shock due to inadequate grounding WARNING ▶ Perform potential equalization at the grounding terminals provided for this purpose according to the figure “Grounding connections on transmitter and sensor”. Fig. 27: Grounding connections on transmitter and sensor Grounding screw in transmitter terminal box for grounding conductor Grounding terminal on transmitter for potential equalization... -
Page 45: Connecting Cable Installation
Outer cone part Plastic part Mounting thread Inner cone part Housing cable entry If the connecting cable, included in the delivery, is too short, additional lengths can be procured through the Yokogawa sales organization. IM 01U10B00-00EN-R, 3rd edition, 2018-07-09 45 / 90... -
Page 46: Connection Terminals
General Instruction Manual Wiring Connecting cable installation 7.3.1 Connection terminals The delivery includes an operating tool for connecting the connecting cable to the connection terminals. 2 3 4 Fig. 30: Connection terminal circuits (transmitter on the left side, sensor on the right side) Driver circuit (D+/D-) Signal grounding Sensor circuits (S1+/S1-, S2+/S2-) - Page 47 General Instruction Manual Wiring Connecting cable installation green blue white brown yellow drain wire Fig. 32: Terminated standard connecting cable L␣␣␣, transmitter side Connection scheme of standard connecting cable option L␣␣␣ Standard connecting cable option L␣␣␣ Signal Coaxial wire Coaxial wire pair colour Wire type Wire colour Core wire...
- Page 48 General Instruction Manual Wiring Connecting cable installation Installation of fire retardant connecting cable option Y␣␣␣ D– D– S1– S1– S2– S2– Fig. 33: Transmitter and sensor interconnection diagram Sensor Transmitter Potential equalization system Shield wire Fig. 34: Terminated fire retardant connecting cable Y␣␣␣, transmitter side Connection scheme of fire retardant connecting cable option Y␣␣␣...
-
Page 49: Connecting The Connecting Cable To Sensor
General Instruction Manual Wiring Connecting cable installation 7.3.2 Connecting the connecting cable to sensor Use the cable end without shield wire to connect to the sensor (observe labeling). NOTICE If the cable is not terminated or was shortened, observe the separate instructions in the NOTICE included terminating set. -
Page 50: Connecting The Connecting Cable To Transmitter
General Instruction Manual Wiring Connecting cable installation 7.3.3 Connecting the connecting cable to transmitter 1. Loosen the four screws from the sensor connection cover and remove cover. 2. Remove connector nut from cable gland and pull out clamped insert. 3. Push cable through connector nut and clamped insert. 4. -
Page 51: Transmitter
General Instruction Manual Wiring Transmitter 7.4 Transmitter 7.4.1 Connection terminals Risk of injury from electrical shock due to inadequate grounding WARNING ▶ Use grounding screw to connect the grounding conductor. ▶ Use an M4 ring-type or forked cable lug for the grounding conductor of the connect- ing cable. -
Page 52: Hart Communication
3-Wire cable (twisted pair (D0, D1) and Common) with shield should be used. Wire gauge should be AWG24 or wider. Rotamass Total Insight has a RS485 electrical interface, operating in slave mode and communicating with the following default specification: Default Modbus ▪... -
Page 53: Assignment Of Inputs And Outputs
General Instruction Manual Wiring Transmitter 7.4.4 Assignment of inputs and outputs The table below shows possible connection terminal assignments for I/O outputs depend- ing on model code Position 13. The following figure shows the relevant position of the model code: 13 14 Configuration of input/output terminals for HART communication HART I/O... - Page 54 General Instruction Manual Wiring Transmitter Model code Connection terminal assignment Position 13 I/O1 +/- I/O2 +/- I/O3 +/- I/O4 +/- P/Sout1 P/Sout2 Iout1 Iout2 Passive Passive Write-protect Passive Passive NAMUR NAMUR Iout1 Analog current output with HART communication Iout2 Analog current output Analog current input P/Sout1 Pulse or status output...
-
Page 55: Output Signals
General Instruction Manual Wiring Transmitter 7.4.5 Output signals Galvanic isolation All circuits for inputs, outputs and power supply are galvanically isolated from each other. Active current One or two current outputs are available depending on model code position 13. output lout Depending on the measured value, the active current output delivers 4 –... - Page 56 General Instruction Manual Wiring Transmitter Passive current Value output lout Nominal output current 4 – 20 mA Maximum output current range 2.4 – 21.6 mA External power supply 10.5 – 32 V Load resistance for secure HART communi- 230 – 600 Ω cation Load resistance at current output ≤...
- Page 57 General Instruction Manual Wiring Transmitter Active pulse Connection of an electronic counter output P/Sout Maximum voltage and correct polarity must be observed for wiring. Value Load resistance > 1 kΩ Internal power supply 24 V ±20 % Maximum pulse rate 10000 pulses/s Frequency range 0 –...
- Page 58 General Instruction Manual Wiring Transmitter Active pulse Value output P/Sout Internal power supply 24 V ±20 % with internal Internal pull-up resistor 2.2 kΩ pull-up resistor Maximum pulse rate 10000 pulses/s Frequency range 0 – 12.5 kHz ROTAMASS 24 V P/Sout+ P/Sout- Fig. 43: Active pulse output P/Sout with internal pull-up resistor...
- Page 59 General Instruction Manual Wiring Transmitter Active status Since this is a transistor contact, maximum allowed current as well as polarity and level of output P/Sout output voltage must be observed during wiring. Value Load resistance > 1 kΩ Internal power supply 24 V ±20 % ROTAMASS...
- Page 60 General Instruction Manual Wiring Transmitter Passive status Value output P/Sout Output current ≤ 200 mA or Sout Power supply ≤ 30 V ROTAMASS P/Sout+ or Sout+ P/Sout- or Sout- Fig. 48: Passive status output connection P/Sout or Sout ① External device ROTAMASS P/Sout+ or Sout+ P/Sout- or Sout-...
-
Page 61: Input Signals
General Instruction Manual Wiring Transmitter 7.4.6 Input signals Active current An individual analog power input is available for external analog devices. input lin The active current input lin is provided for connecting a two-wire transmitter with an out- put signal of 4 – 20 mA. Value Nominal input current 4 –... -
Page 62: Power Supply
General Instruction Manual Wiring Transmitter Status input Sin Do not connect a signal source with electric voltage. The status input is provided for use of voltage-free contacts with the following specifica- tion: Switching status Resistance Closed < 200 Ω Open >... -
Page 63: Connecting Power Supply And External Devices
General Instruction Manual Wiring Transmitter 7.4.8 Connecting power supply and external devices Risk of sparking and damage to the flow meter due to incorrect sealing WARNING ▶ In case of metric cable entry ensure appropriate IP rating and suitability of O-ring of used accessory (e.g. - Page 64 General Instruction Manual Wiring Transmitter 1. Switch off power supply. 2. Using an Allen wrench (Size: 3.0), tighten the locking screw on the back cover in clockwise direction. 3. Unscrew back cover from transmitter housing in counter-clockwise direction. 4. Attach cable glands. 5.
- Page 65 General Instruction Manual Wiring Transmitter 6. Fit grounding conductor with a terminal lug and affix to grounding conductor. 7. Screw cable gland on tightly. 8. Screw back cover onto transmitter housing in clockwise direction. 9. Using an Allen wrench (Size: 3.0), loosen the locking screw in counter-clockwise direction.
-
Page 66: Wiring Check List
General Instruction Manual Wiring Wiring check list 7.5 Wiring check list The following checks must be performed once the flow meter is connected electrically: Risk of injury from electrical shock due to insufficiently closed housing WARNING ▶ Before switching on the power supply, check that the housing covers of the transmit- ter have been properly installed. -
Page 67: Commissioning
General Instruction Manual Commissioning 8 Commissioning 1. Activate external power switch. 2. Perform check of piping installation. 3. Check flow meter for device errors, warnings or alarms, see chapter on Troubleshooting [} 80]. 4. Configure the transmitter, and perform autozero, see chapter on Default settings [} 72]. ð... -
Page 68: System Configuration And Operation
Operating options 9 System configuration and operation 9.1 Operating options The Rotamass Total Insight can be operated in different ways: ▪ IR (Infra-Red) switches on the display ▪ Digital communication (e.g. HART or Modbus) The section below describes how to operate the system using the IR switches on the dis- play. - Page 69 General Instruction Manual System configuration and operation Display The controls on the display are IR switches. They respond as soon as an object, such as a finger, is in close proximity. It is not necessary to apply pressure to the display surface. Impairment of the display NOTICE If the device is operated for a longer period and is subjected to high temperatures or high...
- Page 70 General Instruction Manual System configuration and operation Display Status Description Status Description icon icon Upload parameter enabled Download parameter enabled Total health result: good Total health result: warning (only indicated when display total (only indicated when display total health result is active) health result is active) Total health result: bad state Tube health check with result: OK...
- Page 71 General Instruction Manual System configuration and operation Display Abbreviation Measured quantity or identification NV1, NV2 Net volume flow rate 1, 2 Corrected net volume flow rate Drive current Viscosity 24hours totalizer 1 24hours totalizer 2 24hours totalizer 3 Gas void fraction IM 01U10B00-00EN-R, 3rd edition, 2018-07-09 71 / 90...
-
Page 72: Default Settings
Additional information about data recording can be found in the applicable software instruction manual. Only use the microSD card included with the Rotamass Total Insight. Functionality of the device cannot be guaranteed if other cards are used. Tab. 2: Trend display... -
Page 73: Setting Date
General Instruction Manual System configuration and operation Default settings 9.3.2 Setting date 1. Press [SET] switch for 2 seconds to enter [Operation level]. 2. Press [▼] switch until the [Maintenance] menu is selected. 3. Press [SET] switch to enter the [Device setup] menu. 4. -
Page 74: Setting Zero Point
2. Close valves in front of and after the flow meter and stop the flow. 3. Wait until density, temperature and pressure are stabilized. 4. In case of fluids, compare the density displayed on the Rotamass Total Insight with the fluid density in order to rule out gas accumulations in the measuring tube. -
Page 75: Advanced Settings
General Instruction Manual System configuration and operation Advanced settings 9.4 Advanced settings Explosion hazard DANGER ▶ When the housing is opened in hazardous areas, the applicable Explosion Proof Type Manual must be observed, see chapter Operation, maintenance and repair. 9.4.1 Setting hardware write-protection The flow meter can be protected from unauthorized access. - Page 76 General Instruction Manual System configuration and operation Advanced settings 4. On the main board, set DIP switch 2 to the ON position using a sharp-pointed object. 5. Screw display cover back onto transmitter housing. 6. Tighten the locking screw by turning it counterclockwise with an Allen wrench (size: 3.0).
-
Page 77: Modbus Hardware Setting
General Instruction Manual System configuration and operation Advanced settings 9.4.2 MODBUS hardware setting Switch settings 1. Switch off power supply. 2. Loosen the locking screw by turning it clockwise with an Allen wrench (size: 3.0). Fig. 55: 3. Unscrew display cover from transmitter housing. 4. - Page 78 General Instruction Manual System configuration and operation Advanced settings 5. Remove the display from housing by slowly pulling forward. ð The switch can be seen. 6. Set the desired address. Address 7. Push display into housing. 8. Fasten the display with 2 screws. 9.
- Page 79 General Instruction Manual System configuration and operation Advanced settings Default settings Switches Address SW 3 SW 2 Address switch SW (ADDRESS: 7) Device address Position Description Address SW” settings between position 0 and 6 are the Hardware device address. Parameter value setting is the device address. Software Factory setting SW (ADDRESS: 0-6)
-
Page 80: Troubleshooting
All error messages and error codes that may appear in operation are described in the software instruction manual. Possible malfunctions that may occur during commissioning are explained below and remedying them is explained. If you cannot remedy the malfunc- tion using these explanations, contact the Yokogawa service center. 10.1 Malfunction of operation Malfunction... -
Page 81: Zero Point Unstable
General Instruction Manual Troubleshooting Zero point unstable 10.2 Zero point unstable Malfunction Possible causes Remedy Measuring tube not – Check that the measuring tube in the completely filled with sensor is completely filled with fluid. fluid Correct installation, see [} 21]. –... -
Page 82: Display Deviating
Faulty temperature – Check temperature measurement circuits measurement TP1 – TP3 of connecting cable. – If corrosion or erosion due to corrosive fluids is suspected, contact Yokogawa Corrosion and erosion and have density and mass flow recali- brated, if necessary. Contaminated –... - Page 83 General Instruction Manual Troubleshooting Display deviating Malfunction Possible causes Remedy – Match settings of flow meter and reading Temperature unit, system. highest and lowest value for temperature – Check LRV and URV process parame- set incorrectly ters, see software instruction manual. –...
-
Page 84: Maintenance And Repair
NOTICE other sensitive electrical equipment due to increased electromagnetic emissions. The need for maintaining the Rotamass Total Insight depends on process and environ- mental conditions. Maintenance-free operation is possible for many processes. Contact the responsible Yokogawa sales organization for details. -
Page 85: Exterior Cleaning
2. Use only cleaning agents that do not corrode the surface of the flow meter. 11.2 Recalibration and calibration service For recalibration, flow meters should be sent to the manufacturer Rota Yokogawa GmbH in Wehr/Germany. The option of having on-site calibration performed by a Yokogawa technician is available in some countries. -
Page 86: Dismantling And Disposal
▶ Clean flow meter thoroughly. No harmful chemicals must remain in or on the flow me- ter. Rota Yokogawa only accepts completely drained and cleaned flow meters. ▶ The form "Decontamination Declaration" must be filled in completely and sent to Yokogawa along with the flow meter. - Page 87 ROTA YOKOGAWA GmbH & Co. KG Service & Repair Department Rheinstraße 8; D - 79664 Wehr Phone no.: +49 (0)7761-567-190 Fax no.: +49 (0)7761-567-285 e-Mail: services.flow@de.yokogawa.com Declaration of Decontamination Legal regulations for the safety of our employees and operating equipment determine that we need the declaration of decontamination before your order can be handled.
-
Page 88: Specifications
In doing so, the following specifications must be taken into account: As ambient temperature is intend the air surrounding the device. Allowed ambient and storage temperature of Rotamass Total Insight depends on the be- low components and their own temperature limits: ▪... - Page 89 General Instruction Manual Specifications Ambient conditions Ranges and specifications Electromagnetic compatibility (EMC) ▪ IEC/EN 61326-1, Table 2 ▪ IEC/EN 61326-2-3 ▪ NAMUR NE 21 recommendation ▪ DNVGL-CG-0339, chapter 14 This includes Immunity assessment criterion: ▪ Surge immunity acc.: The output signal fluctuation is within ±1% –...
- Page 90 Phone : 1-800-888-6400/ 1-770-253-7000 Fax : 1-770-254-0928 YOKOGAWA AMERICA DO SUL LTDA. YOKOGAWA ELECTRIC KOREA CO., LTD. YOKOGAWA MIDDLE EAST & AFRICA B.S.C.(C) Praca Acapulco, 31 - Santo Amaro, Sáo Paulo/SP, (Yokogawa B/D, Yangpyeong-dong 4-Ga), P.O. Box 10070, Manama, Building 577,...
Need help?
Do you have a question about the ROTAMASS Total Insight and is the answer not in the manual?
Questions and answers