Advertisement
Quick Links
DREAM ON ME INC.
1532 S WASHINGTON AVE
PISCATAWAY TOWNSHIP
NJ 08854
TEL: 732-752-7220
CUSTOMER CARE: +1 (732) 366-1788
Adult assembly required.
Small parts may present choking hazard prior to assembly.
Enclosed please find simple step-by-step instructions to help you
quickly assemble your products. Before you begin we recommend
that you following the steps below:
1. Please read the instructions thoroughly.
2. Identify all parts and hardware.
3. You will need the following tools:
Philips head screw driver
Flat head screw driver
Hammer
Do Not Use Power Drills or Drivers
To protect your parts during assembly please place them on a soft
surface.
To clean surface use only water on a damp cloth. Do not use
window cleaners or cleaning abrasives as it will scratch the surface
and could damage the protective coating.
ASSEMBLY INSTRUCTIONS
ITEM NO: 646
s
1
Advertisement

Related Manuals for Dream On Me 646


Summary of Contents for Dream On Me 646
- Page 1 DREAM ON ME INC. 1532 S WASHINGTON AVE ASSEMBLY INSTRUCTIONS PISCATAWAY TOWNSHIP ITEM NO: 646 NJ 08854 TEL: 732-752-7220 CUSTOMER CARE: +1 (732) 366-1788 Adult assembly required. Small parts may present choking hazard prior to assembly. Enclosed please find simple step-by-step instructions to help you quickly assemble your products.
- Page 2 A FREQUENT AND PEDRIODICALLY CHECK SHOULD BE MADE TO CONFIRM ALL THE SCREWS AND NUTS REMAIN TIGHT. · NEVER USE THIS PRODUCT IF THERE ARE ANY LOOSE, MISSING FASTENERS, LOOSE JOINTS,BROKEN PARTS, OR TORN MESH/FABRIC.CONTACT DREAM ON ME 1532 S WASHINGTON AVE PISCATAWAY NJ 08854 732-752-7220 FOR REPLACEMENT PARTS AND INSTRUCTIONAL LITERATURE IF NEEDED ·...
-
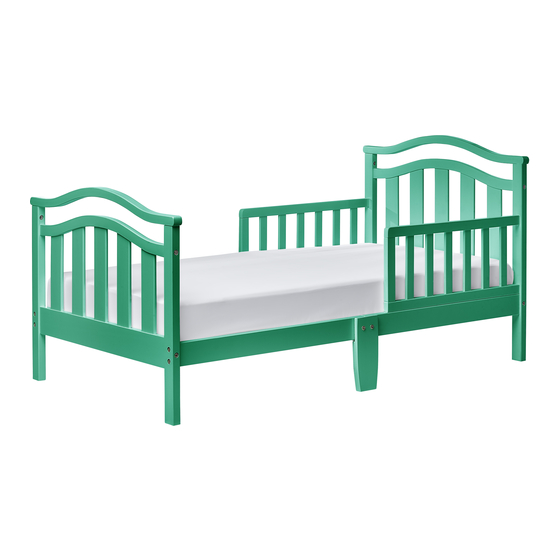
Page 3: Component Parts
COMPONENT PARTS (A3)Headboard left leg(1pc) (A1)Top cap (1pc) (A2) Top rail (1pc) (B1)Top cap (1pc) (B2) Top rail (1pc) (A4)Headboard right leg(1pc) (A5)Headboard base rail(1pc) (B3) Footboard left leg(1pc) (B4)Footboard left leg(1pc) (B5)Headboard base rail{1pc) (A6)Headboard cross bar(2pc) (B6)Headboard cross bar(2pc) (A7)Headboard cross bar(2pc) (B7)Headboard cross bar(2pc) (C1) Right Bed Rail (1pc) (C2) Left Bed Rail (1pc) - Page 4 COMPONENT PARTS (a) Bolt 2-3/5’ (22pcs) (b) Barrel nut (14pcs) (c) Allen Wrench (1pc) (e) Wood Dowel (4pcs) (f) Selfdrilling Screw (8pcs) (d) Bolt 1-3/5’ (4pcs) (g) L Metal Plate (2pcs) (i)Cam pin(4pcs) (h)Cam lock(4pcs) (j) Wood Dowel (12pcs) PHILLIPS-HEAD SCREWDRIVER REQUIRED FOR ASSEMBLY ---- NOT INCLUDE STEP#1 Insert the cross bar (A6, A7, A8) to top rail (A2) and headboard base rail (A5),...
- Page 5 (A1) STEP#2 Insert the cross bar (B6, B7, B8) to top rail (B2) and footboard base rail (B5), Connect footboard left leg (B3) and footboard right leg (B4) to footboard with bolt (a) and wood dowel (j), Connect top cap (B1) to footboard with cam pin (i) and cam lock (h) (B6) (B2) (B8)
- Page 6 STEP#3 Side Bar (E) (D2) Connect Right Side Bar & Left Side Bar (D1) & Side Bar with Wood Dowel (D1) (D2) STEP#4 Connect the side bar(D1&D2) to the side bar(E) by L metal paltes(g) and selfdrilling screws (f). (D1) NOTE:When attach the L metal plates(g) (D2)
- Page 7 STEP#5 Insert the cross bar (F&G) to the left side bar (D1&E) . t hen attach the split legs (H) to the cross middle bar(F) by bolts (a) and barrel nuts (b). (D1) STEP#6 Insert the cross bar (D&E) to the right side bar (D2&E) .
- Page 8 STEP#7 Connect headboard (A) to the left side bar (D1) using bolts (a) and Barrel Nuts(b). The right side bar (D2) use the same way. (D1) (D2) STEP#8 Connect the side bar (E) to the footboard (B) by using bolts (a) and barrel nuts (b) .
- Page 9 STEP#9 1.Connect right bed rail (C1) to the right side bar (D1) using bolt (d),Then connect the right bed rail (C1) to the headboard (A) by using bolts (a)&(d) and barrel nut (b). 2.Connect left bed rail (C2) to the left (C2) side bar (D2) using bolt (d),Then connect the left bed rail (C2) to the headboard (A)
Need help?
Do you have a question about the 646 and is the answer not in the manual?
Questions and answers