Advertisement
Quick Links
DREAM ON ME INC.
1532 S WASHINGTON AVE
PISCATAWAY TOWNSHIP
NJ 08854
TEL: 732-752-7220
CUSTOMER CARE: +1 (732) 366-1788
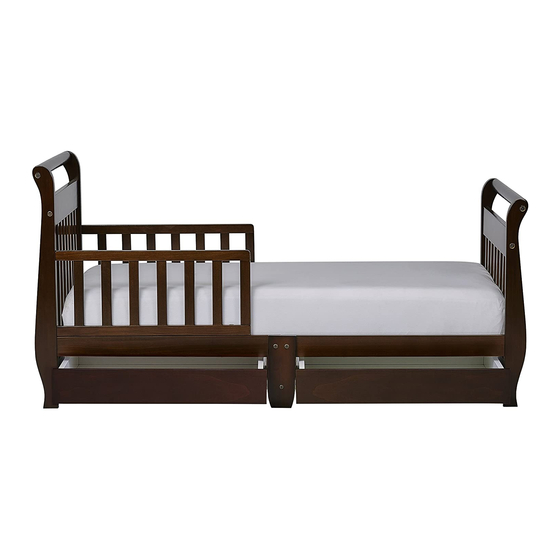
DOUBLE BAR TODDLER
BED WITH DRAWER
STYLE NO: 643
CAUTION: ANY MATTRESS USED IN THIS
TODDLER BED MUST BE AT LEAST 51-5/8
INCHES (131CM) BY 27-1/4 INCHES ( 69CM )
WITH A THICKNESS OF AT LEAST 4 INCHES
( 10CM ) BUT NOT EXCEEDING 5 INCHES
(12.5CM).INFANTS CAN SUFFOCATE IN
GAPS BETWEEN CRIB SIDES AND A
MATRESS THAT IS TOO SMALL.
KEEP INSTRUCTIONS FOR FUTURE USE
READ ALL INSTRUCTIONS BEFORE ASSEMBLY
CAUTION: BEFORE USING THIS TODDLER BED, RECHECK ALL
SCREWS TO BE SURETHAT THEY ARE TIGHTENED SECURELY.
A PERIODICAL CHECK SHOULD BE MADE TO CONFIRM THAT
ALL SCREWS & NUTS REMAIN TIGHT.
DO NOT SUSPEND STRINGS OVER THE TODDLER BED OR
ATTACH STRINGS TO TOYS.
WARNING:
1
MADE IN CHINA
Advertisement

Subscribe to Our Youtube Channel
Related Manuals for Dream On Me 643


Summary of Contents for Dream On Me 643
- Page 1 DREAM ON ME INC. 1532 S WASHINGTON AVE PISCATAWAY TOWNSHIP NJ 08854 TEL: 732-752-7220 CUSTOMER CARE: +1 (732) 366-1788 DOUBLE BAR TODDLER BED WITH DRAWER STYLE NO: 643 MADE IN CHINA CAUTION: ANY MATTRESS USED IN THIS TODDLER BED MUST BE AT LEAST 51-5/8...
- Page 2 JOINTS, MISSING PARTS,OR SHARP EDGES. DO NOT USE THE TODDLER BED IF ANY PARTS ARE MISSING OR BROKEN.ASK YOUR DEALER OR WRITE TO DREAM ON ME FOR REPLACEMENT OF THE PARTS AND INSTRUCTIONAL LITERATURE IF NEEDED. DO NOT SUBSTITUTE ANY PARTS.
-
Page 3: Component Parts
COMPONENT PARTS (L) Side Bar 2PCS (K2) Right (K1) Left (K) Side Bar 2PCS (B1) Left (B2) Right (M) Cross Middle Bar (B) Footboard Leg 2PCS (A1) Left (A2) Right (A) Headboard Leg 2PCS (N) Cross Bar 8PCS (O) Slider 1PC (P) Slider base 2PCS (C1) Left (C2) Right... - Page 4 HEADWARE AND TOOL DIAGRAM (a) Bolt 3” 22PCS (b) Barrel Nut 22PCS (c) Allen Wrench 1PC (e) Wood Dowel 1-3/5” 28PCS (d) Bolt 1-3/5” 14PCS (k) Cams 16PCS (g) Stopper 16PCS (f) 3/5” Selfdrilling Screws (h) L Metal Plate 2PCS 8PCS PHILLIPS-HEAD SCREWDRIVER REQUIRED (m) Cam Bolt 16PCS...
- Page 5 STEP 2 Using the bolt (a) ,barrel nut (b) and the wood dowel (e) to connect the (A2) left leg (A1) and right leg (A2) to top rail (G) . Using the bolt (d) and the wood dowel (e) to connect the left leg (A1) and right (J1) leg (A2) to middle rail (H)
- Page 6 STEP 4 Using the bolt (a) ,barrel nut (b) and the wood dowel (e) to connect the left leg (B1) and right leg (B2) (B2) to top rail (G) . Using the bolt (d) and the wood dowel (e) to connect the left leg (B1) and right leg (B2) to (J2)
- Page 7 STEP 6 (K2) (K1) Connect the side bar (K1&K2) to the side bar (L) by L metal plates (h) and selfdrilling screws (f) . Note: When attach the L metal plates (h) ,make sure the holes on the L metal plates (h) match to the holes on the side bar (K&L) . Then tighten the selfdrilling screws (f) .
- Page 8 STEP 8 (K2) (b) (b) Insert the cross bar (M&N) to the right side bar (K2&L), then attach the split leg (F) to the cross bar (M) and the slider (O) by bolts (a), barrel nuts (b) and wood dowels (e) . STEP 9 (A2) (A1)
- Page 9 STEP 10 (B2) (B1) Connect the side bar (L) to the footboard leg (B1) by using bolts (a) and barrel nuts (b) . The footboard leg (B2) use the same way . STEP 11 Put down the assembled parts as shown . Then connect the slider base (P) to the assembled parts by using bolts (a&d) and barrel nuts (b) .
- Page 10 STEP 12 (A2) (C2) (A1) (C1) (K2) (K1) 1.Connect the left bed rail (C1) to the left side bar (K1) using bolts (d).Then connect the left bed rail (C1) to the headboard leg (A1) using bolts (a&d) and barrel nuts (b) . 2.Connect the right bed rail (C2) to the right side bar (K2) using bolts (d) .Then connect the right bed rail (C2) to the headboard leg (A2) using bolts (a&d) and barrel nuts (b) .
- Page 11 STEP 14 (T1) (T2) Slide drawer bottom panel (S) painted side up into grooves of drawer side panel (T) and drawer back panel (R) . STEP 15 (T1) (T1) (T2) (T2) Attach drawer front panel (Q) by inserting cam bolts (m) into their corresponding cam bolts holes on ends of drawer side panel (T) .
- Page 12 STEP 16 Line up the drawer with the wheels and mental tracks on each side . panel (T) . With the front slightly elevated . slide into the track on the end ,lowering the front as it rolls into place under the toddler bed . Congratulations , your toddler bed with drawer is ready to use .
Need help?
Do you have a question about the 643 and is the answer not in the manual?
Questions and answers