Advertisement
Advertisement
Table of Contents

Related Manuals for Sunny Health & Fitness SF-RW5639


Summary of Contents for Sunny Health & Fitness SF-RW5639
- Page 1 FULL MOTION ROWING MACHINE SF-RW5639 USER MANUAL IMPORTANT! Please retain owner’s manual for maintenance and adjustment instructions. Your satisfaction is very important to us, PLEASE DO NOT RETURN UNTIL YOU HAVE CONTACTED US: support@sunnyhealthfitness.com or 1- 877 - 90SUNNY (877-907-8669).
-
Page 2: Important Safety Information
IMPORTANT SAFETY INFORMATION We thank you for choosing our product. To ensure your safety and health, please use this equipment correctly. It is important to read this entire manual before assembling and using the equipment. Safe and effective use can only be achieved if the equipment is assembled, maintained and used properly. -
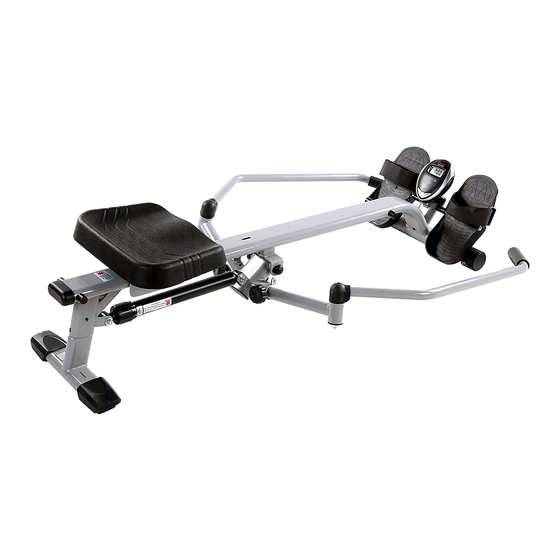
Page 3: Exploded Drawing
EXPLODED DRAWING... -
Page 4: Hardware Package
HARDWARE PACKAGE ……………………………………………………………#42 M8 X 50 2PCS ………………………………………………………………………#40 M8 X 15 3PCS ………………………………………………………#35 M8 X 61 2PCS ……………………#38 M8 2PCS ……………………#36 M8 2PCS ………………#46 Φ8.5 X Φ19 2PCS ………#50 Φ8.4 X Φ19 3PCS ……………#49 Φ8.4 X Φ13.5 5PCS #29 M8 2PCS #53 S5 2PCS #52 #13 - #17 1PCS NOTE:... -
Page 5: Parts List
PARTS LIST Description Spec. Description Spec. Sensor Seat Bracket Rear Stabilizer Knob Hydraulic Seat Rail Cylinder Left Handlebar Pedal Strap Seat Right Handlebar Connecting Joint Foam Grip Junction Piece Roller Long Shaft Bolt M8x60 Axle Fixed Plate Handlebar Cover Dome Nut Bushing Phillips Screw M5x12... -
Page 6: Assembly Instructions
ASSEMBLY INSTRUCTIONS STEP 1: Attach the Front Stabilizer (No. 21) to the Seat Rail (No. 3) with 2 Bolts (No. 35), 2 Arc Washers (No. 50), 2 Spring Washers (No. 49), and 2 Dome Nuts (No. 38). Attach the Rear Stabilizer (No. 2) to the Seat Rail (No. - Page 7 STEP 4: Insert the Seat (No. 32) onto the Seat Rail (No. 3), and then remove the tape from the Rollers (No. 34). Insert the Axle (No. 9) into the Seat Rail (No. 3), secure with the End Cap (No. 17). Then put the Oval End Cap (No.
-
Page 8: Adjusting The Resistance
ADJUSTING THE RESISTANCE This rowing machine is designed with 12 levels of resistance. The arrow on Hydraulic Cylinder (No.30) indicates the numbered resistance setting. Turn the upper ring on the Hydraulic Cylinder (No.30) to select the desired resistance level. -
Page 9: Meter Instructions
METER INSTRUCTIONS TIME ..............00:00-99:59 MIN COUNT ..............0-9999 TOTAL COUNT ............0-9999 CALORIE ..............0-9999 KCAL FUNCTIONS MODE: Press this button to select and set to a function. Press and hold for 3 seconds to reset TIME, COUNT, and CALORIE. SET: Press this button to set the value of TIME, COUNT and COLORIE.
Need help?
Do you have a question about the SF-RW5639 and is the answer not in the manual?
Questions and answers