TechniSat DigitRadio 360 CD Instruction Manual
Hide thumbs
Also See for DigitRadio 360 CD:
- User manual (652 pages) ,
- Instruction manual (508 pages) ,
- Instruction manual (22 pages)
Table of Contents
Advertisement
Quick Links
Download this manual
See also:
User Manual
Advertisement
Table of Contents

Related Manuals for TechniSat DigitRadio 360 CD


Summary of Contents for TechniSat DigitRadio 360 CD
-
Page 2: Table Of Contents
Index Section Description Page Index…………………………….………………………………..……..………...……..… Safety…………………………….……………………….…………………………………….……3 Parts………………………………. ….……………………….……………………….…….. Assembly………………………………………….………………………………………….. Using the remote control……………………. ….……………………….……………………… 5 Setting the clock…………………………….….…….……………………….……………… Basic operation – getting started………………….…………….…………………….…… Using the radio DAB mode..……………….…….……………….….…………………… Using the radio FM mode……………………….……………………….…………………… Using the radio programmed station function….………….…………………….……………… 8 Using the CD player……………………………….………………………….……………………8 Caring for discs………………………………………….…….……………………….…………... -
Page 3: Safety
SAFETY PLEASE READ THESE INSTRUCTIONS BEFORE USE AND RETAIN FOR FUTURE REFERENCE. • FOR HOUSEHOLD AND INDOOR USE ONLY. • PLACE THE APPLIANCE ON A FLAT, STABLE SURFACE WITH ADEQUATE VENTILATION AND • AWAY FROM OTHER SOURCES OF HEAT. MINIMUM DISTANCES AROUND THE APPLIANCE FOR ADEQUATE VENTILATION IS 10CM. -
Page 4: Parts
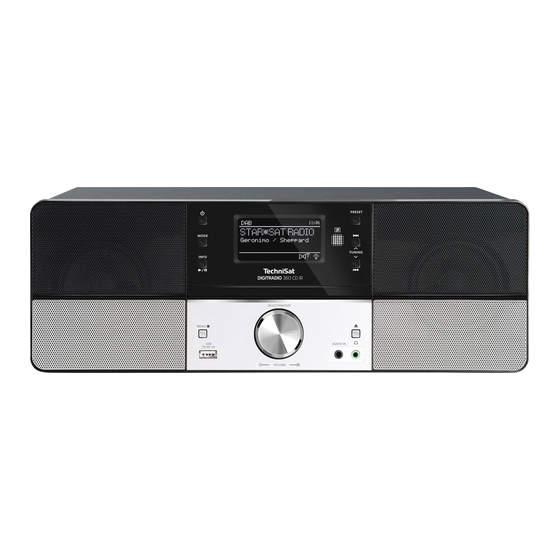
PARTS Front view Standby/On ( ) button Preset 11. USB =5V 1A Charging Port Mode button Skip/Tune search forward 12. Select/ VOLUME +/– Dial INFO/( ) button (!) button 13. Audio in socket CD disc tray Skip / Tune search back (") 14. -
Page 5: Using The Remote Control
USING THE REMOTE CONTROL To use the remote control, slide open the battery compartment cover on the reverse of the remote control. Insert 1 x AA 1.5V battery (supplied) in accordance with the diagram in the battery compartment. Take care to observe the correct polarity (+/-) marked in the battery compartment and refit the cover. -
Page 6: Using The Radio Dab Mode
vii. Move the antenna (and hi-fi if necessary) until the best reception is received. viii. Adjust the volume to the desired level using the VOLUME (+ or – ) buttons. The sound can be silenced by pressing the MUTE button and ‘MUTE’ will appear in the display. Press the MUTE button a second time to restore the sound. -
Page 7: Using The Radio Fm Mode
Signal strength – the display will show a slide bar to indicate the signal strength. The stronger the signal, • the longer the bar. Programme type – this describes the style of the programme. If the information is not available the display •... -
Page 8: Using The Radio Programmed Station Function
Press and hold the PRESET button until the display shows ‘#: (Empty).’ iii. Press the PRESET up or down(!) or (") buttons to select the preset storage location and then press the ENTER button. The station now broadcasting has now been stored in the selected location and the display will show the preset location and ‘Preset # stored’. -
Page 9: Caring For Discs
Never write on the playing surface of the disc or on the label surface with a ballpoint pen. • Do not stick labels onto discs. • Wipe any dust or fingerprints form the disc • using a soft cloth. Wipe from the centre of the disc to the outside and never in a circular motion. -
Page 10: Programmed Play Function
17.2 When the track has been found, press the INTRO button again to listen to the whole track. Intro will not be shown in the display when this function has been deselected. PROGRAMMED (MEMORY) PLAY FUNCTION (CD and USB modes only) This function allows up to 32 CD tracks or 64 MP3 / WMA files into be programmed into the memory and be played in a specific order. -
Page 11: Setting And Using The Sleep Function
22.3 To cancel the sleep timer, press the SLEEP button until the sleep setting shows ‘SLEEP OFF’ in the display and normal play is resumed. SETTING AND USING THE TIMER This function will switch the hi-fi on and off at a preset time and can be used as an alarm. 15.1 To set the time that the timer will activate, during standby mode, press and hold the TIMER button until ‘On... -
Page 12: Technical Specification
Has ‘CD’ been selected using the MODE button? Has the PLAY/PAUSE ( ) SCAN button been pressed? Disc skipping Clean the disc and lens. If cleaning does not work the disk may have a defect. USB device does not play Is the USB device fully located in the USB port? Has ‘USB’...
Need help?
Do you have a question about the DigitRadio 360 CD and is the answer not in the manual?
Questions and answers