Table of Contents

Subscribe to Our Youtube Channel
Related Manuals for Skoda SatCompass


Summary of Contents for Skoda SatCompass
- Page 1 ŠkodaAuto RADIO NAVIGATION SYSTEM...
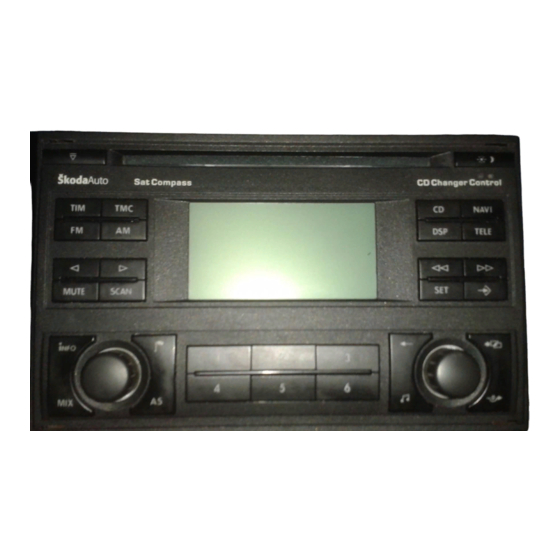
- Page 2 EQUIPMENT ILLUSTRATION RADIO NAVIGATION SYSTEM...
-
Page 3: Table Of Contents
QUICK REFERENCE Radio operation NAVI button, to activate the main navigation menu Manual station tuning for FM, TMC and AM TIM, use to select messages TELE button, to display the traffic messages CD-/CD changer operation received via TMC Select tracks Radio operation FM button, to activate FM radio operation Recalling stored stations... -
Page 4: Radio Operation
QUICK REFERENCE Radio operation Station preset buttons CD changer operation CD direct selection buttons Delete button, to delete entries in the character list Tone button, to adjust the tone and sound range Menu button, to select and confirm menu items Traffic detour, to calculate an alternate route to bypass traffic congestion button, to exit the menu... - Page 5 CONTENTS INTRODUCTION CD operation ........29 Language ............18 Integrated CD player ........29 Default settings..........18 The Škoda Radio Inserting an audio CD (integrated CD Theft Protection ........19 Navigation System ......... 6 player) .............29 Switching the system on/off....20 Navigation ............7 Starting CD operation (integrated CD How does navigation work? ......7 player) .............29...
- Page 6 CONTENTS NAVIGATION Destination entry - to a flagged destina- Bypassing traffic congestion....58 Activating the traffic congestion function ..58 tion............46 Navigation ..........34 Selecting an alternate route ......59 Setting a flagged destination ......46 Main navigation menu ........34 Tour list ..........60 Storing a flagged destination ......46 Destination entry........35 Travel guide..........
-
Page 7: Introduction
INTRODUCTION The Škoda Radio Navigation system RADIO NAVIGATION SYSTEM... -
Page 8: Navigation
INTRODUCTION How does navigation work? The radio navigation system makes it very Always devote your attention primarily to easy to operate the convenient radio, CD and The electronic speedometer signal and driving! As the driver of a motor vehicle, navigation features in your vehicle. You can also the locating signals received from the GPS you bear full responsibility for your road equip the system with an original Škoda 6-disc... -
Page 9: Display
INTRODUCTION Display Display contents Display illustration Background - When navigation is active, the sta- tus of the functions for radio, CD or CD changer Background (audio sources) will appear at the top of the dis- play. During radio or CD operation, the currently Foreground active function for navigation will appear. -
Page 10: Switching To The Night Display
INTRODUCTION Alarm Telephone (PHONE) the directional arrow the distance to the next turning point the name of the street that you are currently driving down Switching to the night display When driving at night, you can press button on the main panel to switch to night display. If your radio navigation system should receive If your vehicle is equipped with a car phone an emergency message, ALARM will appear... -
Page 11: Menus
INTRODUCTION Selecting and confirming Menus menu items Menu structure All the basic functions for your radio navigation These menus are marked with an arrow on the Use the menu knob to select menu items . system can be adjusted in the setup menu. right. -
Page 12: Altering Settings
INTRODUCTION Altering settings Exiting menus The slider appears in a frame, use the menu knob If you do not want to save the new setting, Once you have confirmed your selection, the next to change the settings. Change the setting •... -
Page 13: Main Buttons
INTRODUCTION Main buttons INFO button TELE button Press INFO to obtain more information on The TELE button allows you to view traffic The number of received traffic messages is dis- played as dots beneath the TMC indicator the current destination or on list entries marked information received via TMC (Traffic Message by three dots. -
Page 14: Dsp Button, To Adjust The Display Contrast
INTRODUCTION MUTE button DSP button Press the MUTE button to switch the audio If you press the TELE button , a display will sources radio, CD and CD changer (extra appear as illustrated above. In the background, The DSP button allows you to adjust the feature) to mute. -
Page 15: Setup - Main Settings
INTRODUCTION SETUP - Main settings Navigation setup Audio setup DRIVE SYMBOL - If you want to display the visual driving recommendations in the instrument cluster only (depends on the operation), select OFF. LOCATION - If it is not possible for the system to receive GPS signals, you can enter your current vehicle location here manually. - Page 16 INTRODUCTION • Select FIX if you want the name of the radio OFF - You can select a regionally related AUTO, the frequency response for voice station to appear permanently in the display station frequency manually. The system will reproduction will be altered automatically without any changing information.
-
Page 17: Volume Setup
INTRODUCTION Volume setup TA-MIN - the minimum volume for traffic Macro key setup information announcements. NAV-MIN - Here you can select the minimum volume for the voice output used for navigation. Note: If the system volume is set louder than TA-MIN or NAV-MIN when a traffic announcement or voice output is made, this information will be emitted at the current system volume. -
Page 18: Clock Setup
INTRODUCTION ALPH. DEST. MEMORY activates the Clock setup TIME ZONE - This is where you can enter the alphabetically sorted destination memory. time difference between your current time zone and world standard time (UTC), (see page 64). GPS STATUS indicates the number of GPS satellites currently received and your DAYLIGHT SAVING TIME - Select ON if you geographical position. -
Page 19: Language
INTRODUCTION Language Default settings You can select from a number of different Use this menu to reset all the settings in the languages for the display of information on the Setup menu and the tone settings to the default screen and for the voice output for navigation. settings. -
Page 20: Theft Protection
INTRODUCTION Theft Protection Anti-theft coding Cancelling the anti-theft coding It is necessary to enter the code, when the system has been disconnected from the vehicle's power supply or when a fuse has „blown“. In this case, SAFE will appear in the display when the system is switched on. -
Page 21: Switching The System On/Off
INTRODUCTION Switching the system on/off Entering the incorrect code number Switching the system on The audio source or navigation status (if the last route guidance was no longer than 30 minutes If you inadvertently enter and confirm an inco- ago) used last before the system was switched rrect code number, SAFE will appear again in off will be activated. -
Page 22: Volume Adjustment And Switching The System On/Off
INTRODUCTION Switching the system off Press the left-hand rotary/push button The active audio source and navigation status will be stored. If the key is removed from the ignition while the system is switched on, the system will switch off automatically. Adjusting the volume Turn the left-hand rotary/push button to alter... -
Page 23: Radio Operation
AUDIO OPERATION Radio operation Radio operation with RDS TMC (Traffic Message Channel) RDS Regional In addition to their regular programming, a num- Radio stations sometimes divide their pro- RDS (Radio Data System) ber of radio stations also transmits digital traffic gramming into regional programming at certain RDS (Radio Data System) is always active for information on the Traffic Message Channel. -
Page 24: Switching On Radio Operation
AUDIO OPERATION Use the RDS-Regional function in the AUDIO Switching on radio operation FM in 2 memory banks (FM1 and FM2) SETUP menu to switch RDS-REG to AUTO or • To switch FM radio on, press FM OFF. For more information, please refer to the section on AUDIO SETUP, page 14. -
Page 25: Recalling Stored Stations
AUDIO OPERATION Selecting stations Selecting stations Storing and recalling stations Manual station tuning for FM, TMC and AM Automatic station tuning for AM Storing stations • • Press one of the buttons briefly to tune into Press one of the buttons to start seek You can store six stations in each memory bank a station manually. -
Page 26: As Button, To Store Radio Stations Automatically
AUDIO OPERATION Recalling stored stations Storing stations automatically If the radio is no longer able to pick up a stored TMC station, TMC-SEEK will appear in the You can recall any station you have stored at the display. touch of a button. •... -
Page 27: Seeking And Scanning Stations Cyclically
AUDIO OPERATION Scanning stations (Radio Scan) Traffic station reception • Keep the AS button pressed until the Many FM stations transmit regular traffic infor- automatic storing procedure begins and mation for their reception areas. A-STORE appears in the status line. An addi- tional progress indicator in percent appears Stations that broadcast traffic information also in the display foreground. -
Page 28: Listening To Traffic Message
AUDIO OPERATION Listening to traffic messages Traffic Information Memo (TIM) Activating TIM standby for 24 hours • If your radio navigation system has been set to Once you have switched the system off and traffic information standby, the traffic messages removed the ignition key from the ignition, will interrupt other programming, i.e. -
Page 29: Tim, Use To Select Messages
AUDIO OPERATION Activating TIM standby for 2 hours Listening to recorded messages • Park your vehicle, leave the system switched on and turn off and remove the ignition key from the ignition. This standby mode will be deactivated as soon as you switch the system back on again. -
Page 30: Cd Slot
AUDIO OPERATION CD operation Integrated CD player TRACK and the number of the track currently playing will appear in the display foreground. You can use your radio navigation system to listen to audio CDs on the integrated CD player. Starting CD operation (integrated CD You also have the option of connecting a CD player) •... -
Page 31: Cd Eject Button
AUDIO OPERATION CD functions (integrated CD player) Playing all the tracks on a CD in random CD changer operation order Selecting a track (extra feature) • You can also play all the tracks on a CD in ran- To select the next track, press the right-hand dom order. -
Page 32: Selecting A Cd
AUDIO OPERATION Selecting a CD Playing all the tracks in random order (MIX) Ending the MIX function: • • Press one of the station presets briefly. To end the MIX function, press MIX The numbering of the station presets 1 - 6 again. -
Page 33: Notes On Audio Cds
AUDIO OPERATION Tone settings Notes on audio CDs Condensation Tone settings and balance and fader set- tings Condensation may occur in the CD changer CD label housing when it is cold or humidity is high, such Make sure that you only play audio CDs that bear as during or after rain showers. -
Page 34: Radio Navigation System
AUDIO OPERATION It will not be possible to adjust the fader setting unless speakers have been installed in the rear of the vehicle. • Press to access the Sound menu. • Use the menu knob to select the function you want to adjust (BASS, TREBLE, BAL- ANCE or FADER). -
Page 35: Navi Button, To Activate The Main Navigation Menu
NAVIGATION Navigation Activating the main navigation menu Main navigation menu ENTER DESTINATION (starting page 35). Destination entry with the entry of the desti- nation address or by selecting a destination from the destination memory. ROUTE OPTIONS (starting page 48). Here you can select dynamic route guidance or display the route list. -
Page 36: Destination Entry
NAVIGATION Destination entry Overview Now you can use the menu items to choose TOURLIST (page 60). Combining and re- between the following ways to enter your in- calling destinations to form a tour. tended destination: TRAVEL GUIDE (starting page 60). View DESTINATION FROM MEMORY (memory of travel information (e.g. -
Page 37: Destination Entry - City/Town
NAVIGATION Destination entry - City/Town Selecting a city or town as your The editor Use the following menu items in the city sub- menu: destination Destination entry via the STREET menu item Destination entry via the TOWN CENTRE menu item Destination entry via the CLOSE TO AD- DRESS menu item Selecting the TOWN menu item... -
Page 38: Entering The City Name
NAVIGATION Entering the city name The edit menu consists of: • Use the menu knob to mark the correct let- the Speller with letters, a space and num- ter. The cursor will move to the corresponding bers, letter and the letter will appear enlarged. Note: You can only enter names that are the control field stored on the CD. -
Page 39: Accessing The List
NAVIGATION Accessing the list Note: If the city name you want to select ap- Entering more precise details on your pears on the list more than once, a submenu destination will appear from which you can select the desired entry. Selecting city names from the list •... -
Page 40: Intersection
NAVIGATION Enter destination - Street - Intersection Selecting a street as your destination Selecting the STREET menu item TOWN CENTRE - allows you to select the • town centre of the place you selected. In the Use the menu knob to mark and confirm case of smaller towns, this menu item is used the STREET menu item in the enter desti-... -
Page 41: Selecting Streets From The List
NAVIGATION Enter destination - Centre Selecting streets from the list Selecting an intersection as your Selecting the city centre (city district) destination In large cities, you can use the TOWN CENTRE To scroll through the list, move the selection bar beyond the last entry (to page forwards) or menu item to select the centre of part of the city Use the street submenu to define your desti- beyond the first entry (to page back). -
Page 42: Selecting The Centre
NAVIGATION Enter destination - Special destinations In large cities you can use the TOWN CENTRE Selecting the centre Entering special destinations menu item to directly select individual parts of the city or their main centres as your destination. Selecting the TOWN CENTRE menu item •... - Page 43 NAVIGATION Selecting a category SUPRAREGIONAL DESTINATIONS • Use the menu knob to mark and confirm the desired special destination. The special destination category for suprar- egional destinations is not dependent on whe- Destination input continues on the basis of cat- ther you have already entered a destination.
-
Page 44: Destination Memory
NAVIGATION Enter destination - from the destination memory Selecting an entry from the list Entering a destination from the Selecting the memory destination memory • • Use the menu knob to mark and confirm Use the menu knob to select and confirm the desired entry on the list. -
Page 45: Selecting A Stored Destination
NAVIGATION Selecting a stored destination Storing a destination in the destination Use the DESTINATION MEMORY menu item to • activate the destination memory menu directly Use the menu knob to select one of the memory menu from the main navigation menu. memories listed above. -
Page 46: Entering A Short Name
NAVIGATION Storing a destination in the destination Entering a short name Sorting destinations in the memory • Enter the short name (e.g. HOME) in the edit memory yourself field. • Press the menu knob firmly to confirm the name you have entered or •... -
Page 47: Flagged Destination Button, To Set A Flag
NAVIGATION Enter destination - to a flagged destination Setting a flagged destination Note: You should not set a flagged destination Storing a flagged destination unless the name of the street it is located on appears in the display. Otherwise, it might not be possible for the system to find this destination at a later date. -
Page 48: Naming The Flagged Destination
NAVIGATION Naming the flagged destination Using the standard name: Selecting the flagged destination as your • destination Press the menu knob firmly (for longer than 2 seconds) to confirm the entry FLAG DEST. (TIME). Entering a name of your own choosing: •... -
Page 49: Route Options
NAVIGATION Route options Selecting the FLAGGED DESTINATION menu Planning a route Selecting route options item • Use the menu knob to mark and confirm the FLAGGED DESTINATION menu item in the enter destination menu. Now the main navigation menu will appear and you can start route guidance to the flagged des- tination. -
Page 50: Closing The Route Options Menu
NAVIGATION DYNAMIC - If you select ON for this option, the Notes: Because of local conditions or for Closing the route options menu purposes of route optimisation, a route may route will be calculated whilst taking the current traffic situation into account. The ROUTE, MO- be calculated using one of the options even TORWAYS, FERRIES and TOLL ROAD menu though it was marked as “AVOID”. -
Page 51: Calculating The Route List
NAVIGATION Route guidance Calculating the route list Starting route guidance Depending on the length of the route, the calcu- lation process can take a few seconds. Then the route list will appear. The route list will remain in the display during route guidance, but it is not dynamic, i.e. -
Page 52: Displaying The Complete Destination Ad
NAVIGATION If the DRIVE SYMBOLS: ON option is set in the Route guidance with driving symbols If a turning arrow is displayed, the name of the navigation setup menu (see page 14), the visual street onto which you will turn will appear. A small driving recommendations will appear in the radio arrow pointing to the right in front of the street navigation system’s display and in the instrument... -
Page 53: Off Map Route Guidance
NAVIGATION Route guidance without driving symbols The navigation status, e.g. GUIDANCE and the OFF MAP route guidance distance to your destination, appears in the dis- play background. If the option LANGUAGE: ON has been selected in the navigation setup menu, route guidance will also be accompanied by spoken driving re- commendations. -
Page 54: Off Road Route Guidance
NAVIGATION OFF ROAD route guidance NO MAP route guidance Once you insert the CD ROM again, route guidance will resume if it was active before the CD ROM was removed. Note: For reasons of a technical nature, it may take several minutes until route gui- dance resumes correctly acoustically and with the pictograms after you insert the CD ROM. -
Page 55: Locating With A Cd
NAVIGATION Locating with a CD Destination reached Cancelling active route guidance When locating is active, an arrow pointing north Once you have reached your destination, the dis- To cancel route guidance, activate the main will appear. The name of the street you are cur- play will appear as illustrated. -
Page 56: Destination Memory
NAVIGATION Destination memory Overview You can view the destinations stored in the Destination memory alphabetical destination memory sorted in any order you choose in the user-sorted memory. The last destinations memory contains the last ten destinations used for navigation in chronological order. - Page 57 NAVIGATION CHANGE SHORT NAME - to edit short names Entering/changing a short name Editing the short name • in the destination memory, see below. Use the menu knob to mark and confirm the CHANGE SHORT NAME menu item. DELETE DESTINATIONS - to delete last desti- The alphabetical destination memory will nations, single destinations or all destinations, appear.
-
Page 58: Deleting Destinations In The Destination Memory
NAVIGATION Deleting destinations in the destination memory Sorting Destinations The entry selected will be highlighted by a move marking. • Move the marked entry to the desired po- sition. • Press the menu knob to confirm this change. Now you can select another entry. •... -
Page 59: Bypassing Traffic Congestion
NAVIGATION Bypassing traffic congestion Activating the traffic congestion function • The navigation system automatically limits the Use the menu knob to mark and confirm length of the route section you can exclude to a the DELETE DESTINATIONS menu item in reasonable length. -
Page 60: Selecting An Alternate Route
NAVIGATION Note: The radio navigation system always Selecting an alternate route • Use the menu knob to mark and confirm calculates the best route in terms of time for the starting and end point of the route section the automatic traffic congestion function, you want to exclude. -
Page 61: Tour List
NAVIGATION Tour list STORE DESTINATION - The current destination Travel guide or the destination that was active last will be ad- ded to the tour list. DELETE DESTINATIONS - Here you can delete individual destinations from the tour list or the entire tour list. -
Page 62: Selecting A Destination
NAVIGATION Selecting a destination Changing the navigation CD ROM To take advantage of the travel guide, you re- • quire a navigation CD that includes travel guide Use the menu knob to mark and confirm To change the CD ROM, press the CD eject information. -
Page 63: Calibrating The System After The Tyres Have Been Changed
NAVIGATION Care of equipment Glossary Calibrating the system after the tyres Care of the screen EON - Enhanced Other Network have been changed Please handle the screen carefully. Pressure With RDS, EON makes it possible to exchange applied with your fingers may result in dents station information within a station network. - Page 64 NAVIGATION CD-changer magazine for 6 CDs. SCAN This function can be used to scan the radio stations within reception range or the tracks of a CD for CD operation. TA - Traffic Announcement Priority for traffic information. TMC - Traffic Message Channel Special service provided by a number of radio stations.
- Page 65 NOTES Anchorage Moscow London Montreal Chicago Rome Beijing Tokyo Tehran Washington D.C. Los Angeles Cairo Mexico City Bombay Hong Kong Rayadh Bangkok Dakar Honolulu Khartoum Caracas Singapore Mogadishu Jakarta Johannesburg Perth Sao Paulo Auckland Sydney Buenos Aires 0:00 1:00 2:00 3:00 4:00 5:00...
- Page 66 NOTES RADIO NAVIGATION SYSTEM...
- Page 67 NOTES RADIO NAVIGATION SYSTEM...
- Page 68 Radio Passport Notes Please make sure to remove the “Equipment card” and keep it in Radio a safe place. Never leave it in Radio Navigation System MCD name the vehicle! If you should lose the “Equipment Serial card” with the code number, number please contact a Škoda service centre.
- Page 69 Please make sure to remove the “Equipment card” and keep it in a safe place. Never leave it in the vehicle! If you should lose the “Equipment card” with the code number, please contact a Škoda service centre. They will be able to help you free of charge.
- Page 70 Škoda Auto is constantly working on the further development of all types and models. Please understand that, for this reason, chan- ges to the scope of supply in terms of shape, equipment and engineering may be introduced at any time. It is therefore not possible to derive any claims from the information, illustrations and descriptions contained in this Owner ´...
- Page 71 Radionavigační systém Škoda Auto anglicky 08.03 S00.5610.21.20 3U0 012 151 AK...
Need help?
Do you have a question about the SatCompass and is the answer not in the manual?
Questions and answers