Table of Contents
Advertisement
Advertisement
Chapters
Table of Contents

Related Manuals for Skoda Infotainment Navigation Amundsen


Summary of Contents for Skoda Infotainment Navigation Amundsen
- Page 1 SIMPLY CLEVER Infotainment Navigation Amundsen Operating Instructions...
- Page 2 5L0012720DA...
-
Page 4: Sd Card 1 - Removal Of The Sd Storage Card
Preface You have chosen a ŠKODA vehicle, which is fitted with the Infotainment Navigation Amundsen (here- after called the unit) – we thank you for your confidence in us. Please read these Operating Instructions carefully, because the operation in accordance with these... -
Page 5: Table Of Contents
Telephone functions Table of Contents Text messages (SMS) ™ MirrorLink Operating Instructions Notes Navigation Declaration of conformity Description of the navigation system Preface to navigation Abbreviations Settings Familiarization with the unit route guidance Enter new destination Introductory information Destination entry by means of saved Important notes destinations Equipment overview... -
Page 6: Operating Instructions
Operating Instructions This Owner's Manual describes all possible device functions without identify- ing them as special equipment, model variants or market-dependent equip- ment. Consequently, the device on this vehicle does not need to contain all of the functions described in this Owner's Manual. The Pictures in these Operating Instructions are for illustrative purposes only. -
Page 7: Notes
CAUTION Notes Texts with this symbol draw attention to the risk of vehicle damage or possible inoperability of some systems. Structure of these Operating Instructions The Operating Instructions are hierarchically divided into the following areas. Note Texts with this symbol contain additional information. Section (e.g. -
Page 8: Declaration Of Conformity
Declaration of conformity ŠKODA AUTO a.s. hereby declares that the ŠKODA Infotainment systems meet the basic requirements and additional provisions of Directive 1999/5/EC with reference to radio equipment and telecommunications devices. ŠKODA AUTO a.s. hereby declares that the “connection and the use of this communication device is granted by the Nigerian Communications Commis- sion.”... -
Page 9: Abbreviations
Abbreviation Definition Abbreviations a system for the transmission of additional information for Abbreviation Definition FM radio reception ® a Bluetooth profile for the one-sided audio data transmis- Messages a service for short text messages A2DP sion ® the quick coupling method of a Bluetooth device Alternative frequencies for the current radio station data service for continuous transmission of traffic reports... -
Page 10: Familiarization With The Unit Introductory Information
If the component protection does not activate by switching on the ignition, Familiarization with the unit please contact a ŠKODA specialist garage. Introductory information Equipment overview Important notes Introduction Introduction This chapter contains information on the following subjects: This chapter contains information on the following subjects: Description of the device Touch screen... -
Page 11: Touch Screen
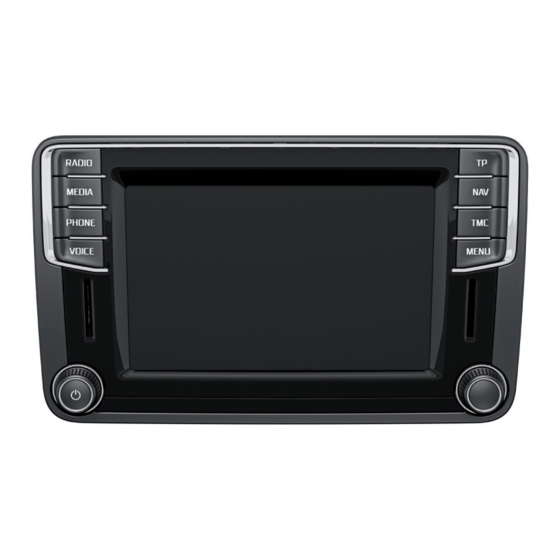
Description of the device Device power on / off - Left control knob for switching the device on and off; volume adjust- Switching the unit on and off manually ment › Press to switch the device on or off. Right control knob for calls and confirmations ... -
Page 12: Unit Menus
› Press the button. Unit menus The symbol appears in the display screen when the sound is muted . Fig. 2 If at the time of muting a sound is made in the menu Media, then the playback Unit menus is interrupted (pause) CAUTION If the volume is too high sound resonance can occur in the vehicle which can... -
Page 13: Unit Operation
Status line Unit operation In some menus a status bar located at the top of the screen shows the time and outdoor temperature along with other information. Operation on the device screen Function keys Introduction Screen areas which confirm a function or a menu are called “function keys”. Grey background - The key is inactive and thus not selectable This chapter contains information on the following subjects: White background- The key is active and thus selectable... -
Page 14: Operation Via The Buttons / Wheels On The Multifunction Steering Wheel / Operating Lever
While entering characters a search of the most relevant entries takes place Alphanumeric with keyboard with characters already entered. Therefore, it is not always necessary to enter the entire entry name. Do not forget to enter a space for terms made up of more than one word, such as Lorem Ipsum. - Page 15 Depending on equipment this can be operated using the buttons / wheels on Button / the multifunction steering wheel or on the operating lever. adjustment Action Operation wheel The multifunction steering wheel features 8 buttons / wheels that always de- »...
- Page 16 Buttons and wheels of the media menu Operating the phone menu Button / adjustment Action Operation wheel » Fig. 6 Press Switch connected audio sources Switch between the Radio and Media menus and Hold open the last context status (e.g. the last radio station or track to be played) Press Start/stop playback...
- Page 17 Menu functions in the phone MAXI DOT display Operating the navigation menu Call type Menu item Operation Answer Accepting a call Incoming Reject Reject call Ignore Mute the ringer Outgoing Cancel End call End Ending a call ...
-
Page 18: Voice Control
First and foremost, pay attention to the safety instructions » page 7, Impor- Operate with the control lever buttons tant notes. Some equipment functions can be operated by using voice commands. Thus, Fig. 9 the use of the device is accelerated and increased comfort while driving. Buttons on the control lever The voice control system can be used with the following menus. - Page 19 › Hold the button on the device or press twice. CAUTION › Hold the symbol key on the multifunction steering wheel or press twice. For some languages, there is no voice control available. This device indicates ■ › Press a key or a function key on the device (does not apply to ...
-
Page 20: Fig
Voice command entry was stopped » page 17, Stop/restore voice com- The function can be used for the contact search in the phone book. mand input When stopped the symbol shown in the device screen or in the MAXI DOT dis- A voice command is recognized ... - Page 21 Accessing the route information Voice command Operation Voice command Operation Switch on traffic reports Switching on/off the traffic pro- gramme (TP) Switch off traffic reports Information concerning distance to Distance to destination the destination Menu Media Information concerning time of arrival Time of arrival Voice command Operation...
-
Page 22: Device Settings
■ AUX volume - Sets the volume for the device connected through AUX Device Settings Quiet - Low volume ■ Medium - Medium volume ■ Menu Sound ■ Loud - High volume ® Bluetooth audio - Volume settings of the Bluetooth Audio profile connec- ■... -
Page 23: Menu Setup
■ System information - Displays system information » page 22 Menu Setup Copyright - Information on licences and copyrights are only available in the ■ English language Introduction This chapter contains information on the following subjects: Screen settings Main Menu ›... - Page 24 Keyboard settings Data transmission of mobile devices › › Press the button → → Keypad:. Press the button → → Mobile device data transfer. You can choose between two types of keyboard character arrange- The activated function enables transmission of vehicle data for applications in ™...
- Page 25 ■ Update software - the function key for the software update ■ The information about available software updates can be found on the ŠKODA Internet pages www.infotainment.skoda-auto.com . ® A2DP or AVRCP are Bluetooth profiles that support multimedia functions. Familiarization with the unit...
-
Page 26: Radio
Radio Main menu Operation Introduction This chapter contains information on the following subjects: Main menu Radio DAB text and images presentation Select the frequency range List of available stations Search and select available stations Fig. 12 Main menu FM and AM / DAB main menu Save radio station ... -
Page 27: Radio Dab Text And Images Presentation
Note Symbol Meaning If the screen is touched in the area of the radio text , only this text is dis- ■ AF Alternative frequency is switched off (FM) played in the full screen display. Signal is not available (DAB) ... -
Page 28: Search And Select Available Stations
List of available stations - information symbols and function keys Manually selecting a radio station › In the Radio menu, press the function key . Symbol Meaning It current frequency range appears in the scale. Radio station, which is stored under a preset button ... -
Page 29: Station Logos
» Fig. 12 on page 23. The information about radio station updates can be found on the ŠKODA In- ■ › ternet pages www.infotainment.skoda-auto.com . Select a storage group. › Press the station button. TP Traffic programme The station is stored under the selected station button. -
Page 30: Settings
Auto-save station logos- Automatic storage of the station logos » page ■ Settings Station logos Station logo region - Clarification of the station logo region ■ Introduction Alternative frequency (AF) - Switching on/off the search for alternative fre- ■ This chapter contains information on the following subjects: quencies of the station currently being heard, when you turn off AF off is dis- played on the device screen... - Page 31 L-band For the DAB radio reception in different countries, different frequency ranges are used. In some countries the DAB radio reception is only possible in the so called L-band. If no L-band DAB radio reception is possible in the country then we recom- mend to leave this menu item turned off.
-
Page 32: Media
Main Menu - Information and function keys Media Title or possibly artist name, album name Playback timeline with a slider (shows details of the playing time and re- Operation maining playing time of the track) Introduction Selected audio source / display of the album image Select the audio source »... - Page 33 Operation Action Folder / track list - Browser Press after about 3 seconds after the start of the title playback Fig. 16 Folder / Title list Finger movement to the right of the Plays the current track from the start screen area »...
-
Page 34: Audio Sources
In the area the display shows the selected audio source, and possibly the Artists - Sorted by artist's name audio source folder. Movement within the folder is done by pressing the func- Albums - Sorted by album name tion key for the folder. -
Page 35: Select Audio Source
First and foremost, pay attention to the safety instructions » page 7, Impor- Select audio source tant notes. The device allows you to play audio files in various formats and to connect dif- ferent source types » page For an audio source with a memory split into several areas, only the memory areas of the supported formats can be read »... -
Page 36: Bluetooth Player
If the main and the additional telephones » page 40are connected to the de- Inserting an SD memory card › vice the audio source appears after selection BT Audio a menu for selecting Push the SD memory card into the available slot with the cut edge upwards ®... -
Page 37: Usb Input
Charge USB audio source USB input With the ignition on after connecting the USB audio source, the charging proc- ess is automatically started (applies for audio sources where charging via the Fig. 20 USB connector is possible). USB and AUX inputs The charging efficiency can be different compared to the charging from the usual mains power supply. -
Page 38: Supported Audio Source And File Formats
Disconnect AUX audio source Supported file formats › Disconnect the connector of the audio source. Maximum Codec type Max bit Multi- After disconnecting the AUX audio source is no automatic change to another File suffix sampling Playlists (File formats) rate channel audio source takes place. -
Page 39: Pictures
Note Pictures We recommend that you use class 4 SD memory cards and higher. This guar- ■ antees the fastest possible access to the audio files. Image viewer For a good playback, we recommend using files with a smaller degree of ■... - Page 40 Function keys of the menu Images Operation Action Select the source image files Maximum zoom Double finger tap on the screen Select the image file or folder from the list Double tap on the screen again Return to the original repre- Display the previous image file ...
-
Page 41: Communication
■ Display time: - Set the display time for the slideshow Communication ■ 10 s ■ Telephone ■ 15 s 30 s ■ Introduction Repeat slide show - Switching on/off the picture presentation - repeat ■ This chapter contains information on the following subjects: Telephone Main / additional phone ®... - Page 42 WARNING (Continued) Telephone Never leave a telephone in the deployment area of an airbag, on a seat, ■ on the dash panel or in another area, from which it can be thrown during a Fig. 22 sudden braking manoeuvre, an accident or a collision - there is a risk of in- Telephone: Main menu jury.
- Page 43 Symbols on the screen The name of the device connected to the telephone as a main telephone is displayed in the function key » Fig. 22 on page 39. Symbol Meaning Additional telephone Charge status of the telephone battery The additional telephone provides you with the opportunity to accept or reject Signal strength of the mobile wireless connection ...
- Page 44 › Hands-free telephone (HFP) - Devices that support the connection via the ■ Hands-free- Enabling and disabling hands-free system (during a call, the call HFP profile is switched to the telephone) › Bluetooth audio (A2DP) - Devices that support the connection via the au- Select telephone - Search for available telephones/list of paired telephones/ ■...
-
Page 45: Pair
If there are problems with the availability of the mobile network or with the Pair ® Bluetooth function, one of the following messages may appear on the device display screen. Introduction Message Meaning This chapter contains information on the following subjects: The telephone scans for available conditions for coupling Netw. - Page 46 ŠKODA website www.infotain- In the device screen the message Choose whether you would like to replace ment.skoda-auto.com. the main telephone … or whether you would like to add … as an additional telephone. along with the following menu.
- Page 47 Select the device in the list of devices Addition. tel. - Replacement of the additional telephone The device is displayed in the telephone to be connected to as SKODA BT ..If you have a telephone, which is connected to the device via the Bluetooth ®...
-
Page 48: Connection
› › Confirm the coupling » page 45, Pairing confirmation from the telephone. Enter the 4 - 16 digit PIN code into the device. › Enter the PIN code shown on the device display into the telephone within 30 After successful connection, the menu Telephone appears »... - Page 49 › Check that the conditions for a successful pairing and the connection of the Select the telephone you want from the list of paired telephones or if the de- telephone to the device is possible » page 43, conditions for coupling. sired telephone from the list does not exist, press the function key Find tele- phone.
-
Page 50: Dial Telephone Number
Disconnection Direct entry of the telephone The connection of a telephone to the device can be disconnected in one of the Fig. 24 following ways. Direct entry of a telephone num- › By removing the ignition key (or turning off the ignition and opening the driv- er's door in the case of vehicles with the starter button). -
Page 51: List Of Telephone Contacts
› Press the function key , connection starts. The breakdown and info numbers are set country-specific at the factory. If you › Press the function key - connection starts with the area code. want to change the preset numbers, then consult a ŠKODA service partner. Search for a contact in the list List of telephone contacts The input screen... -
Page 52: Speed Dialling A Telephone Number
› Read out contact name - Reads the contact name using the device gener- If an error occurs while loading the list, the following message appears: Import ated voice failed. Please try again and check whether the BT device … allows connec- ›... -
Page 53: Telephone Functions
› The selected telephone number is assigned to a function key for speed dial- Press in the menu Telephone function key . ling. The system displays a call list. Selecting a stored speed dial Description of the function keys ›... -
Page 54: Text Messages (Sms)
Incoming call Conference This feature is supported by the main telephone and the additional telephone. The conference is a shared call with between three and six participants. During an incoming call, the device screen shows the telephone number or contact name. And the following functions can be selected. Start a conference/invite additional participants ›... -
Page 55: Press In The Menu Telephone Function Key
First and foremost, pay attention to the safety instructions » page 7, Impor- Deleted- Open a list of deleted messages tant notes. Open a list for quick answer provided short messages (called templates) The device provides the ability to display and send text messages, if your tele- New text message ®... -
Page 56: Entering A Phone Number
A message can have a max. of 70 characters including empty spaces. If more Display the contact list with the possibility to add further recipients for the characters are entered the text is split into multiple messages. The max. num- text message by means of the “Checkbox ”add / remove ber of characters is 440. -
Page 57: Mirrorlink
Transport and practical equipment. used as a USB audio source Media menu. ™ The list of available facilities and applications, which support the MirrorLink ■ function, can be seed in the ŠKODA Internet pages www.infotainment.skoda- CAUTION auto.com. ™ MirrorLink Applications that use a mobile data connection, are dependent ■... - Page 58 Display function keys on the right side Operation Display of the function keys in the bottom of the screen Masking the function keys In area various function keys are shown, depending on the connected de- vice. Example of displayed keys Open a menu with applications for the attached device ...
- Page 59 Examples of warning messages Message Meaning Connect to the USB input of a facility No USB connection found. Please es- ™ which supports the MirrorLink func- tablish a connection using "Connect". tion and make the connection. The app is unavailable while the ve- The application is only available when hicle is in motion.
-
Page 60: Navigation
For more information on updating the data, please visit the ŠKODA website guidance. The satellite signal allows you to determine your current vehicle po- www.infotainment.skoda-auto.com or contact a ŠKODA Partner. sition. The version of the navigation data for maps can be found in the navigation Outside the range of the GPS satellite signal (e.g. -
Page 61: Main Menu
Main menu Map display Fig. 31 Fig. 32 Main menu Navigation Read and observe on page 57 first. Read and observe on page 57 first. › Press the button. The map display can be operated by using function keys, by finger touching ... -
Page 62: Map Orientation
If no scale change occurs then above the scale function key the symbol with Turn on / off the automatic scale mediated elevation appears. fast map manual scale Map Orientation The manual scale is turned on when the function key and the symbol ... -
Page 63: Options For Map Display
Options for map display Split screen Fig. 33 Map options Read and observe on page 57 first. Fig. 34 Split screen / menus in the split screen Switch between different navigation map display modes depending on the Read and observe on page 57 first. -
Page 64: Settings
Traffic signs Main menu settings The device offers the possibility to display the road signs in the information › display and the device screen of the data stored in the navigation information Press in the menu Navigation function key . of the map data. - Page 65 ■ Avoid ferries and motorail trains - Switch use of ferries and motorail Navigation announcements trains on/off › Avoid toll roads - Switch on/off use of toll roads Press in the menu Navigation function key → Navigation announce- ■...
-
Page 66: Route Guidance
■ Delete user data - Selection of data to be deleted (by pressing the function route guidance key Delete the list of selected menu item is deleted) Last destinations - Delete the last destinations ■ Enter new destination ■ Dest. memory - Delete the stored destinations Tour memory - Deletes the stored tours ■... - Page 67 More options for calling the destination entry menu House number entry › Press in the menu Navigation function key Route → New dest. / stopover By pressing the function key House number the following menu » Fig. 36 → Options . opened for the house number entry.
- Page 68 After entering the destination check whether the entered destination is cor- Drag the desired destination to the centre of the crosshair on the map with rect, for example by pressing the function key » Fig. 36 and viewing on the your finger.
-
Page 69: Destination Entry By Means Of Saved Destinations
Favourites - Saved favourite destinations » page 75, Destination de- Destination entry by means of saved destinations tails Contacts- a telephone contact containing an address » page 48, List of Introduction telephone contacts This chapter contains information on the following subjects: By pressing one of the menu points of dests. -
Page 70: Poi
For more information on creating and importing your custom destination see Area - select a search area » page 68 the ŠKODA Web pageswww.infotainment.skoda-auto.com . Menu with context-sensitive search areas » page 68 Find category - POI search by category »... - Page 71 » page 62, Map. Search and selecting a POI For more information on creating and loading custom POIs refer to the ŠKODA Web pages www.infotainment.skoda-auto.com. The POIs are searched for in the selected search area » page 68, Search area for POI.
-
Page 72: Poi Categories
Attractions and leisure Motorway services Car parks Other destinations shown on the map Car rental Skoda dealers First and foremost, pay attention to the safety instructions » page 7, Impor- Skoda service Ferries and motorail trains ... -
Page 73: Route Guidance
Companies and public institutions Other destinations shown on the map Sym- Sym- Meaning Symbol Meaning Meaning Symbol Meaning Banks Community centres Home address Favourite Places of worship Companies Destination Stopover destination Cemeteries Convention centres City centre Town centre... - Page 74 The route is recalculated each time if you ignore driving recommendations or Graphical driving recommendations change the route. This process takes only a few seconds. Nav. announcements can only then be re-transmitted. If Demo mode is switched on » page 62, a prompt appears asking whether you want the guidance to start in demo mode or normal mode.
-
Page 75: Traffic Information (Tmc)
The navigation announcements can be repeated by pressing the right control- Traffic Information (TMC) » Fig. 1 on page 7. Introduction The timing of the navigation announcement depends on the type of road and the driving speed. For example, on motorways the first announcement is heard This chapter contains information on the following subjects: about 2000 m (6000 ft) before the location of the motorway exit. -
Page 76: My Tour
■ An information line, on how current the information is and on the provider Dynamic route switch on / off of the message. › Press in the menu Navigation function key → Route options → Dynamic Symbol that specifies the type of information. ■... -
Page 77: Destination Management
A route can contain a maximum of twenty stopovers. With destinations on the route already reached the text Destination reached is displayed below the destination name. It is not possible to switch these des- The individual destinations can be mutually replaced by touching the function tinations with each another. - Page 78 ■ Cancel - the stopover destination input and the destination guidance to the The destination information is displayed in the destination details. › original destination is continued preview map with indication of the destination by means of the symbol ›...
- Page 79 In the POI details, individual POIs can be shown from the POIs found by press- ing the function key / or by finger motion across the screen. A destination / favourite stored in the destination storage The following menu is shown by pressing the function key if this destination is in the destination memory or the favourites list.
-
Page 80: Index
Control lever Device Index connect to the telephone Coupled device Disconnection connected to a telephone Pair with your telephone connected to two telephones Abort route guidance more options of the telephone search Device language Additional keyboard languages Couple device Device menu no telephone connected Radio Additional telephone... - Page 81 Favourite Operation Phone File formats keyboard Radio Media Keyboard Media File Formats Audio source Pictures Flagged destination Bluetooth Audio Language characters Browser List Settings File formats of available stations Frequency range Foreword of telephone contacts See main menu List With folder / track list Fuel options Main menu List of saved destinations...
- Page 82 Multimedia Options for map display personal POIs Pair device Multimedia database Pairing confirmation POI categories Mute Pair the telephone POI entry My Destinations with your device Preface My tour Route Phone new tour Route calculation Multifunction steering wheel Tour editing Route display Voice control Tour memory...
- Page 83 Select frequency range Split screen See main menu Audio Radio Compass Select radio station DAB settings Manoeuvre 60, 71 See main menu FM - settings Menus Select source Frequency range on / off Images List of available stations Road sign Media Main menu Satellite data...
- Page 84 Disconnection Traffic information (TMC) Enter telephone number Information Function problems Requirements Functions Traffic programme (TP) Info service Traffic reports (TMC) Main menu Operation Main telephone Traffic signs Operation Turning off the device Pairing confirmation Turning on the device Settings Speed dialling a telephone number Telephone Unit menus Telephone book...
- Page 85 Index...
- Page 86 Index...
- Page 87 Reprinting, reproduction, translation, or any other use, either in whole or in Issued by: ŠKODA AUTO a.s. part, is not permitted without the written consent of ŠKODA AUTO a.s. © ŠKODA AUTO a.s. 2014 ŠKODA AUTO a.s. expressly reserves all rights relating to copyright laws. Subject to change.
- Page 88 Amundsen: Yeti Infotainment anglicky 11.2014 S90.5614.02.20 5L0012720DA 5L0012720DA...
Need help?
Do you have a question about the Infotainment Navigation Amundsen and is the answer not in the manual?
Questions and answers