Sierra Wireless Airlink GX400 Hardware User's Manual
Gx series
Hide thumbs
Also See for Airlink GX400:
- User manual (48 pages) ,
- Installation manual (6 pages) ,
- Hardware user's manual (72 pages)
Table of Contents
Advertisement
Quick Links
Advertisement
Table of Contents

Related Manuals for Sierra Wireless Airlink GX400


Summary of Contents for Sierra Wireless Airlink GX400
- Page 1 AirLink GX Series Hardware User Guide 4114008 Rev 3...
- Page 3 Notice totally lost. Although significant delays or losses of data are rare when wireless devices such as the Sierra Wireless modem are used in a normal manner with a well-constructed network, the Sierra Wireless modem should not be used in...
-
Page 4: Contact Information
® product includes technology licensed from QUALCOMM . This product is manufactured or sold by Sierra Wireless Inc. or its affiliates under one or more patents licensed from InterDigital Group and MMP Portfolio Licensing. Copyright © 2014 Sierra Wireless. All rights reserved. -
Page 5: Table Of Contents
Contents Introduction to the AirLink GX Series ....... .7 Introduction........... 7 Description . - Page 6 EU (AirLink GX400 Only) ........
-
Page 7: Introduction To The Airlink Gx Series
1: Introduction to the AirLink GX Series This chapter describes the Sierra Wireless AirLink GX Series device, including a description of ALEOS embedded software and the AirVantage Management Service (AVMS) device management platform. Introduction The AirLink GX Series device is a compact, intelligent and fully-... -
Page 8: Description
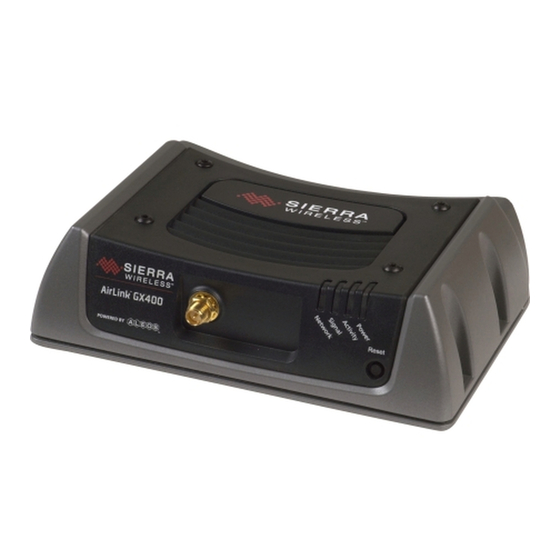
AirLink GX Series User Guide Description Front Panel The front panel has the following indicators and controls: LEDs Reset Button Figure 1-1: GX Series Front Panel • LEDs – These show the device’s operating status. Each LED can be red, green, yellow or off. - Page 9 GPS Antenna Connector – This connects an optional GPS antenna to the device. It works with most antennas that have an SMA connector. Note: The GPS antenna connector has a bias output and Sierra Wireless recommends that you use an active antenna for better sensitivity.
-
Page 10: X-Cards
ALEOS Software Note: For detailed information on all of the features in ALEOS, refer to the ALEOS Software Configuration User Guide. It is available for downloading from the Sierra Wireless web site. ALEOS, the embedded core technology of the AirLink product line provides: •... -
Page 11: Acemanager
Introduction to the AirLink GX Series Download the applications and user guides from the Sierra Wireless AirLink Solutions web site at www.sierrawireless.com/support. ACEmanager ACEmanager: • Simplifies deployment • Provides extensive monitoring, control and management capabilities • Configures your device to meet your needs •... -
Page 12: Airvantage Management Service
AirVantage Management Service AirLink devices can be managed with the AirVantage Management Service (AVMS) available from Sierra Wireless. AVMS is a cloud-based application, accessed from your web browser, that provides remote monitoring and configuration for any number of AirLink ALEOS devices from a single computer. -
Page 13: Installation And Startup
2: Installation and Startup This chapter shows you how to connect, install and start the Sierra Wireless AirLink GX Series device. It also describes the front panel LEDs. Also described are the optional X-Cards available from Sierra Wireless that add more functions to the basic device. Tools and Materials Required •... -
Page 14: Installing The Sim Card
AirLink GX Series User Guide Installing the SIM Card All GX Series devices except the GX400 for Sprint and Verizon networks require a SIM card. If the SIM card has not already been installed by your Mobile Network Operator, install the SIM card before installing or connecting any external equipment or power to the AirLink device. -
Page 15: Installing The Sim Card-No X-Card Present
Installation and Startup Installing the SIM Card—No X-Card present 1) Remove the four screws attaching the cover. Save the screws for reinstallation. 2) Remove the cover. 3) Slide the SIM card into the SIM card holder. Note the direction of notched corner of SIM card for proper alignment. -
Page 16: Installing The Sim Card-Wi-Fi X-Card Present
AirLink GX Series User Guide Installing the SIM Card—Wi-Fi X-Card present Important: Failure to follow these instructions carefully may damage the X-Card and void the warranty agreement. To install a SIM card in a GX Series device with a Wi-Fi X-Card installed: 1. - Page 17 Installation and Startup Wi-Fi SMA antenna Figure 2-3: Tilting the cover (Wi-Fi X-Card installed) 4. Continue to slide the cover horizontally until it clears the SMA antenna connector. Figure 2-4: Removing the cover (Wi-Fi X-Card installed) 5. Lift the cover to remove it completely. Save the cover. It is used later. 6.
- Page 18 AirLink GX Series User Guide Note the direction of notched black gasket corner of SIM card for proper alignment. Figure 2-5: Inserting the SIM card (Wi-Fi X-Card installed) 7. Ensure the black gasket is in place at the base of the SMA antenna connector.
-
Page 19: Installing The Sim Card-I/O X-Card Present
Installation and Startup SMA antenna connector lock washer hexagonal nut Figure 2-6: Replacing the screws, nut, and washer (Wi-Fi X-Card installed) 10. Place the lock washer onto the SMA antenna connector and move it to the back of the connector, so it is touching the decorative black cover. 11. - Page 20 AirLink GX Series User Guide hexagonal threaded standoffs (jack screws) Figure 2-7: Removing the screws and threaded standoffs (I/O X-Card installed) 3. Gently tilt up the back of the decorative black cover and then move the cover forward so that it slides over the serial port. Figure 2-8: Tilting the cover (I/O X-Card installed) 4.
- Page 21 Installation and Startup Figure 2-9: Removing the cover (I/O X-Card installed) 5. Lift the cover to remove it completely. Save the cover. It is used again. 6. Insert the SIM card, with the gold contacts facing down and the notch on the right side, as shown in the following illustration.
-
Page 22: Installing The Sim Card-Dual Ethernet X-Card Present
AirLink GX Series User Guide tight so that the seal underneath the decorative black cover is tight against the device. 9. Re-install the screw nuts you saved in step 1 to either side of the serial port. (Finger tight is sufficient.) Note: The screw nuts must be re-installed to maintain the IP rating for the AirLink device. - Page 23 Installation and Startup Figure 2-12: Removing the screws (Dual Ethernet X-Card installed) 2. Gently tilt up the back of the decorative black cover and then move the cover forward so that it slides over the Ethernet ports, being careful not to damage the rubber gasket.
- Page 24 AirLink GX Series User Guide Figure 2-14: Removing the cover (Dual Ethernet X-Card installed) 4. Lift the cover to remove it completely. Save the cover. It is used again. 5. Insert the SIM card, with the gold contacts facing down and the notch on the right side, as shown in the following illustration.
-
Page 25: Mounting The Gx Series
Installation and Startup 7. Use the 4 screws saved in step 1 to re-attach the decorative black cover. Torque the screws to 5 in-lb. (0.6 N-m). Ensure that the screws are tight so that the seal underneath the decorative black cover is tight against the device. black gasket around the Ethernet ports Figure 2-16: Replacing the screws (Dual Ethernet X-Card installed) -
Page 26: Vehicle Mounting
AirLink GX Series User Guide Note: Sierra Wireless recommends that the device’s case or the mounting bracket be connected to ground, which can be the battery or power source negative terminal. This provides protection from electrostatic discharges. Do this by connecting a grounding strap under one of the mounting screws. -
Page 27: Antenna Separation Recommendations
Installation and Startup Antenna Separation Recommendations • The antennas should be separated so that there is at least 10dB isolation over the entire operating frequency range. • The separation should be at least 1/4 wavelength (), but preferably 1/2 wavelength or greater of the lowest operating frequency. See Table 2-1 specific recommendations, based on your network service type and frequency. -
Page 28: Antenna Recommendations
AirLink GX Series User Guide Table 2-2: Separation Examples for Specific Mobile Network Operator Bands Service Band Mobile Network Country Wavelength ( Best Antenna Good Antenna Operator Frequency (mm) Separation (mm) Separation (mm) (MHz) (1/2 (1/4 Verizon 401.8665657 AT&T 425.8415597 Bell/Rogers/Telus... -
Page 29: Mounting The Gps Antenna
Installation and Startup Mounting the GPS Antenna Mount the antenna where it has a good view of the sky such as on the roof, the ⁰ dashboard or the rear panel. It should see at least 90 of the sky. Cellular antenna GPS antenna AirLink GX device... -
Page 30: Starting The Gx Series Device
AirLink GX Series User Guide Starting the GX Series Device Upon receiving power, the device automatically starts as indicated by the flashing LEDs. If it does not turn on, see that the: • Power connector is plugged in • Power cable is connected to power (line or battery power) •... -
Page 31: Led Operation
Installation and Startup The ACEmanager homepage appears. Figure 2-20: ACEmanager Homepage 4. Check the Network State field. If you see “No SIM or Unexpected SIM Status” the SIM card may be missing or installed incorrectly. For information on other network states, refer to the ALEOS Software Configuration User Guide. LED Operation Power-up and Reboot On power-up or reboot, all LEDs turn red, then yellow, then green. -
Page 32: Led Behavior
AirLink GX Series User Guide LED Behavior Table 2-3: LED Behavior Color / Pattern Description ≥ ≤ Power No power or input voltage 36VDC or 9VDC Solid Green Device is connected to nominal power and is operating normally. Flashing Yellow / Green Device has a GPS fix Solid Yellow Device is entering low power mode or system low level boot. -
Page 33: Power Connector Description
This section has information to help you plan your device’s connection and configuration. The connector’s pin diagram is shown below. It also shows the colors of the wires used on the DC power cable you can order from Sierra Wireless. Rev 3 Oct.14... - Page 34 (9 36VDC). If one is not present, the device will not turn on. If you are using a Sierra Wireless AC cable, the connection is inside the cable. There are several typical connection options for this pin: Option 1—If you want the device turned on and off when the engine is...
- Page 35 Option 5—If you have an installation where the device uses line power such as in a store or a remote site where power saving isn’t needed: · Use the Sierra Wireless AC adapter or connect pin 3 to pin 1 · In ACEmanager, disable the Low Power Mode. (Default setting is disabled) The device is on for as long as the power is on.
- Page 36 AirLink GX Series User Guide It has a maximum rating of 30V and 50mA sink current. The pin is user programmed. For information on configuring Pin 4 (Digital Input/Relay Output 1 in ACEmanager) refer to the ALEOS Software Configuration User Guide. One way to use pin 4 is with events reporting.
-
Page 37: Serial Port
Note: Some solenoids/relays include a flyback diode built into the unit. For those that do not, Sierra Wireless recommends a flyback diode with a voltage rating at least double the relay voltage and a current rating at least double the relay ON current to avoid damage to the GX input. -
Page 38: X-Cards
(X-Cards) available to add more functions to the basic device. They are configurable with ACEmanager and more information is available in the ALEOS Software Configuration User Guide, which is available for downloading from the Sierra Wireless web site. The available X-Cards are: •... -
Page 39: I/O X-Card
Installation and Startup See the ALEOS Software Configuration User Guide for details on Wi-Fi set up and use. I/O X-Card This card uses a 15-pin connector to add to the basic device: • One additional RS-232 communication port • Four additional digital I/O pins •... - Page 40 AirLink GX Series User Guide Table 2-5: I/O 15-Pin Connector Pin Description Name Description Wire color (on optional I/ O X-Card breakout cable) AIN[2] Analog Input 2 Green AIN[4] Analog Input 4 Reserved for future use Black Ground White DIO[3] Digital I/O 3 Orange DIO[5]...
- Page 41 Installation and Startup AirLink GX device 2.8 V 51 k internal Contact closed pull up Digital 0 0 VDC to 1.2 VDC Contact Contact open I/O Circuit Digital 1 2.2 VDC to 30 VDC Ground Examples: Door opening/closing, valve opening/closing, ignition on/off, tow bar up/down, empty/full container.
- Page 42 AirLink GX Series User Guide I/O X-Card Digital I/O Input Pins Pins 3, 4, 11 and 12 are programmed in ACEmanager to monitor inputs, respond to certain types of events or trigger a digital output. They behave exactly like the Digital I/O (pin 4) on the power connector as described in Power Connector Description...
-
Page 43: Dual Ethernet X-Card
Installation and Startup AirLink device configured in ACEmanager to send an email when storage tank is Level Full Storage tank almost empty (5 V on pin) Sensor output level sensor voltage = 20 V Analog voltage input Storage available on connector Tank pins 7, 8, 14, 15 Note: Pins have a maximum rating... - Page 44 AirLink GX Series User Guide For example, the Ethernet ports on the Dual Ethernet X-Card are ideal for applications that run on IP or other protocols that run on top of IP such as TCP and UDP. Other suggested applications include: •...
-
Page 45: Configuring Airlink Gx Series Devices
Note: For all of the configurable features available in ALEOS, refer to the ALEOS Software Configuration User Guide. It is available for downloading from the Sierra Wireless support web site. AirLink devices are highly configurable when using the embedded ALEOS software. ACEmanager is a free utility included with every AirLink device. -
Page 46: Configuring With Airvantage Management Service
Configuring with AirVantage Management Service AirLink devices can be configured with the AirVantage Management Service (AVMS) from Sierra Wireless. AVMS is a cloud-based application, available from your web browser, that provides remote monitoring and configuration for any number of your AirLink ALEOS devices. -
Page 47: Configuring With At Commands
Configuring AirLink GX Series devices The AirVantage start page appears. You can now manage your device through AirVantage. Figure 3-2: AirVantage Start Page Configuring with AT Commands The device can be commanded and configured with AT commands. All the commands are listed in the ALEOS Software Configuration User Guide. In ACEmanager, mouse over a red AT to the left of a listing to see a popup showing the AT command for that item. - Page 48 AirLink GX Series User Guide Note: This configuration uses an AirLink GX Series device with a Wi-Fi X-Card installed. In Wi-Fi Client mode with automatic switchover, the GX device uses Wi-Fi whenever it is in range of a configured AP. When the GX device is out of range of a configured AP, it switches to using the Mobile Network Operator’s (MNO’s) mobile broadband network.
- Page 49 Configuring AirLink GX Series devices broadband network to the AP. If more than one configured AP is available, the GX device connects to the AP with the strongest signal. If the AP has a landing page that requires entering credentials, the GX device may not be able to transmit or receive traffic via the AP, as the GX device is not able to pass credentials to the landing page.
- Page 50 AirLink GX Series User Guide 4114008...
-
Page 51: Airlink Gx Series Specifications
4: AirLink GX Series Specifications 4G LTE Models (GX 440) • LTE/EV-DO (Verizon Wireless) LTE Band 13 with fallback to EV-DO Rev A 800/1900 MHz • LTE/HSPA+ (AT&T, Canada) LTE Band 17/AWS with fallback to HSPA+ 850/1900/2100 MHz 3G Models (GX 400) •... -
Page 52: Device Management
AirLink GX Series User Guide · Email · SNMP trap · Relay output · GPS RAP report · Events protocol message to server VPN/Security • IPsec, SSL, and GRE VPN client • Up to 5 VPN tunnels • IKE encryption •... -
Page 53: Power Consumption
AirLink GX Series Specifications Power Consumption Table 4-1: GX Series device power consumption (without X-Card) AirLink GX400 / 440 (no X-Card installed) Maximum current draw at 12V Typical current draw at 12V 0.45 A Low Power Mode current draw at 12V... - Page 54 AirLink GX Series User Guide • When used as a client, can connect to one of up to 10 configured access points. • Security: · WEP 64-bit and 128-bit encryption with H/W TKIP processing · WPA/WPA2 (Wi-Fi Protected Access) · AES-CCMP hardware implementation as part of 802.11i security •...
- Page 55 AirLink GX Series Specifications Dual Ethernet X-Card • 2 configurable RJ-45 Ethernet ports • LEDs · Link: 100Base-T=green / 10Base-T= off. · Activity: yellow • Physical Layer Support: 10Base-T 100Base-T • Auto Negotiation: 10Base-T, 100Base-T, Half and Full duplex • Standards: IEEE 802.3 / 802.3u •...
-
Page 56: Mechanical Specifications
AirLink GX Series User Guide Mechanical Specifications Weight: 397g (14 oz) 98.3 mm (3.8 in) 40.5 mm (1.6 in) 142.0 mm (5.6 in) Figure 4-1: AirLink GX Series Mechanical Specifications (Standard Device Shown) The locking power connector housing and the internal wire connector that fits it are: •... -
Page 57: Ac Power Adapter Specifications
AirLink GX Series Specifications AC Power Adapter Specifications This section describes the specifications for the AC power adapter that comes with the GX Series devices. AC Power Adapter Input The input voltage range is 90 VAC to 264 VAC. Minimum Typical Maximum Input Voltage... - Page 58 AirLink GX Series User Guide Safety Standards The power supply is certified with the following international regulatory standards: Regulatory Country or Certified Standard Agency Region Approved UL60950-1 Europe Approved EN60950-1 Europe Approved EN60950-1 Australia Approved AS/NZS 60950 China Approved GB4943 Canada Approved CSA C22.2 NO.60950-1...
-
Page 59: Regulatory Information
2. This device must accept any interference. Warning: Changes or modifications to this device not expressly approved by Sierra Wireless could void the user's authority to operate this equipment. Notice for Canadian Users This Class A digital apparatus complies with ICES-003. -
Page 60: Important Information For North American Users On Radiation Exposure
AirLink GX Series User Guide Industry Canada Notice This Class A device complies with ICES-003 and RSS-210 of the Industry Canada rules. Operation is subject to the following two conditions: 1. This device may not cause harmful interference, and 2. This device must accept any interference received, including interference that may cause undesired operation of the device. - Page 61 Regulatory Information Pour se conformer aux normes FCC/IC réglementation limitée à la fois la puissance maximale de sortie RF et l'exposition humaine aux rayonnements RF, gain d'antenne maximal ne doit pas dépasser les valeurs indiquées dans les tableaux de la section de gain d'antenne maximal. Avertissement : Une distance minimale de 20 cm doit être maintenue entre l'antenne (s) utilisées pour cet émetteur et l'ensemble du personnel.
-
Page 62: Eu (Airlink Gx400 Only)
European community. The alert symbol indicates that usage restrictions apply. The AirLink GX400 is compliant with the RF exposure requirements at 20 cm separation distance specified in EN 62311:2008 and 1999/519/EC for mobile exposure conditions, provided the maximum antenna gain does not exceed the limits given in the table below. - Page 63 Regulatory Information WEEE Notice If you purchased your AirLink GX series in Europe, please return it to your dealer supplier at the end of its life. WEEE products may be recognized by their wheeled bin label on the product label. Rev 3 Oct.14...
- Page 64 AirLink GX Series User Guide 4114008...
-
Page 65: Index
Index ACEmanager, configuring device with, 45 Default AirVantage, AVMS, 12 settings for device, reset to, 8 ALEOS user name and password, 30 default user name and password, 30 Digital I/O pins on X-Card, 39 description of, 10 Diversity/AUX Antenna Connector, 9 X-Card installed, 38 Analog input voltage sensing... - Page 66 AirLink GX Series User Guide Power USB port battery connection, 34 on front panel, 9 connector, measuring external voltages, 35 uses of, installing drivers for, 45 qualified voltage for device turn on/off, 34 User name and password, default, 30 stop draining battery when engine off, 34 connector, 34 Receive port,...
Need help?
Do you have a question about the Airlink GX400 and is the answer not in the manual?
Questions and answers