
Related Manuals for Mindray datascope duo


Summary of Contents for Mindray datascope duo
- Page 1 O p e r a t i n g I n s t r u c t i o n s 0070-01-0603-02_revB_Duo ops color.indd 1 3/10/10 5:17:36 PM...
- Page 2 O p e r a t i n g I n s t r u c t i o n s...
- Page 3 U.S. registered trademarks of Nellcor Puritan Bennett Inc. © Copyright Mindray DS USA, Inc., 2008. All rights reserved. Contents of this publication may not be reproduced in any form without permission of Mindray DS USA, Inc. 0070-10-0603-01 Duo™ Operating Instructions...
-
Page 4: Table Of Contents
Table of Contents Foreword ............................... iii Warnings, Precautions And Notes ........................iii Warnings ..............................iv Precautions ..............................v Notes ................................viii Indication for Use ............................viii Unpacking ..............................viii Symbols................................. ix General Product Description....................1 - 1 Overview............................... 1 - 1 Controls and Indicators............................ - Page 5 Table of Contents Systolic Pressure Measurement ........................5 - 4 Diastolic Pressure Measurement......................... 5 - 4 Static Pressure Measurement ........................5 - 4 Pulse Rate from NIBP..........................5 - 5 NIBP Sub-System Functional Requirements ....................5 - 5 Performance Requirements....................... 5 - 6 Power Supply............................
-
Page 6: Foreword
Foreword Introduction Foreword The Duo Operating Instructions are intended to provide information for proper operation. General knowledge of monitoring and an understanding of the features and the functions of the Duo Monitor are prerequisites for proper use. Do not operate this monitor before reading these instructions. Information for servicing this instrument is contained in the Duo Monitor Service Manual, (Part Number 0070-00-0604-02). -
Page 7: Warnings
Introduction Warnings Warnings WARNING: The Duo monitor is not intended for unsupervised, continuous monitoring. It is for spot-check use only. WARNING: Maintain extreme caution when a defibrillator is in use, avoiding contact with any part of the patient, table or monitor. -
Page 8: Precautions
The use of portable and mobile RF communications equipment, in the proximity of the Duo, can affect the performance of this monitor. CAUTION: Use only Mindray DS accessories with this product. For a comprehensive listing of Duo Accessories refer to section 4.0, “Accessories.” CAUTION: The patient size selection should be matched to the actual patient before monitoring begins. - Page 9 When equipped with Nellcor SpO , use only Nellcor oxygen sensors and cables. Use of other oxygen sensors may cause improper oximeter performance. CAUTION: Use only Mindray DS blood pressure cuffs and hoses with the Duo. 0070-10-0603-01 Duo™ Operating Instructions...
- Page 10 Precautions Introduction CAUTION: A patient's skin is sometimes fragile (i.e., on pediatric and geriatric patients, or due to physiological conditions). In these cases, a longer duration between NIBP measurements should be considered to decrease the number of cuff inflations over a period of time. In extreme cases, a thin layer of soft roll or cotton padding may be applied to the limb in order to cushion the skin when the cuff is inflated.
-
Page 11: Notes
Introduction Notes Notes NOTE: Potential hazards due to errors in software or hardware have been minimized by actions taken in accordance with IEC 60601-1-4. NOTE: Information codes and error codes with corresponding explanations are provided to assist in the identification and correction of problems that may occur with the monitor. -
Page 12: Symbols
Symbols Introduction Symbols SYMBOL DESCRIPTION SYMBOL DESCRIPTION Attention, Consult Accompanying Documents / Type BF Equipment Refer to Manual Defibrillator Proof Type BF Dangerous Voltage Equipment Equipotentiality Battery Charging Alternating Current (AC) NIBP ON/OFF (only for a part Data Input/Output of the equipment) Patient Size Clear/Next Patient (Adult/Pediatric) - Page 13 Introduction Symbols This page intentionally left blank. 0070-10-0603-01 Duo™ Operating Instructions...
-
Page 14: General Product Description
General Product Description Overview The Duo is an NIBP spot-check monitor that is intended for use in health care settings on adult and pediatric patients requiring immediate and constant clinical supervision. Its design facilitates rapid, accurate NIBP measurement. The parameters that can be monitored with the Duo are: Non-Invasive Blood Pressure, Pulse Rate and SpO (Optional). -
Page 15: Controls And Indicators
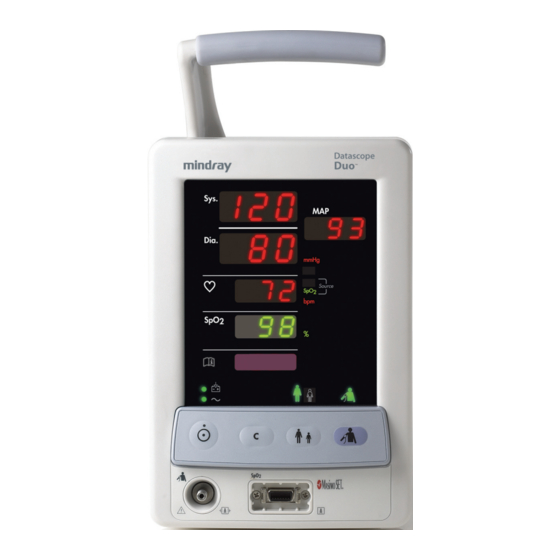
Controls and Indicators General Product Description Controls and Indicators 1.2.1 Front Panel The Duo front panel is the main user interface, providing the digital LED display, keypad, and connector panel. Sys. Dia. NIBP Source SpO 2 S pO FIGURE 1-1 Front Panel 1. - Page 16 General Product Description Controls and Indicators Parameter Tiles The parameter tiles (shown in FIGURE 1-2) display the readings for the monitored parameters and also display information codes and error codes. When there is no measurement being determined and no code condition exists for a particular parameter, its associated tile will be blank.
- Page 17 Controls and Indicators General Product Description LED Indicators LED indicators (shown in FIGURE 1-3) illuminate green and are used to indicate the current status of the following: Battery Charging, AC Power, Patient Size and the NIBP function. FIGURE 1-3 LED Indicators a.
- Page 18 General Product Description Controls and Indicators 2. Keypad The Duo keypad (shown in FIGURE 1-4) is used to initiate all functions. To confirm that a key has been successfully activated, two forms of feedback are provided. Manual feedback is provided in the form of a “click” that can be felt under the fingertip. Audible feedback is provided in the form of a single beep tone when the operation associated with that key is executed.
- Page 19 Controls and Indicators General Product Description 3. Connector Panel FIGURE 1-5 Connector Panel a. NIBP Pneumatic Fitting • This Rectus*, Quick-Connect pneumatic fitting is used to attach the NIBP hose to the Duo. b. SpO Receptacle (optional) • This receptacle is used to attach the SpO sensor to the Duo.
-
Page 20: Rear Panel
General Product Description Controls and Indicators 1.2.2 Rear Panel The rear panel provides a general information label, a serial port, an equipotential lug, an AC receptacle and a mounting alignment slot. V 100 - 240~ IEC 601-1:1988 CSA - C22.2 No. 601.1 - M90 0.7 - 0.4 UL 2601-1:1997 Hz 60 / 50... -
Page 21: Bottom Panel
Controls and Indicators General Product Description 1.2.3 Bottom Panel The battery compartment and the mounting nut for the optional rolling stand are located on the bottom panel as shown in FIGURE 1-7. FIGURE 1-7 Bottom Panel a. Mounting Nut • The mounting nut secures the Duo to the optional rolling stand. b. -
Page 22: Operation
Operation Modes of Operation The Duo functions in the following four (4) operating modes: • Normal Monitoring Mode • Standby Mode • Auto Shutoff Mode • Maintenance Mode 2.1.1 Normal Monitoring Mode The Normal Monitoring Mode is the mode from which all monitoring functions are initiated during routine operation of the Duo. -
Page 23: Auto Shutoff Mode
Modes of Operation Operation When any of the events listed in the following table occur, an internal Standby Mode counter is reset to zero and started. The Duo enters Standby Mode after a preset time period for specific events as follows: TIME PERIOD TO ENTER EVENT STANDBY MODE... -
Page 24: Initial Set-Up
Operation Initial Set-Up Initial Set-Up This section provides step-by-step instructions for initial set-up of the Duo. 1. Confirm that the proper voltage is available for connecting the Duo to AC power. 2. Install the battery as follows: • Remove the battery compartment door (shown in FIGURE 2-1). Battery Compartment Door... -
Page 25: Setting The Units Of Measure (Units Of Measure Mode)
Initial Set-Up Operation NOTE: The Lithium Ion battery is shipped in a partially charged state and must be fully charged prior to its first use. 3. Charge the Lithium Ion battery as follows: • Connect the AC power cord to the AC receptacle located on the rear panel. •... - Page 26 Operation Initial Set-Up Use the following procedure to change the units of measure. 1. Ensure that the power to the Duo is OFF. 2. Press and hold the Clear/Next Patient key. 3. While continuing to hold the Clear/Next Patient key, press and hold the Power ON/OFF key for two (2) seconds until the Duo beeps.
-
Page 27: Routine Operation
Routine Operation Operation Routine Operation This section provides guidelines and step-by-step instructions for the vital sign measurements that are routinely performed with the Duo. 2.3.1 NIBP Measurement CAUTION: A patient's skin is sometimes fragile (i.e., on pediatric and geriatric patients, or due to physiological conditions). In these cases, a longer duration between NIBP measurements should be considered to decrease the number of cuff inflations over a period of time. - Page 28 American Heart Association. CAUTION: Use only Mindray DS blood pressure cuffs and hoses with the Duo. 2. Attach the NIBP cuff to the NIBP extension hose. 3. Attach the NIBP extension hose to the NIBP pneumatic fitting on the Duo.
-
Page 29: Pulse Rate Measurement
Routine Operation Operation The cuff begins to inflate. After reaching the default pressure for the selected patient size, the cuff slowly deflates and the Duo collects oscillometric pulsations. During this inflation and deflation portion of the measurement, the MAP section of the NIBP parameter tile displays the current pressure in the cuff. -
Page 30: Spo Measurement (Optional)
Operation Routine Operation 2.3.3 Measurement (Optional) Each of the following terms are associated with blood oxygenation: oxygen saturation, pulse oximetry, SpO and plethysmography. Oxygen saturation in capillary blood is measured by a method called pulse oximetry. Pulse oximetry is a continuous and non-invasive measurement of the amount of oxygen attached to the hemoglobin in red blood cells (also known as oxyhemoglobin saturation). - Page 31 Routine Operation Operation CAUTION: Do not place the SpO2 sensor on an extremity with an invasive catheter or blood pressure cuff in place. CAUTION: Tissue damage or inaccurate measurement may be caused by incorrect SpO2 sensor application or use, such as wrapping too tightly, applying supplemental tape, failing to inspect the sensor site periodically or failing to position appropriately.
- Page 32 Operation Routine Operation 2.3.3.1 Masimo SET ® The Masimo pulse oximeter determines SpO in the traditional manner of passing red and infrared light into a capillary bed and measuring changes in light absorption during the pulsatile cycle. It assumes that arterio-venous shunting is highly variable and that fluctuating absorbance by venous blood is the major component of noise during the pulse.
- Page 33 Routine Operation Operation 2.3.3.2 Nellcor ® Nellcor provides a family of sensors suitable for a wide variety of clinical settings and patients. Specific sensors have been developed for a variety of patient sizes. CAUTION: When equipped with Nellcor SpO2, use only Nellcor oxygen sensors and cables.
-
Page 34: Information Codes And Error Codes
Operation Information Codes and Error Codes Information Codes and Error Codes In addition to numeric values for the monitored parameters, the digital LED display of the Duo provides information codes and error codes to indicate the operational status of the monitor. -
Page 35: Information Codes
Information Codes and Error Codes Operation 2.4.1 Information Codes MESSAGE TYPE CODE DESCRIPTION REASON NIBP *LOOSE CUFF Cuff is not properly wrapped or no cuff is present. SUCCESSFUL Indicates NIBP pneumatic test was PNEUMATIC TEST successful. PNEUMATIC TEST During pneumatic test, leak is detected. FAIL/PNEUMATIC LEAK *WEAK SIGNAL... - Page 36 Operation Information Codes and Error Codes MESSAGE TYPE CODE DESCRIPTION REASON NELLCOR SPO2 SPO2 INTERFERENCE Noise is detected on the pulse signal preventing pulse discrimination from the noise. The interference may be due to motion, excess infrared light or electrical/ optical interference.The message is removed when the noise is removed.
-
Page 37: Error Codes
Information Codes and Error Codes Operation 2.4.2 Error Codes MESSAGE TYPE CODE DESCRIPTION REASON NIBP NIBP SELF TEST ERR NIBP module hardware failure. NIBP COMM ERR Communication with NIBP module has failed. AIR LEAK Cuff, hose or connector is damaged. Internal leak. -
Page 38: User Maintenance
User Maintenance Introduction This section of the manual outlines routine maintenance to be performed by the user and/or biomedical technician. The Duo monitor is designed for stable operation over long periods of time and under normal circumstances should not require technical maintenance beyond circumstances described in this section. -
Page 39: Care And Cleaning Of The Monitor
Care and Cleaning of the Monitor User Maintenance Care and Cleaning of the Monitor The monitor housing may be cleaned with a mild soap and water solution or ammoniated window cleaner. Apply cleaning solution to the cloth, not directly onto the monitor. DO NOT apply large amounts of liquid. -
Page 40: Care And Cleaning Of Reusable Cuffs
User Maintenance Care and Cleaning of Accessories 3.3.2 Care and Cleaning of Reusable Cuffs NOTE: Accuracy of cuff-pressure transducers/indicators is to be verified at intervals specified by the manufacturer. 3.3.2.1 Reusable Cuffs with Bladders Take out the bladder before cleaning and disinfecting the cuff. Cleaning The cuff can be hand washed or machine washed in warm water or with mild detergent. - Page 41 Care and Cleaning of Accessories User Maintenance 3.3.2.2 Reusable Bladderless Cuffs Clean cuffs with warm water and a mild detergent. Do not use a detergent containing hand conditioners, softeners, or fragrances. NIBP cuffs can be sterilized with gamma sterilization without affecting the repeated performance of the cuff.
-
Page 42: Battery Replacement And Maintenance
User Maintenance Battery Replacement and Maintenance Battery Replacement and Maintenance Battery Replacement CAUTION: Replace the Lithium Ion battery with part number 0146-00- 0079 only. 1. Remove the battery compartment door. 2. Disengage the battery locking mechanism by moving its plastic tab away from the edge of the battery (see 3-1). - Page 43 Battery Replacement and Maintenance User Maintenance 4. Ensure that the locking mechanism engages over the end of the battery by pressing the battery firmly into the compartment. 5. Replace the battery compartment door. Battery Maintenance and Disposal CAUTION: Remove the battery if the Duo is not likely to be used for an extended period of time.
-
Page 44: Accessories
Accessories Standard Kits Masimo SET Adult/Ped Single-Patient Adhesive 0020-00-0123-01 ® DESCRIPTION PART NUMBERS ® (2) LNOP Adt Adult Single-Patient Adhesive Finger Sensor 0600-00-0043-02 ® (2) LNOP Pdt Pediatric Single-Patient Adhesive Finger Sensor 0600-00-0044-02 (1) Patient Cable, 12’ (3.7 m) 0012-00-1099-02 Duo™... -
Page 45: Optional Accessories
Optional Accessories Accessories Optional Accessories 4.2.1 NIBP Accessories Hoses DESCRIPTION PART NUMBERS NIBP Hose, 5’ (1.5 m), Female Rectus/Female Rectus 0683-04-0003 (for use with Reusable Cuffs and Adult/Child Disposable Cuffs) NIBP Hose, 10’ (3.5 m), Female Rectus/Female Rectus 0683-04-0004 (for use with Reusable Cuffs and Adult/Child Disposable Cuffs) Reusable Cuffs - Quick-Connect DESCRIPTION PART NUMBERS... -
Page 46: Spo Accessories
Accessories Optional Accessories 4.2.2 Accessories Masimo SET Sensors ® DESCRIPTION PATIENT SIZE PART NUMBERS ® > 30 kg 0600-00-0043-01 LNOP Adt Adult Single Patient Adhesive Sensor (Box of 20) ® 10 to 50 kg 0600-00-0044-01 LNOP Pdt Pediatric Single Patient Adhesive Sensor (Box of 20) ®... - Page 47 Optional Accessories Accessories This page intentionally left blank. 4 - 4 0070-10-0603-01 Duo™ Operating Instructions...
-
Page 48: Appendix
Appendix Specifications The Duo monitor complies with the following standards: 5.1.1 Safety Standards IEC 60601-1:1988 Medical Electrical Equipment - (+ A1:1991, A2:1995)/ Part 1: General Requirements For Safety EN 60601-1:1990 (+ A1:1993, A2:1995, A13:1995) UL 60601-1:2003 Medical Electrical Equipment - Part 1 General Requirements for Safety CSA Standard C22.2 Medical electrical Equipment -... -
Page 49: Safety Designations
Specifications Appendix 5.1.2 Safety Designations Type of protection against electric Class 1 with internal electric power source. Where shock the integrity of the external protective earth (ground) in the installation or its conductors is in doubt, the equipment is operated from its internal electric power source (batteries). -
Page 50: United States Food And Drug Administration Documents
Appendix Specifications ISO 3744:1994 Acoustics - Determination of Sound Power Levels of Noise Sources Using Sound Pressure ANSI/AAMI/ISO 10993- Biological evaluation of medical devices-Part 10: 10:1995 Tests for irritation and sensitization ANSI/AAMI/ISO 10993-5 Biological evaluation of medical devices-Part 5: Cytotoxicity ANSI/AAMI/ISO 10993-1:1997 Biological evaluation of medical devices-Part 1: Evaluation and testing... -
Page 51: Patient Parameter Specifications
Patient Parameter Specifications Appendix Patient Parameter Specifications 5.2.1 NIBP Sub-System Performance Characteristics The NIBP function is capable of providing non-invasive systolic, diastolic and mean blood pressure measurements in Pediatric and Adult modes using a blood pressure cuff. The NIBP function is in accordance with the requirements of EN 1060-1, EN 1060-3 and ANSI/AAMI SP-10:1992. -
Page 52: Pulse Rate From Nibp
Appendix Patient Parameter Specifications 5.2.5 Pulse Rate from NIBP Accuracy: ± 1 bpm Resolution: 1 bpm Range: ADULT MODE PEDIATRIC MODE 40 to 240 bpm 40 to 240 bpm 5.2.6 NIBP Sub-System Functional Requirements 5.2.6.1 Maximum Cuff Pressure The software-controlled over-pressure monitor vents to atmosphere at the following pressures: ADULT MODE PEDIATRIC MODE 297 ±3 mmHg... -
Page 53: Spo Performance Requirements
Patient Parameter Specifications Appendix 5.2.6.6 NIBP Start Pressure Settings and Ranges The Start Pressure is adjustable and is set to the following defaults: PRESSURE INCREMENT PATIENT SIZE (DEPENDING ON ALGORITHM) DEFAULT START PRESSURE Adult Mode 30 – 60 mmHg 178 ±5 mmHg Pediatric Mode 30 –... - Page 54 Appendix Patient Parameter Specifications Accuracy: No motion conditions PATIENT SIZE SATURATION RANGE 70% to 100% 0 – 69% Adult Mode ±2 digits unspecified Pediatric Mode ±2 digits unspecified During motion conditions PATIENT SIZE SATURATION RANGE 70% to 100% 0 – 69% Adult Mode ±3 digits unspecified...
- Page 55 Patient Parameter Specifications Appendix Masimo Reference Footnotes ® The Masimo MS-7 pulse oximeter with LNOP- Adt sensors have been validated for no motion accuracy in human blood studies on healthy adult volunteers in induced hypoxia studies in the range of 70% to 100% SpO against a laboratory co-oximeter and ECG monitor.
- Page 56 Appendix Patient Parameter Specifications 5.2.7.3 Nellcor SpO Performance Requirements Sensor Compatibility: OxiMax series MAX-A, MAX-AL, MAX-P, MAX-FAST, MAX-R, OxiCliq A, OxiCliq P, D-YS, D-YSE, D-YSPD, DS-100A, OXI-A/N and OXI-P/I. Display Range: 1 – 100% Resolution: Saturation Accuracy: SENSOR ACCURACY MAX-A, MAX-AL, MAX-P, MAX-I 70% to 100% ±2 digits and MAX-FAST Below 70% unspecified...
-
Page 57: Power Supply
Patient Parameter Specifications Appendix 5.2.8 Power Supply 5.2.8.1 Power Source The Duo monitor auto-selects its power source from those available. The monitor uses the following priority in choosing the power source: 1. AC Mains Power 2. Internal battery power The monitor operates from AC Mains power with or without the internal batteries installed. 5.2.9 AC Mains Power Source Input Voltage:... -
Page 58: Physical Characteristics
Appendix Patient Parameter Specifications 5.2.11 Physical Characteristics 5.2.11.1 Maximum Size 130 mm maximum width 243 mm maximum height 140 mm maximum depth 5.2.11.2 Maximum Weight 1770 grams (3.9 pounds) maximum, without optional accessories 2088 grams (4.6 pounds) maximum, with 1 Lithium-ion battery, without optional accessories 5.2.12 Cooling Fan The cooling fan operates when the Duo is running on AC power only and the internal... - Page 59 Patient Parameter Specifications Appendix Sinusoidal Vibration: Per IEC 60068-2-6 1 g or 0.07 mm, 57 – 62 Hz crossover frequency 10 to 500 Hz, 10 sweep cycles in each axis Random Vibration: Per IEC 60068-2-34 0.02 g2/Hz 20 – 500 Hz Low degree of reproducibility 9 minutes per axis Drop:...
- Page 60 Appendix Patient Parameter Specifications Electromagnetic Compatibility • The Duo meets the requirements of IEC 60601-1-2:2001/EN 60601-1-2:2001. NOTE: The Duo needs special precautions regarding EMC and needs to be installed and put into service according to the EMC information provided below. NOTE: Portable and mobile RF communications equipment can affect the Duo.
- Page 61 Patient Parameter Specifications Appendix TABLE 5-2 GUIDANCE AND DECLARATION - ELECTROMAGNETIC IMMUNITY The Duo is intended for use in the electromagnetic environment specified below. The customer or the user of the Duo should assure that it is used in such an environment. IMMUNITY IEC 60601 COMPLIANCE...
- Page 62 Appendix Patient Parameter Specifications TABLE 5-3 GUIDANCE AND DECLARATION - ELECTROMAGNETIC IMMUNITY The Duo is intended for use in the electromagnetic environment specified below. The customer or the user of the Duo should assure that it is used in such an environment. IMMUNITY IEC 60601 TEST COMPLIANCE...
- Page 63 Patient Parameter Specifications Appendix TABLE 5-4 RECOMMENDED SEPARATION DISTANCES BETWEEN PORTABLE AND MOBILE RF COMMUNICATIONS EQUIPMENT AND THE DUO The Duo is intended for use in an electromagnetic environment in which radiated RF disturbances are controlled. The customer or the user of the Duo can help prevent electromagnetic interference by maintaining a minimum distance between portable and mobile RF communications equipment (transmitters) and the Duo as recommended below, according to the maximum output power of the communications equipment.
-
Page 64: Warranty Statements
Mindray DS USA, Inc.’s option at the factory or at an authorized Distributor, any product which will under normal use and service appear to the Company to have been defective in material or workmanship. - Page 65 Warranty Statements Appendix Calibration may be performed without the need to disassemble the instrument. It is the responsibility of the purchaser to perform calibration as necessary, in accordance with the instructions provided in this manual. 5 - 18 0070-10-0603-01 Duo™ Operating Instructions...
-
Page 66: Manufacturer's Responsibility
Appendix Manufacturer’s Responsibility Manufacturer’s Responsibility Mindray DS USA, Inc. is responsible for the effects on safety, reliability and performance of the equipment only if: a. assembly operations, extensions, readjustments, modifications or repairs are performed by persons authorized by Mindray DS USA, Inc.; and b. - Page 67 0070-10-0603-01 Rev E May 24, 2010...
- Page 68 Tel: +31 33 25 44 911 • Fax: +31 33 25 37 621 Mindray (UK) Limited • 3 Percy Road • St. John’s Park • Huntingdon • Cambridgeshire PE29 6SZ • United Kingdom • Tel: 01480 416840 • Fax: 01480 436588 Mindray Medical France SARL •...
Need help?
Do you have a question about the datascope duo and is the answer not in the manual?
Questions and answers