Table of Contents
Advertisement
Quick Links
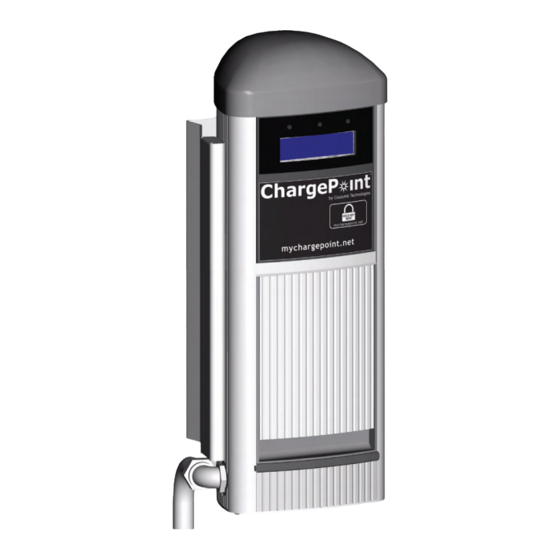
CT1503
Wall Mount
ChargePoint
Part Number: 75-001005-01 Revision 1.0
™
Networked Charging Station
Installation
Instructions
365 Energy N.V.
Bogert 1
5612 LX Eindhoven
Netherlands
0049-30 889 249 523
www.365-energy.com
Coulomb Technologies Inc.
1692 Dell Ave.
Campbell, CA 95008-6901 USA
US toll free: +1-877-370-3802
www.coulombtech.com
www.mychargepoint.net
Advertisement
Table of Contents

Related Manuals for ChargePoint CT1503


Summary of Contents for ChargePoint CT1503
- Page 1 CT1503 Wall Mount ™ ChargePoint Networked Charging Station Installation Instructions 365 Energy N.V. Bogert 1 5612 LX Eindhoven Netherlands 0049-30 889 249 523 www.365-energy.com Coulomb Technologies Inc. 1692 Dell Ave. Campbell, CA 95008-6901 USA US toll free: +1-877-370-3802 www.coulombtech.com www.mychargepoint.net...
- Page 2 Your use of, or modification to, the ChargePoint™ Networked Charging Station in a manner in which the ChargePoint™ Networked Charging Station is not intended to be used or modified will void the limited warranty. Other than any such limited warranty, the Coulomb products are provided “AS IS,” and Coulomb and its distributors expressly disclaim all implied warranties, including any warranty of design, merchantability, fitness for a particular purposes and non-infringement, to the maximum extent permitted by law.
-
Page 3: Before You Start
• Torx Driver T15 - Tamper-Resistant • #2 Phillips screwdriver • #2 Slotted screwdriver Overview of steps Installing the CT1503 Wall Mount ChargePoint™ Networked Charging Station involves a few simple steps: 1. Check boxes for correct contents (see page 4) 2. -
Page 4: Step 1 - Check Boxes For Correct Contents
Coulomb Technologies CT1503 Wall Mount ChargePoint™ Networked Charging Station Step 1 - Check boxes for correct contents Box 1 - Body Assembly Box 1 contains: CT1503 Wall Mount ™ ChargePoint Networked Charging Station Installation • Main body Instructions • Wall mount bracket 365 Energy N.V. -
Page 5: Step 2 - Prepare Body Assembly For Mounting
Coulomb Technologies CT1503 Wall Mount ChargePoint™ Networked Charging Station Step 2 - Prepare body assembly for mounting Remove the front panel: • Use the supplied allen key to loosen the two screws that fasten the panel to the body. • Loosen the bonding screw and disconnect the bonding wire. - Page 6 Coulomb Technologies CT1503 Wall Mount ChargePoint™ Networked Charging Station Step 2 cont’d Remove the bottom plate. Installation Instructions Page 6 of 17...
-
Page 7: Step 3 - Attach Bracket To Wall
Coulomb Technologies CT1503 Wall Mount ChargePoint™ Networked Charging Station Step 3 - Attach bracket to wall Drill 6 holes in the wall, as illustrated. Use the supplied template to ensure correct alignment. IMPORTANT: The maximum height above the surface should be... - Page 8 Coulomb Technologies CT1503 Wall Mount ChargePoint™ Networked Charging Station Step 3 cont’d Using the 6 installer-supplied lag screws and anchors, fasten the wall bracket to the wall. Installation Instructions Page 8 of 17...
-
Page 9: Step 4 - Drill Holes In Body Assembly
Coulomb Technologies CT1503 Wall Mount ChargePoint™ Networked Charging Station Step 4 - Drill holes in body assembly Use a 6.5 mm (¼”) drill to drill out the 2 mounting holes in the back of the body assembly. These holes are partially pre-drilled. -
Page 10: Step 5 - Attach Body Assembly To Wall Bracket
Coulomb Technologies CT1503 Wall Mount ChargePoint™ Networked Charging Station Step 5 - Attach body assembly to wall bracket Attach the body assembly to the wall bracket using the 6 supplied screws and washers. Installation Instructions Page 10 of 17... -
Page 11: Step 6 - Attach Coupler And Connect Conduit
Coulomb Technologies CT1503 Wall Mount ChargePoint™ Networked Charging Station Step 6 - Attach coupler and connect conduit Attach 20 mm (¾”) installer-supplied coupler to the body assembly, as shown, and connect the conduit. Installation Instructions Page 11 of 17... -
Page 12: Step 7 - Connect Wires To Wiring Terminals
Coulomb Technologies CT1503 Wall Mount ChargePoint™ Networked Charging Station Step 7 - Connect wires to wiring terminals Pull Line (brown), Neutral (blue), and Protective Earth (green/yellow) wires into body assembly and connect to wiring terminals. Solid wires are preferred but stranded wires with crimp-on PIN terminators are also OK. - Page 13 Coulomb Technologies CT1503 Wall Mount ChargePoint™ Networked Charging Station Step 7 cont’d Strip wires, insert in terminal block, and tighten screws to 2.1 Nm (18.5 inch-lbs). Use these 3 screws Blue Brown Green/Yellow LINE Installation Instructions Page 13 of 17...
- Page 14 Coulomb Technologies CT1503 Wall Mount ChargePoint™ Networked Charging Station Step 8 - Replace bottom plate and front panel Using a Torx driver, secure the bottom plate to the body assembly with the 5 supplied tamper-resistant security screws. Installation Instructions Page 14 of 17...
- Page 15 Coulomb Technologies CT1503 Wall Mount ChargePoint™ Networked Charging Station Step 8 cont’d Slide the front panel into place. Use the supplied allen key to tighten the two set screws. Re-attach bonding wire and tighten screw. bonding wire Installation Instructions Page 15 of 17...
-
Page 16: Step 9 - Slide Head Assembly Into Body
Coulomb Technologies CT1503 Wall Mount ChargePoint™ Networked Charging Station Step 9 - Slide head assembly into body Slide the head assembly into body far enough to connect “pigtail” connector. Connect pigtail connector. The head assembly will power-up. Firmly slide head module all the way into body. -
Page 17: Step 10 - Secure Head Assembly
Coulomb Technologies CT1503 Wall Mount ChargePoint™ Networked Charging Station Step 10 - Secure head assembly If necessary, open the door using the smart card. Using a Torx driver, secure the head assembly with the 4 supplied tamper-resistant security screws. IMPORTANT: Do NOT overtighten.
Need help?
Do you have a question about the CT1503 and is the answer not in the manual?
Questions and answers