Advertisement
Advertisement
Table of Contents

Subscribe to Our Youtube Channel
Related Manuals for Culina UBGMMT60SS


Summary of Contents for Culina UBGMMT60SS
- Page 1 Instruction Manual BUILD IN GAS OVEN UBGMMT60SS UBGMMT60GF - 1 -...
-
Page 2: General Instruction
General Instruction These instructions are only valid if the country symbol appears on the appliance. If the symbol does not appear on the appliance. If the symbol does not appear on the appliance, it is necessary to refer to the technical instructions which will provide the necessary instructions concerning modification of the appliance to the conditions of us of the country. - Page 3 Warning: a) The use of a gas cooking appliance results in the production of heat and moisture in the room in which it is installed. Ensure that the kitchen is well ventilated: keep natural ventilation holes open or install a mechanical ventilation device (mechanical extractor hood) b) During use the appliances becomes hot.
- Page 4 persons with reduced physical, sensory or mental capabilities or lack of experience and knowledge if they have been given supervision or instruction concerning use of the appliance in a safe way and understand the hazards involved. Children shall not play with the appliance. Cleaning and user maintenance shall not be made by children without supervision j) Ensure that the appliance is switched off before replacing the lamp to avoid the possibility of electric shock.
-
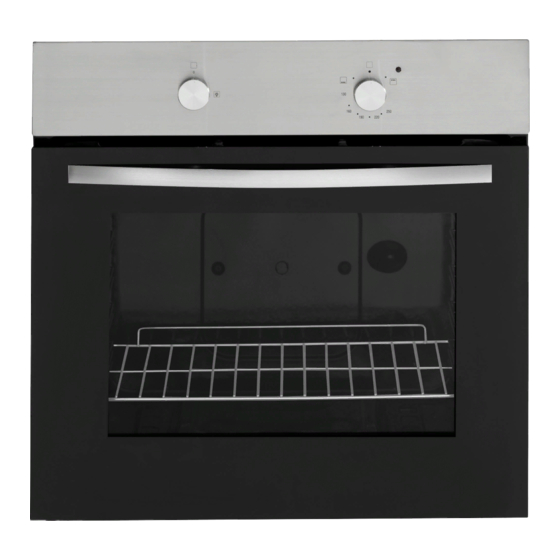
Page 5: Close-Up View
Close-Up View UBGMMT60SS UBGMMT60GF A. Control Panel G. Oven Rack B. Oven/rotisserie-grill knob H. Guides for sliding the racks or dripping pan in or out C. Oven Light button I. Valve knob for gas oven D. Timer Knob J. Electric cooker clock Knob (only available on some models) E. - Page 6 the bottom shelf and never place anything on the bottom of the oven when it is in operation because this could damage the enamel. Always place your cookware (dishes, aluminum foil, etc) on the grid provided with the appliances inserted especially along the oven guides. The oven knob (B) This knob is used not only to select the different oven modes, but also to choose the right cooking temperature...
- Page 7 The valve ignition(I) This knob is used not only to select the different oven modes, but also to choose the right cooking temperature from among the temperatures shown on the knob itself. (from 130 to 250) for the food to be cooked in the oven. The electronic ignition device of the oven is build into the control knob itself.
- Page 8 O Press button (C) and the numbers on the timer display will begin to advance and a symbol will illuminate. O Use buttons (B) and (C) to adjust the time on the timer display, until it shows the length of time that you want the oven to countdown for.
-
Page 9: Practical Cooking Advice
the countdown ends, the oven will continue to heat. You must turn off the oven/grill using the oven function and temperature control knob. accessible; How to remove the oven door b) Remove the glass cover of the For a more thorough clean, you can remove the lamp-holder oven door. - Page 10 start with a high temperature setting (200':C-220-'C) Cooked well on the inside but sticky on the for a short time, then turn the oven down afterwards. outside In general, the larger the roast, the lower the Use less liquid, lower the tempera, tore, and temperature setting.
-
Page 11: Installation
Mackerels 80-90 Trout baked in 30-40 Neapolitan-style pizza 30-35 Dry biscuits 15-20 Tart 25-30 Chocolate cake 30-35 Leavened cakes 50-60 50-60 Soles and cuttlefish Squid and prawn kebabs Cod filet I Grilled vegetables 8-10 Veal steak 20-25 Chops 20-25 Hamburgers 10-15 Sausages 20-25... - Page 12 opening cannot under any circumstances be blocked accidentally (Fig A), The system can also Installation of Build-in Ovens provide the air needed for combustion by indirect To ensure that build-in appliance functions properly, means. i.e. form adjacent rooms fitted with air the cabinet containing it must be appropriate.
- Page 13 exterior must be assembled with glues with glues which can withstand temperature of up to 100. In compliance with current safety standards, contact with the electrical parts of the oven must not be possible once it has been installed. To fasten the oven to the cabinet, open the door of the oven and attach it by inserting the 4 wooden screws into the 4 holes located on the perimeter of the frame.
- Page 14 the appliance, as indicated on the data plate. If To adapt the oven to a different type of gas with you have any doubts, call in a qualified respect to the gas for which it was manufactured technician. (indicated on the label), follow these simple steps: ...
-
Page 15: Technical Specifications
Adjust the screw located outside the thermostat On completion of this operation, replace the old cock pin until the flame is small but steady (the rating sticker with one indicating the new type of gas flame can be seen through the slots on the oven used. - Page 16 GB-56 1.81k 2.59 0.85 1.3k (GB-5 6RCD EGB-5 0.76 2.16 1.05 2240 6RC ( EGB-5 6ERC 、 EGB-5 6RCD At 15℃ and 1013 mbar-dry gas ** Propane Gross Heat Value = 50.37MJ/Kg *** Butane Gross Heat Value = 49.47MJ/Kg Natural Gross Heat Value = 37.78MJ/Kg Methane Gross Heat Value = 15.87MJ/Kg - 16 -...
Need help?
Do you have a question about the UBGMMT60SS and is the answer not in the manual?
Questions and answers