Table of Contents
Advertisement
User Manual for your
UBEFMM613
NOTE
: This User Instruction Manual contains important
information, including safety & installation points, which will
enable you to get the most out of your appliance. Please keep it
in a safe place so that it is easily available for future reference; for
you or any person not familiar with the operation of the appliance.
Advertisement
Table of Contents

Related Manuals for Culina UBEFMM613


Summary of Contents for Culina UBEFMM613
- Page 1 User Manual for your UBEFMM613 NOTE : This User Instruction Manual contains important information, including safety & installation points, which will enable you to get the most out of your appliance. Please keep it in a safe place so that it is easily available for future reference; for...
-
Page 2: Table Of Contents
Contents Environmental note Important safety information 4 - 6 Specifications 7 - 9 Product and aperture dimensions Product specifications Standard accessories Electrical details Cooling fan Control panel Selecting a cooking function and temperature 9 - 13 Before first use Selecting an oven function Oven functions Thermostat control knob Oven operating light... -
Page 3: Environmental Note
Environmental note o The packaging materials that the manufacturer uses are environmentally friendly and can be recycled. o Please discard all packaging material with due regard for the environment. -
Page 4: Important Safety Information
IMPORTANT SAFETY INFORMATION Your safety is of the utmost importance to us. Please make sure that you read this instruction booklet before attempting to install or use the appliance. If you are unsure of any of the information contained in this booklet, please contact the Customer Care Department. - Page 5 Warning and safety instructions o This appliance complies with all current European safety legislation. The manufacturer does wish to emphasise that this compliance does not remove the fact that the appliance surfaces will become hot during use and retain heat after operation. o This appliance is not intended for use by persons (including children) with reduced physical, sensory or mental capabilities, or lack of experience and knowledge, unless they have been...
- Page 6 o Do not attempt to lift or move cooking appliances by using the oven door or handle, as this may cause damage to the appliance or result in injury to the person lifting the appliance. Cleaning o Cleaning of the oven should be carried out on a regular basis. o Great care should be taken whilst using this appliance and when following the cleaning procedure.
- Page 7 o The above directives comply with 93/68/EEC regarding CE marking. o The manufacturer declares that the oven is built using certified materials and requires the appliance to be installed in accordance with the standards currently in force. This appliance must be used by a trained person for domestic purposes only.
-
Page 8: Specifications
Specifications Product Dimensions Aperture Dimensions Height: 595 mm 600 mm Width: 595 mm 560 mm Depth: 530 mm 560 mm (min) Product specifications o 4 oven functions o Oven net/gross capacity: 58/65 liters o Energy efficiency class: A o Cooling fan o Double-glazed removable door o Removable inner door glass o Mark resistant coating... -
Page 9: Standard Accessories
Standard accessories Accessory Name Picture Quantity Baking tray Grill Each 1 Handle Screws(ST4x35) Electrical details Rated Voltage: 220-240 Vac, 50/60 Hz Supply Connection: 10A (double pole switched fused outlet with 3mm contact gap) Rated max power: 2.20 kW Mains Supply Lead: 3 x 1.5mm²... -
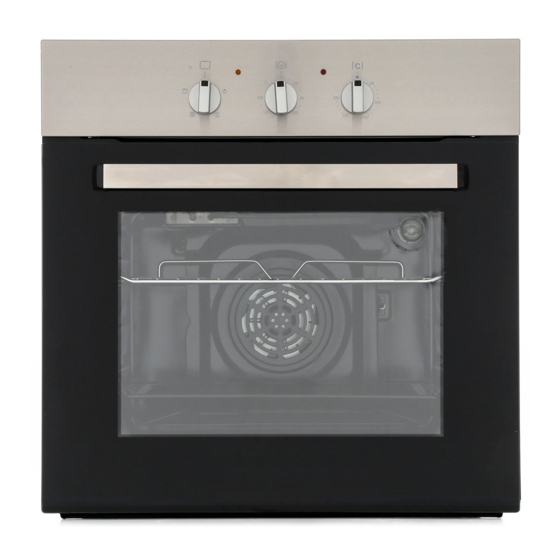
Page 10: Control Panel
Control Panel 1) Oven function selector knob 2) Thermostat control knob 3) Timer 4) Oven operating light 5) Power indicator light Selecting a cooking function and temperature IMPORTANT: Make sure that you have sent your oven into manual operation mode before selecting an oven function and temperature. -
Page 11: Selecting An Oven Function
o It is advisable for you not to remain in the room whilst the burning off process is taking place. o You should leave the oven on maximum setting for 30 – 40 minutes. o After the oven cavity has cooled, it should then be cleaned with warm soapy water, using either a sponge or soft cloth. -
Page 12: Thermostat Control Knob
allows food to be cooked simultaneously on different shelves, preventing the transmission of smells and tastes from one dish onto another. GRILL: This method of cooking utilises the inner part only of the top element, which directs heat downwards onto the food. This function is suitable for grilling small portions of bacon, toast and meat etc. -
Page 13: Cooking Guidelines
Timer o The timer can be used of an oven cooking function for a time period of up to 120 minutes. o Set the timer by turning the knob clockwise to the required time. o The time period that has been set will expire when the knob reaches zero, a brief audible signal will sound. -
Page 14: Warnings
o Place cooking trays in the centre of the oven and leave gaps between the trays to allow air to circulate. o Try to open the door as little as possible to view the dishes. o The oven light will remain on during cooking. Warnings o Keep the oven door closed when using any of the cooking functions, including the grill functions. -
Page 15: Shelf Positions
Shelf positions Your oven will come supplied with the following oven furniture: (A) Oven shelf (B) Enamelled baking tray & trivet o The numbers 1 – 5, indicate the different shelf positions that you can utilise within the oven. (Image for reference only – actual product may differ slightly) o The sides of the cavity are moulded to provide positions for the shelves or enamelled baking tray to rest on. - Page 16 o The oven should be thoroughly cleaned before it is operated for the first time and after each use. This will avoid residual food stuffs becoming baked on the oven cavity. After residues have been baked on several times, they are far more difficult to remove. o Never clean the oven surfaces by steam cleaning.
-
Page 17: Replacing The Oven Bulb
Replacing the oven bulb IMPORTANT: The oven must be disconnected from your mains supply before you attempt to either remove or replace the oven bulb. o Remove all oven shelves, the drip tray and the side rack that is on the same side as the oven light. o Remove the light cover by turning it anti-clockwise. -
Page 18: Removing The Inner Door Glass For Cleaning
o The hinges (A) have two movable bolts on them (B). o If you raise both of the movable bolts (B), then the hinges (A) are released from the oven housing. o You should grip the sides of the door at the centre and then incline it slightly towards the oven cavity and then pull the door gently away from the oven cavity. - Page 19 o Unscrew the bracket latch that is in the corner of the top of the door. Remove the glass from the door and clean with warm soapy water. o After cleaning, insert the glass panel correctly back into the door. Screw the bracket latch back into place.
-
Page 20: Electrical Connection
Electrical connection Before connecting the appliance, make sure that the supply voltage marked on the rating plate corresponds with your mains supply voltage. WARNING: THIS APPLIANCE MUST BE EARTHED. o This appliance should be wired into a 10A double pole switched fused spur outlet, having 3 mm contact separation and placed in an easily accessible position adjacent to the appliance. -
Page 21: Installing The Oven Into The Kitchen Cabinet
o The earthing (yellow/green) conductor must always be 10 mm longer than the line conductors. o Care must be taken to ensure that the temperature of the mains supply cable does not exceed 50°C. o Regularly check the power cord for damage. If the supply cord is damaged, it must be replaced by the manufacturer, its service agent or similarly qualified persons in order to avoid a danger or injury. -
Page 22: Ventilation Requirements
o The oven must be fitted into an oven housing with the ventilation cut-outs shown in the “Ventilation requirements” section on the next page. o Ensure that the rear panel of the furniture housing unit has been removed. Ventilation requirements (Figure shows the ventilation and cut-out requirements for the installation of the appliance into a standard kitchen unit). -
Page 23: My Appliance Isn't Working Correctly
o Ensure that the oven has been securely fixed into the housing unit. The fixing of the oven into the housing is made by using four screws. These should be screwed through the oven cabinet and into the housing unit. My appliance isn’t working correctly o The oven isn’t coming on. - Page 24 o My food is not cooking properly * Ensure that you are selecting the correct temperature and the correct cooking function for the food that you are cooking. It may be appropriate to adjust your cooking temperature by plus or minus 10°C, to achieve the best cooking results. o My food is not cooking evenly * Check that the oven has been installed correctly and is level.
- Page 25 Please note that if an engineer is asked to attend whilst the product is under guarantee and finds that the problem is not the result of an appliance fault, then you may be liable for the cost of the call out charge.
Need help?
Do you have a question about the UBEFMM613 and is the answer not in the manual?
Questions and answers