Table of Contents
Advertisement
User Manual for your
UBEMF610 UBEMF611
UBEMF612
NOTE
: This User Instruction Manual contains important
information, including safety & installation points, which will
enable you to get the most out of your appliance. Please keep it
in a safe place so that it is easily available for future reference; for
you or any person not familiar with the operation of the appliance.
Advertisement
Table of Contents

Subscribe to Our Youtube Channel
Related Manuals for Culina UBEMF610


Summary of Contents for Culina UBEMF610
- Page 1 User Manual for your UBEMF610 UBEMF611 UBEMF612 NOTE : This User Instruction Manual contains important information, including safety & installation points, which will enable you to get the most out of your appliance. Please keep it in a safe place so that it is easily available for future reference; for...
-
Page 2: Table Of Contents
Contents Environmental note Important safety information 4 - 6 Specifications 7 - 9 Product and aperture dimensions Product specifications Standard accessories Electrical details Cooling fan Control panel Oven programmer/timer display Setting and using the oven programmer/timer 10-14 Selecting manual operation mode Setting clock (the time of day) The oven timer Before first use... -
Page 3: Environmental Note
Environmental note o The packaging materials that the manufacturer uses are environmentally friendly and can be recycled. o Please discard all packaging material with due regard for the environment. -
Page 4: Important Safety Information
IMPORTANT SAFETY INFORMATION Your safety is of the utmost importance to us. Please make sure that you read this instruction booklet before attempting to install or use the appliance. If you are unsure of any of the information contained in this booklet, please contact the Customer Care Department. - Page 5 Warning and safety instructions o This appliance complies with all current European safety legislation. The manufacturer does wish to emphasise that this compliance does not remove the fact that the appliance surfaces will become hot during use and retain heat after operation. o This appliance is not intended for use by persons (including children) with reduced physical, sensory or mental capabilities, or lack of experience and knowledge, unless they have been...
- Page 6 o Do not attempt to lift or move cooking appliances by using the oven door or handle, as this may cause damage to the appliance or result in injury to the person lifting the appliance. Cleaning o Cleaning of the oven should be carried out on a regular basis. o Great care should be taken whilst using this appliance and when following the cleaning procedure.
- Page 7 Declaration of conformity This appliance complies with the following European Directives: - 2014/35/EU regarding “low voltage” - 2014/30/EU regarding “electromagnetic disturbances” - Regulation (EC) N° 1935/2004 regarding “materials in contact with food” o The above directives comply with 93/68/EEC regarding CE marking. o The manufacturer declares that the oven is built using certified materials and requires the appliance to be installed in accordance with the standards currently in force.
-
Page 8: Specifications
Specifications Product Dimensions Aperture Dimensions Height: 595 mm 600 mm Width: 595 mm 560 mm Depth: 530 mm 560 mm (min) Product specifications o 9 oven functions o Energy efficiency class: A o Oven net/gross capacity: 58/65 liters o LED fully programmable timer o Cooling fan o Thermostatically controlled grill o Double-glazed removable door... -
Page 9: Standard Accessories
Standard accessories Accessory Name Picture Quantity Baking tray Grill Each 1 Handle Screws(ST4x35) Electrical details Rated Voltage: 220-240 Vac, 50/60 Hz Supply Connection: Rated max power : 2.90 kW Mains Supply Lead: 3 x 1.5mm² Oven Light Bulb: 25 W/300°C screw type pygmy Cooling fan o A tangential cooling fan is fitted inside of this appliance, to make the internal temperature of the oven stable and the external... -
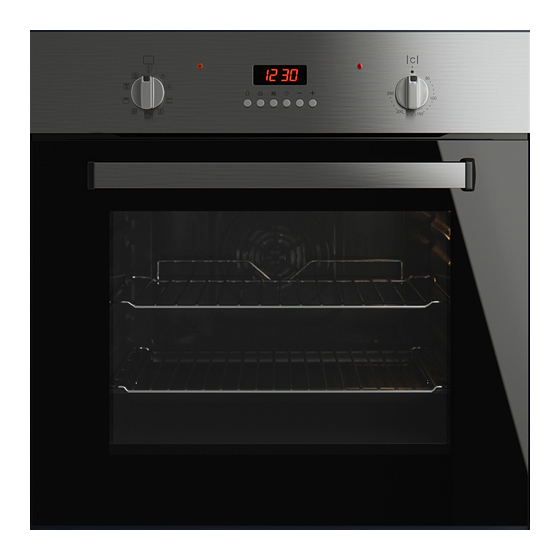
Page 10: Control Panel
Control Panel UBEMF610 UBEMF611 UBEMF612 1) Oven function selector knob 2) Thermostat control knob 3) Minute minder button 4) Duration button 5) End cook button 6) Manual operation button 7) Minus button 8) Plus button 9) LED display A) Power indicator light... -
Page 11: Oven Programmer/Timer Display
Oven programmer/timer display 10) Auto function symbol 11) Minute minder symbol 12) Manual operation symbol Setting and using the oven programmer/timer Selecting manual operation mode After your appliance is connected to your mains supply for the first time, the numbers on the timer display will flash. Before you can select a cooking function or set a temperature,you must set the appliance into manual operation mode. -
Page 12: Before First Use
Before first use o To remove any residue from the oven that may have been left from the manufacturing process, you should select the fan oven function and set the thermostat to its maximum temperature setting. o It is perfectly normal for a smell to be produced during this process. -
Page 13: Setting The Duration Function
o Once the display has got to your desired countdown time, let go of the minus and plus buttons. The minute minder symbol (11) will appear on the timer display. o Once a countdown time has been set, it is possible to shorten or lengthen the time by using the minus or plus buttons. -
Page 14: Setting The End Cook Function
o An alarm will sound when the countdown time has elapsed and the oven will switch off. The word AUTO will flash and the heating symbol will disappear. The alarm can be silenced by pressing the duration button. o You will need to return the oven to manual operation mode, once the duration function has been used. -
Page 15: Setting The Start And End Time Function
o When the time of day reaches the end of cooking time that you set, the oven will switch off and an alarm will sound. The word AUTO will flash and the heating symbol will disappear. The alarm can be silenced by pressing the end cook button. o You will need to return the oven to manual operation mode, once the end cook function has been used. - Page 16 o When the time of day reaches the end of cooking time that you set, the oven will switch off and an alarm will sound. The word AUTO will flash and the heating symbol will disappear. The alarm can be silenced by pressing the end cook or duration button. o You will need to return the oven to manual operation mode, once the start and end time function has been used.
-
Page 17: Selecting A Cooking Function And Temperature
Selecting a cooking function and temperature IMPORTANT: Make sure that you have sent your oven into manual operation mode before selecting an oven function and temperature. Selecting an oven function The oven function selector knob should be used to select the particular mode of cooking that you require. -
Page 18: Thermostat Control Knob
FAN OVEN: This method of cooking uses the circular element while the heat is distributed by the fan. This results in a faster and more economical cooking process. The fan oven allows food to be cooked simultaneously on different shelves, preventing the transmission of smells and tastes from one dish onto another. -
Page 19: Oven Operating Light
Oven operating light o This light will come on to indicate that oven’s heating elements operation. The light will turn off when the temperature set thermostat control knob has been reached. It will cycle on and off throughout the cooking time. You should not place food inside the cavity, until the correct cooking temperature has been reached. -
Page 20: Warnings
o IMPORTANT: You should ALWAYS pre-heat the oven if you are baking. o If there is no guidance given on the food packaging specifically for cooking in fan oven mode, you can generally reduce the cooking time and temperature by 10% from the information given for conventional oven cooking. -
Page 21: Shelf Positions
o When removing any item from the oven, you should ALWAYS use an oven glove. o Warning: Accessible parts may become hot during use. Young children should be kept well away from the oven when it is in use. Shelf positions Your oven will come supplied with the following oven furniture: (A) Oven shelf... -
Page 22: Cleaning And Maintenance
Cleaning and maintenance Cleaning operations must only be carried out when the oven is cool. The appliance should be disconnected from your mains supply before commencing any cleaning or maintenance process. o The oven should be thoroughly cleaned before it is operated for the first time and after each use. -
Page 23: Replacing The Oven Bulb
o Do not use harsh or abrasive cleaners or sharp metal scrapers to clean the oven door glass since they can scratch the surface which may result in shattering. o Any damage that is caused to the appliance by a cleaning product will not be fixed by the manufacturer free of charge, even if the appliance is within the guarantee period. -
Page 24: Removing The Oven Door For Cleaning
Removing the oven door for cleaning To facilitate the cleaning of the inside of the oven and the outer frame of the oven, the door can be removed as follows: o The hinges (A) have two movable bolts on them (B). o If you raise both of the movable bolts (B), then the hinges (A) are released from the oven housing. -
Page 25: Removing The Inner Door Glass For Cleaning
o Take care not to dislodge the hinge locking system when removing the door, as the hinge mechanism has a strong spring. o Do not immerse the door in water at any time. Removing the inner door glass for cleaning o Do not use any abrasive cleaner that could cause damage. -
Page 26: Installation
INSTALLATION The installation must be carried out by a suitably qualified person, in accordance with the current version of the following. o UK Regulations and Safety Standards or their European Norm Replacements. o Building Regulations (issued by the Department of the Environment). - Page 27 o Connect the wires as indicated in the image above, using the brass links provided where necessary. o The earthing (yellow/green) conductor must always be 10 mm longer than the line conductors. o Care must be taken to ensure that the temperature of the mains supply cable does not exceed 50°C.
-
Page 28: Installing The Oven Into The Kitchen Cabinet
Installing the oven into the kitchen cabinet Positioning the appliance o Ensure that the aperture that you will be fitting the oven into is of the size given in the above diagram. o The oven must be fitted into an oven housing with the ventilation cut-outs shown in the “Ventilation requirements”... -
Page 29: Ventilation Requirements
Ventilation requirements (Figure shows the ventilation and cut-out requirements for the installation of the appliance into a standard kitchen unit). (Figure shows the ventilation and cut-out requirements for the installation of the appliance into a tall housing unit). o Ensure that the oven has been securely fixed into the housing unit. -
Page 30: My Appliance Isn't Working Correctly
My appliance isn’t working correctly o The oven isn’t coming on. * Check that the oven is in manual operation mode. * Check that you have selected a cooking function and a cooking temperature. o There appears to be no power to the oven and grill. * Check that the appliance has been connected to the electrical mains supply correctly. - Page 31 o The oven light is not working * Refer to the “Replacing the oven bulb” section. o I am getting condensation in my oven * Steam and condensation is a natural by product of cooking any food with high water content, such as frozen food, chicken etc. * You may get condensation in the oven cavity and forming between the oven door glasses.
- Page 32 This includes situations where appliances have been tiled in, sealed in with sealant, have wooden obstructions placed in front of the appliance - like plinths, or any installation other than the one specified by the manufacturer has been completed. Please refer to the conditions of guarantee that appear on the warranty card that you receive with the appliance.
- Page 33 UBEMF610+UBEMF611+UBEMF612 User'smanual_20170225...
Need help?
Do you have a question about the UBEMF610 and is the answer not in the manual?
Questions and answers