Advertisement
Quick Links
Download this manual
See also:
User Manual
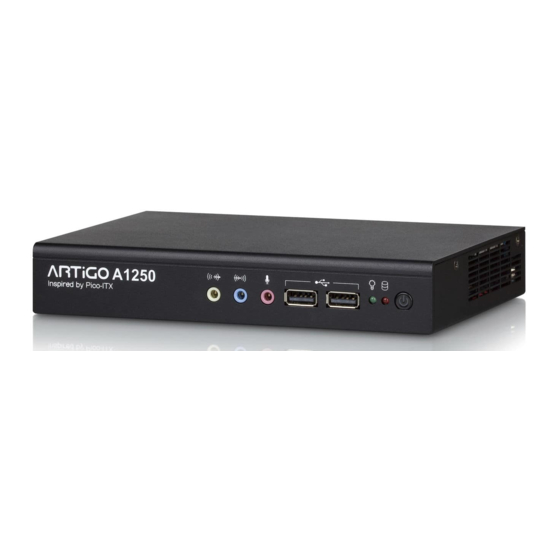
ARTiGO A1250
Quick Guide
Key Features:
•
Ultra-slim, space saving, low noise and low
power consumption
•
Powered by 1.2GHz VIA Eden
®
X4 processor
•
Support multiple I/O on dual access panel
•
Quick installation, convenient to setup and
easy maintenance.
•
Optional Wi-Fi support and VESA mount
Layout Diagram
Front Panel I/O
USB 2.0
Power On/Off
A1250
Inspired by Pico-ITX
Line-out
Mic-in
HDD LED
Line-in
Power LED
Back Panel I/O
Gigabit Ethernet
Mini HDMI
Wi-Fi antenna hole
DC-in
+12V
HDMI
USB 3.0
VGA
DC plug strap holder hole
The ARTiGO A1250 is an ultra-slim size system powered by a high per-
formance 1.2GHz VIA Eden
®
X4 processor. The ARTiGO A1250 system
is designed to be space saving system with an elegant chassis that fits
easily into any environment and is suitable for a broad spectrum of ap-
plication, including media streaming, home automation, digital signage
and surveillance.
The ARTiGO A1250 has a wide selections of interfaces on the front and
back panel to easily support various applications, easy integration and
quick setup. In addition, the ARTiGO A1250 is a low power consumption
system and fully compatible with Windows and Linux operating systems.
Specifications:
•
CPU:
•
®
1.2GHz VIA Eden
X4
•
Chipset:
•
VIA VX11H Advanced all-in-one system
•
System Memory:
•
1 x SODIMM slot supporting DDR3 1066/1333 MHz
•
Supports up to 8GB memory size
•
Graphics:
•
Integrated VIA C-640 DX11 3D/2D graphics with MPEG-2,
WMV9, VC1 and H.264 video decoding acceleration
•
Storage:
•
1 x Hard disk bracket tray for 2.5" SATA HDD
•
LAN:
•
VIA VT6130 Gigabit Ethernet controller
•
Support wake-on LAN and Boot from LAN (PXE)
•
Audio:
•
VIA VT2021 High Definition Audio Codec
•
System Indicator:
•
Power status LED (green LED)
•
HDD activity LED (red LED)
Dimensions
Front View
Side View
Bottom View
1 0 0
m m
m
0 m
1 0
•
Watchdog Timer:
•
System reset
•
Programmable 1 ~255 sec
•
BIOS:
•
AMI Aptio UEFI BIOS, 32Mbit Flash memory
•
Front Panel I/O:
•
3 x Audio jacks: Line-in, Line-out and Mic-in
•
2 x USB 2.0 ports
•
1 x Red LED for HDD activity
•
1 x Green LED for power status
•
1 x Power on/off button
•
Back Panel I/O:
•
1 x Gigabit Ethernet port
•
2 x USB 3.0 ports
•
1 x VGA port
•
1 x Mini HDMI port
•
1 x DC-in jack
•
1 x Antenna hole reserved to support Wi-Fi
•
1 x DC plug strap holder hole
•
Power Supply:
•
12V DC-in (typical: 30W)
•
Dimensions:
•
177mm(W) x 30mm(H) x 125mm(D) (6.96" x 1.18" x 4.92")
•
Weight:
•
0.68kg (1.49lbs)
•
Mounting:
•
VESA mount
•
Mechanical Construction:
•
Aluminum top cover chassis housing
•
Galvanized steel sheet (SECC) body chassis housing
•
Front removable aluminum face plate
•
Operating Temperature:
•
0°C ~ 40°C
Installing the Rubber
1
Feet and Memory
Step 1
On the bottom side of ARTiGO A1250, attach carefully each rubber foot
to the designated area then firmly press it down to ensure the rubber
foot is properly in place.
Step 2
Remove the two screws from the memory access cover then gently lift
up the cover. Flip over the memory access cover and remove the
protective plastic cover of the pre-installed memory thermal pad.
•
Storage Temperature
•
-10°C ~ 60°C
•
Operating Humidity:
•
0% ~ 90% (non-condensing)
•
Compliance
•
CE/FCC
•
Software Compatibility (Operating System):
•
Windows 10
•
Windows 8.1
•
Windows 8
•
Windows 7
•
Windows XP
•
Windows XP Embedded Standard 2009
•
Windows Embedded Standard 7
Notes:
1. The ambient temperature and the CPU loadings affect the system fan rpm.
Therefore, the higher rpm will generate higher fan noise (dB). The smart fan
of ARTiGO A1250 system runs at lowest speed (default) at 25°C room
temperature and when the CPU loading is less than 60%.
2. As the operating temperature provided in the specifications is a result of the
test performed in VIA's chamber, a number of variables can influence this
result. Please note that the working temperature may vary depending on the
actual situation and environment. It is highly suggested to execute a solid
testing and take all the variables into consideration when building the
system. Please ensure that the system runs well under the operating
temperature in terms of application.
Packing List:
•
1 x ARTiGO A1250 system
•
1 x AC-to-DC power adapter
•
1 x Power cord
•
1 x SATA cable
•
1 x Screw park for HDD
•
1 x DC plug strap holder
Note:
Please ensure that all items in the packing list are present before using this
product. If any of the items are missing or damaged, contact your distributor
or sales representative immediately.
Step 3
Align the notch on the SODIMM memory module with the protruding
wedge on the SODIMM slot. Gently insert the SODIMM memory
module at a 30 degrees angle. Push down the SODIMM memory until
the locking clips lock the memory module into place. There will be a
slight tension as the SODIMM memory module is being locked.
1
2
3 0
Step 4
Reinstall the memory access cover and secure it with two screws.
Advertisement

Subscribe to Our Youtube Channel
Related Manuals for VIA Technologies ARTiGO A1250


Summary of Contents for VIA Technologies ARTiGO A1250
-
Page 1: Quick Guide
The ARTiGO A1250 is an ultra-slim size system powered by a high per- • • Watchdog Timer: Storage Temperature formance 1.2GHz VIA Eden ® X4 processor. The ARTiGO A1250 system • • System reset -10°C ~ 60°C is designed to be space saving system with an elegant chassis that fits •... - Page 2 Connect the other end of the Wi-Fi antenna cable to Remove the DC plug strap holder hole cover (rubber) from the back the micro-RF connector labeled “IPEX” on the EMIO-1533 module. panel of the ARTiGO A1250. The hole is located between the antenna Step 2 hole and DC-in jack.
Need help?
Do you have a question about the ARTiGO A1250 and is the answer not in the manual?
Questions and answers