VIA Technologies AMOS-820 Development Manual
Hide thumbs
Also See for AMOS-820:
- Manual (49 pages) ,
- User manual (40 pages) ,
- Quick start manual (27 pages)
Table of Contents
Advertisement
Quick Links
Advertisement
Table of Contents

Related Manuals for VIA Technologies AMOS-820


Summary of Contents for VIA Technologies AMOS-820
- Page 1 DEVELOPMENT GUIDE AMOS-820 HMI Solution Pack v2.0 1.06-11172015-161400...
- Page 2 VIA Technologies, Inc. reserves the right the make changes to the products described in this manual at any time without prior...
- Page 3 Added section 4.2.2 and 4.2.3 1.04 2015/8/20 Corrected u-boot to U-boot 1.05 2015/9/2 Changed the way of U-boot booting kernel Changed document cover from AMOS-820 VAB-820 HMI Solution 1.06 2015/11/12 Pack to AMOS-820 HMI Solution Pack. Modified some descriptions for AMOS-820...
-
Page 4: Table Of Contents
Image Build Image Build ............................................Extract AMOS-820 BSP ..................4 Machine configurations ..................4 Build an image....................4 4. 4. 4. 4. Image Deployment Image Deployment ........ Image Deployment Image Deployment .................... - Page 5 AMOS AMOS- - - - 8 8 8 8 2 2 2 2 0 0 0 0 HMI Solution Pack HMI Solution Pack V V V V2.0 2.0 Development Guide Development Guide AMOS AMOS HMI Solution Pack HMI Solution Pack Development Guide Development Guide Lists of Figures...
- Page 6 HMI Solution Pack V V V V2.0 2.0 Development Guide Development Guide AMOS AMOS HMI Solution Pack HMI Solution Pack Development Guide Development Guide Lists of Tables Table 1 AMOS-820 Solution Pack content..............1 Table 2 Images generated through Bitbake ............... 4...
-
Page 7: Overview
Introduction Introduction The purpose of this document is to provide a practical introduction on developing software for the AMOS-820 (Bare board: VAB-820 Freescale i.MX6 Quad) on a Yocto Project development host. 1.1. Overview AMOS-820 HMI Solution Pack v2.0 is developed based on fsl-yocto- 3.10.17_1.0.0 (Yocto 1.5 Dora) and it enables hardware features. -
Page 8: Bsp Folder Contents
AMOS AMOS- - - - 8 8 8 8 2 2 2 2 0 0 0 0 HMI Solution Pack HMI Solution Pack V V V V2.0 2.0 Development Guide Development Guide AMOS AMOS HMI Solution Pack HMI Solution Pack Development Guide Development Guide 1.2.1. -
Page 9: Setup Building Environment
AMOS AMOS- - - - 8 8 8 8 2 2 2 2 0 0 0 0 HMI Solution Pack HMI Solution Pack V V V V2.0 2.0 Development Guide Development Guide AMOS AMOS HMI Solution Pack HMI Solution Pack Development Guide Development Guide 2. -
Page 10: Image Build
$ cd via-release-bsp via-release-bsp$ MACHINE=imx6qvab820 source via-setup-release.sh -b build-vab820 3.3 Build an image AMOS-820 BSP supports 'via-image-x11' image name. via-release-bsp/build-vab820$ bitbake via-image-x11 There are u-boot.imx, uImage, *.dts and root file system generated. The location for this example can be found in the directory “via “via... -
Page 11: Image Deployment Image Deployment
Image Deployment Image Deployment Image Deployment AMOS-820 supports two booting ways. One is from Micro SD storage card and the other is SPI ROM. This section will guide user through making the Linux system boot media for AMOS-820. Uses could use the image built from BSP, its location is mentioned in the previous Section 3.3, or use the demo image in EVK/... -
Page 12: Making A Micro Sd Card Image
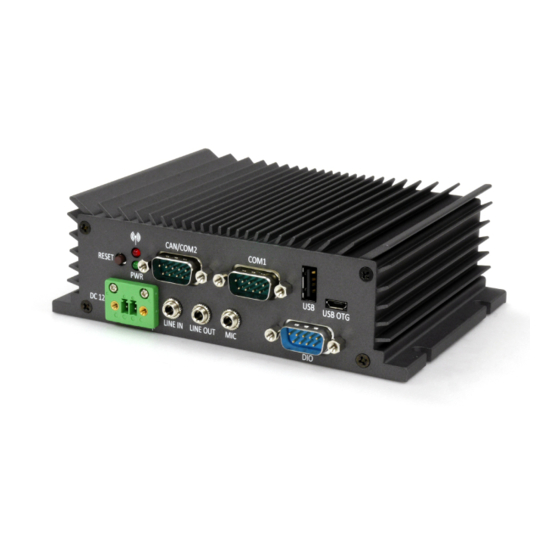
Connect the AMOS-820 and host PC through COM2 of AMOS-820. Run serial port communications program (GtkTerm, Minicom…..) on host PC to receive the booting message. Power on the AMOS-820 and press any key to stop the booting process as shown in Figure 2. -
Page 13: Booting From Spi Rom
If users would like to make a Linux system on eMMC, users need to burn U- boot on SPI ROM, and burn kernel and Root FileSystem on eMMC. 4.2.1 Making Linux System eMMC If users use AMOS-820 first, users must boot from Micro SD card and run the following steps. 4.2.1.1 4.2.1.1... -
Page 14: Burn U-Boot.imx Into Spi Rom
Connect the AMOS-820 and host PC through COM2 of AMOS-820. Run serial port communications program (GtkTerm, Minicom…..) on host PC to receive the booting message. Power on the AMOS-820 and boot from Micro SD card into system. Login account is root... -
Page 15: Copy Images To Emmc
Connect the AMOS-820 and host PC through COM2 of AMOS-820. Run serial port communications program (GtkTerm, Minicom…..) on host PC to receive the booting message. Power on the AMOS-820 and press any key to stop the booting process as shown in Figure 5. - Page 16 If users would like to change loading kernel from Micro SD card or eMMC, users could refer to the two examples below. The AMOS-820 will load kernel from Micro SD card. VAB-820 U-Boot > setenv bootcmd 'run bootcmd_sd' VAB-820 U-Boot > saveenv...
-
Page 17: Restore The Default U-Boot Parameter
AMOS HMI Solution Pack HMI Solution Pack Development Guide Development Guide The AMOS-820 will load kernel from eMMC. VAB-820 U-Boot > setenv bootcmd 'run bootcmd_mmc' VAB-820 U-Boot > saveenv VAB-820 U-Boot > boot 4.3 Restore the default U-boot parameter User could type “destroyenv” in U-boot to restore the default parameter.
Need help?
Do you have a question about the AMOS-820 and is the answer not in the manual?
Questions and answers