Table of Contents
Advertisement
Quick Links
Advertisement
Table of Contents

Related Manuals for Martin RUSH PAR 4 UV


Summary of Contents for Martin RUSH PAR 4 UV
- Page 1 RUSH PAR 4 UV User Manual...
- Page 2 Martin®, RUSH®, HARMAN® and all other trademarks in this document pertaining to services or products by Martin Professional™...
-
Page 3: Table Of Contents
Table of contents Safety information ....................4 Introduction ......................9 Before using the product for the first time ............9 Physical installation ..................10 Standing the fixture on the floor ..............10 Fastening the fixture to a flat surface ............10 Mounting the fixture on a truss..............10 AC power ......................12 Linking fixtures to power in a chain ..............12 Fixture overview....................14... -
Page 4: Safety Information
Keep this user manual for future use. For the latest user documentation and other information for this and all Martin™ products, please visit the Martin website at http://www.martin.com RUSH PAR 4 UV... - Page 5 If you have any questions about how to install, operate or service the fixture safely, please contact your Martin™ distributor (see www.martin.com/where-to for details) or call the Martin™ 24-hour service hotline on +45 8740 0000, or in the USA on 1-888-tech-180. Respect all locally applicable laws, codes and regulations when installing, operating or servicing the fixture.
- Page 6 60598-2-17 Section 17.6.6 and must be capable of bearing a static suspended load that is ten times the weight of the fixture and all installed accessories. Check that all external covers and rigging hardware are securely fastened. RUSH PAR 4 UV User Manual...
- Page 7 Do not modify the fixture in any way not described in this manual or install other than genuine Martin™ parts. Refer any service operation not described in this manual to a qualified technician.
- Page 8 EN62471 for blue light at the distances indicated below: 0.2 m 0.3 m 0.6 m 1.2 m (8 in.) (12 in.) (24 in.) (47 in.) RISK GROUP RISK GROUP RISK GROUP RISK GROUP DO NOT EXEMPT EXPOSE RUSH PAR 4 UV User Manual...
-
Page 9: Introduction
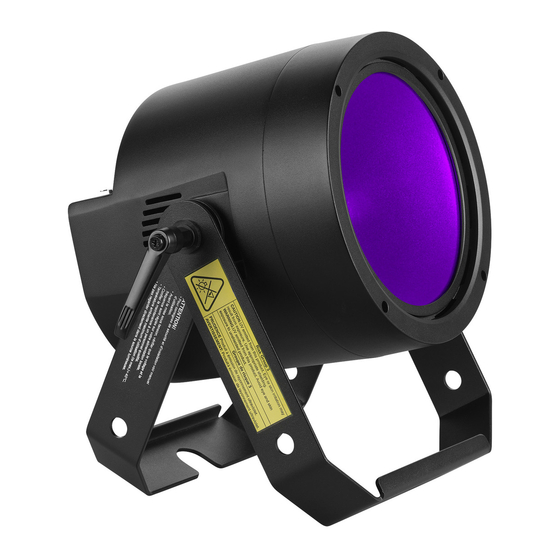
Introduction The RUSH PAR 4 UV is a bright single-lens UV LED PAR Can using a 100 watt COB RGB LED. It offers electronic dimming and strobe and features a bracket for floor or truss mounting. The LED source and rugged, lightweight construction make it ideal for live shows, TV events, stage, concerts, and nightclubs. -
Page 10: Physical Installation
Do not use the fixture to illuminate surfaces within 0.5 m (20 in.) of the fixture. Martin™ can supply safety cables and rigging clamps that are suitable for use with the fixture (see ‘Accessories’ on page 31). Standing the fixture on the floor The fixture may be used free standing on the floor by spreading the two mounting brackets apart. - Page 11 Loop the safety cable through the eye bracket on the fixture (arrowed in illustration below) and around a secure anchoring point. If a safety cable attachment point becomes damaged or deformed, do not use the fixture. Return it to a Martin Service Centre for repair. RUSH PAR 4 UV User Manual...
-
Page 12: Ac Power
Linking fixtures to power in a chain The mains power input cable supplied with the fixture is 0.75mm (18 AWG), rated at 6A, and can only supply enough power for one fixture. If you want to RUSH PAR 4 UV User Manual... - Page 13 MAINS OUT socket on the fixture to link power to the next fixture in a daisy-chain, you need to obtain the larger 2.5mm (14 AWG) power input cables and power link cables available as an accessory from Martin, see ‘Accessories’ on page 31. Using the 14 AWG or 2.5mm cables from Martin™, you can link:...
-
Page 14: Fixture Overview
Please refer to the section above “Linking fixtures to power in a chain” for safe use of this connector. 5,6 –XLR DMX input/output connectors 5-pin XLR connectors are provided for DMX input and output (through to next fixture). RUSH PAR 4 UV User Manual... -
Page 15: Control Data Link
Standard pin-out is pin 4 = data 2 cold (-) and pin 5 = data 2 hot (+). To split the link into branches, use an opto-isolated splitter such as the Martin™ DMX 5.3 Splitter. Terminate the link by installing a termination plug in RUSH PAR 4 UV... -
Page 16: Connecting The Data Link
2. Connect the first fixture’s DMX output to the DMX input of the next fixture and continue connecting fixtures output to input. 3. Terminate the last fixture on the link with a DMX termination plug. RUSH PAR 4 UV User Manual... -
Page 17: Fixture Setup
1. Enter the control menu and select DMX FUNC. Press ENTER. 2. Select DMX ADDR and press ENTER. 3. Use the UP and DOWN buttons to select the desired address setting. 4. Press ENTER to confirm your selection. RUSH PAR 4 UV User Manual... -
Page 18: Setting Dmx Mode And Master-Slave
3. Press ENTER to confirm or press MENU to exit. Dimmer curve You can set the dimmer curve which affects how the fixture brightness tracks the DMX control value for the dimmer. 1. In the SHOW SET menu select DIMCURVE and press ENTER. RUSH PAR 4 UV User Manual... - Page 19 1. In the FIX TEST menu select MANUAL and press ENTER. 2. Select DIMMER, DIMFINE, or STROBE and press ENTER. The fixture will enter manual test mode and any previous levels you have set will be recalled. RUSH PAR 4 UV User Manual...
-
Page 20: Fixture Information
3. Press MENU to exit. Setting options by RDM You can remotely configure the fixture over the DMX line using RDM. Martin® offers a range of suitable RDM-compatible controllers. Martin® M-PC is a Windows-based application available from Martin® that lets you set up, manage and control a lighting installation from a PC that is connected to the installation via a DMX data link. -
Page 21: Scanning For Rdm Devices On The Data Link
PC running the application to the data link via a USB-to-DMX interface box such as the Martin® M-DMX. Note that RDM is only supported on Port A of the M-DMX. A full list of the RDM functions that the fixture supports is given at the end of this chapter. - Page 22 Device management DEVICE_INFO IDENTIFY_DEVICE DMX_START_ADDRESS SOFTWARE_VERSION_LABEL SUPPORTED_PARAMETERS PARAMETER_DESCRIPTION COMMS_STATUS QUEUED_MESSAGE STATUS_MESSAGES STATUS_ID_DESCRIPTION CLEAR_STATUS_ID DEVICE_MODEL_DESCRIPTION MANUFACTURER_LABEL DEVICE_LABEL FACTORY_DEFAULTS DMX_PERSONALITY DMX_PERSONALITY_DESCRIPTION SENSOR_DEFINITION SENSOR_VALUE DEVICE_HOURS BOOT_SOFTWARE_VERSION_ID BOOT_SOFTWARE_VERSION_LABEL LAST_STATE DIMMER_CURVE DEVICE_POWER_CYCLES RUSH PAR 4 UV User Manual...
- Page 23 SLOT_DESCRIPTION RESET_DEVICE RUSH PAR 4 UV User Manual...
-
Page 24: Effects
Effects This section describes the effects provided by the RUSH PAR 4 UV. See ‘DMX protocol’ on page 27 for a full list of the DMX channels and values required to control the different effects. imming Overall intensity can be precisely adjusted from 0 to 100% using 16-bit coarse and fine control. -
Page 25: Maintenance
The user may carry out the service operations described in this manual. All other service operations must be carried out by an authorized Martin™ service technician. Do not try to repair the fixture yourself, as you may create a safety risk or cause damage that is not covered by the product warranty. -
Page 26: Updating Firmware
Updating firmware If Martin releases an updated version of firmware for this fixture, you can update it using the Martin Companion Software using M-DMX. See www.martin.com. Service and repairs Never try to repair the fixture by yourself as this may result in damage or malfunction and it may potentially void your product warranty. -
Page 27: Dmx Protocol
Fast close & slow open Snap 182-189 190-231 Fast open & slow close 232-239 240-247 Random strobe effect slow fast 248-255 Shutter open Dimmer, coarse Fade 0-255 Intensity 0 to 100% Dimmer,fine Fade 0-255 Dimmer intensity fine RUSH PAR 4 UV User Manual... -
Page 28: Control Menus
(… other functions) channels* Temp Val xxx °C Fixture temp Fix Hour xxxh Fixture power on time Info ShowHour xxxh LED illuminated time Firmware Vx.x.x Fixture firmware Reset settings to factory Special Factory Yes/No defaults RUSH PAR 4 UV User Manual... -
Page 29: Troubleshooting
DMX interference from polarity. proximity to a high Attempt to control the voltage installation. fixture with another DMX control device. Move or shield link if it is close to an unshielded high-voltage installation. RUSH PAR 4 UV User Manual... -
Page 30: Specifications
Minimum distance to illuminated surfaces ........0.5 m (20 in.) Minimum distance to combustible materials ......... 0.1 m (4 in.) Connections AC power input/output............Neutrik PowerCon DMX & RDM data in/out ............5-pin locking XLR RUSH PAR 4 UV User Manual... - Page 31 Quick-trigger clamp (vertical hanging suspension only) ....P/N 91602007 Safety cable, 60Kg, BGV C1............P/N 91604006 Cables, 16 A, for connection to power in chains Power relay cable 3 x 2.5 mm2, H07RN-F POWCON-POWCON 1.2 m (3.9 ft.) ..........P/N 91611798 RUSH PAR 4 UV User Manual...
- Page 32 Related Items Martin M-DMX with Martin Companion Uploader Software (see www.martin.com) Ordering Information RUSH PAR 4 UV in cardboard box........... P/N 90480140 Specifications subject to change without notice. For latest product specifications, see www.martin.com Disposing of this product Martin™ products are supplied in compliance with Directive...
- Page 33 The label shown below is displayed on this product. If it becomes difficult or impossible to read, it must be replaced using the illustration below to reproduce a new label sized 35 x 130 mm, in black on a yellow background. RUSH PAR 4 UV User Manual...