Table of Contents
Advertisement
Quick Links
Thank you for purchasing the HAKKO FX-889 Soldering Station.
Please read this manual before operating the HAKKO FX-889.
1. PACKING LIST AND PART NAMES
HAKKO FX-889 Station
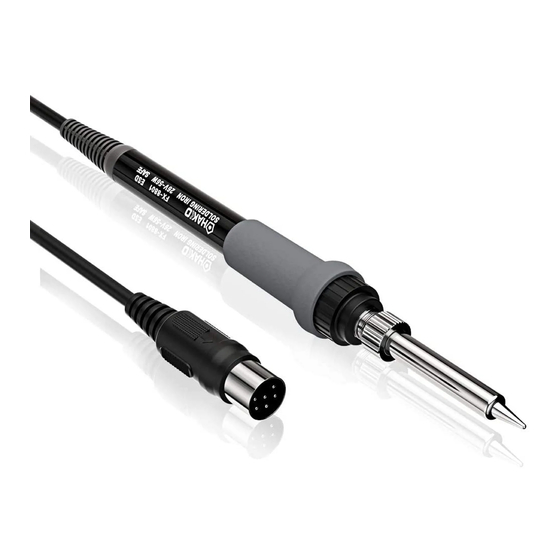
HAKKO FX-8801 Soldering iron
HAKKO FH-801 Iron holder
Power cord
Power switch
(for A.IRON)
Receptacle
HAKKO
FX-889
Power cord
● When using the HAKKO FX-8803 / FX-8804, please use
the applicable iron holder.
● Each Hakko handpiece with the exception of the HAKKO FX-8801 /
FX-8805 has their own instruction manual. Please refer to this
manual for specifications and replacement parts.
Instruction Manual
Keep this manual readily accessible for reference.
1
1
1
1
Power cord
receptacle
Fuse
Power switch
(for B.IRON)
HAKKO FX-8801
Please check to make sure that all items listed
below are included in the package.
Color band
Instruction manual
Iron receptacle
Cleaning
sponge
Power switch
(Main)
HAKKO
FH-801 Iron holder
Color band
(×2)
※ Use this product with the
following models.
• HAKKO FX-8801
Cord assembly
{Soldering iron (M)}
• HAKKO FX-8802
(Soldering iron N
• HAKKO FX-8803
(Soldering gun)
• HAKKO FX-8804
(SMD Hot tweezer)
• HAKKO FX-8805
{Soldering iron (L)}
2
1
Rubber plate
Iron receptacle
Cleaning
wire
Type)
2
Advertisement
Table of Contents

Related Manuals for Hakko Electronics FX-889


Summary of Contents for Hakko Electronics FX-889
- Page 1 Instruction Manual Thank you for purchasing the HAKKO FX-889 Soldering Station. Please read this manual before operating the HAKKO FX-889. Keep this manual readily accessible for reference. Please check to make sure that all items listed 1. PACKING LIST AND PART NAMES below are included in the package.
-
Page 2: Specifications
● Remove power and iron cords by holding the plug, not the wires. ● Be sure the work area is well ventilated. Soldering produces smoke. ● While using the HAKKO FX-889, don’t do anything which may cause bodily harm or physical damage. -
Page 3: Initial Setup
4. INITIAL SETUP A. Setup the iron holder (1) Cleaning Sponge 1. Fit the small sponge pieces into the hollows of the iron holder base. 2. Add an appropriate amount of water into the iron holder base. The small sponge will absorb water and help keep the large sponge damp at all times. -
Page 4: Operation
ENTER ENTER The front panel of HAKKO FX-889 has two control buttons each for “A.IRON” and “B.IRON.” – Use this button to select and change settings. • In the temperature preset mode, pressing this button will change the selected preset temperature while the unit is in operation. - Page 5 B. The preset mode The HAKKO FX-889 has a preset mode that will allow the unit to store up to 5 preset temperatures you can change between instead of using the above normal mode. Initial preset temperatures P1: 250℃ (482℉), P2: 300℃ (572℉), P3: 350℃ (662℉), P4: 400℃ (752℉), P5: 450℃ (842℉) The initial number of active presets is set to 5 at the factory.
- Page 6 D. Restriction on setting changes (Password function) It is possible to restrict certain setting changes to the unit. There are three choices for the password setting. (The factory default is "0 : Open") 0 : Open 1 : Partial 2 : Restricted ○...
-
Page 7: Parameter Setting
※ 3 It is displayed only when either “1: Custom” or “2: valid” is selected in the password setting. ※ 4 ○: Password not required ×: Password required ● Changing Parameter Setting The HAKKO FX-889 has four parameters. Parameter settings can be set for A. IRON and B. IRON respectively. : ℃ or ℉ temperature display seletion ●... - Page 8 A. ℃ or ℉ temperature display selection 1. Either will be displayed if you press the button when is displayed. ENTER will be switched alternately If you press the button. 3. The display will return to if you press the button after selecting.
- Page 9 D. Password setting 1. Press the button to change the display to 2. If you press the button, the display will move to the setting mode selection screen. ENTER If you press the button, (Open), (Partial) and (Restricted) will be switched alternately.
-
Page 10: Tip Maintenance
7. MAINTENANCE Performing proper and periodic maintenance extends product life. Efficient soldering depends upon the temperature, quality and quantity of the solder and flux. Apply the following service procedure as dictated by the conditions of usage. WARNING Since the soldering iron can reach a very high temperature, please work carefully. Except the case especially indicated, always turn the power switch OFF and disconnect the power plug before performing any maintenance procedure. -
Page 11: Checking Procedure
8. CHECKING PROCEDURE Disconnect the plug of the cord assembly and a. Between pins 4 & 5 2.5 – 3.5 Ω (Heating Element) (at time of room temperature) measure the resistance value between the ping of the connecting plug as follows. b. -
Page 12: Error Messages
9. ERROR MESSAGES ● Sensor Error When there is the possibility that a failure has occurred in the sensor or heater (including the sensor circuit), is displayed and the power is shut down. CAUTION The sensor error also occurs if the tip is not inserted properly. ●... -
Page 13: Troubleshooting Guide
10. TROUBLE SHOOTING GUIDE WARNING Before checking the inside of the HAKKO FX-889 or replacing parts, be sure to disconnect the power plug. ● Nothing happens when the power CHECK : Is the power cord and/or connecting plug disconnected? switch is turned on. -
Page 14: Parts List (Station)
Tapping screw ③ M3×6 (8) ① ③ Tapping screw ⑥ M4×10 (4) ⑤ ⑤ ⑥ ● HAKKO FX-889 station Item No. Part No. Part Name Specifications Item No. Part No. Part Name Specifications B5110 Front panel B2419 Power cord, 3-wire cord... - Page 15 12. PARTS LIST (Soldering iron) ● HAKKO FX-8801 Soldering iron Item No. Part No. Part Name Specifications 1 ~ 11 FX8801-01 HAKKO FX-8801 ● Soldering iron parts Item No. Part No. Part Name Specifications B1785 B3469 Tip enclosure See “13. TIP STYLES” B2022 Nipple B2032...
-
Page 16: Tip Styles
T18-CF2* T18-CF3* T18-D08 SHAPE-0.8D T18-D12 SHAPE-1.2D T18-D16 SHAPE-1.6D T18-D24 SHAPE-2.4D T18-I SHAPE-I T18-K SHAPE-K * Tinned on the soldering surface only. ● Use only genuine Hakko soldering iron tips. Replacement tips for the HAKKO FX-889 are designated the T18 series. -
Page 17: Wiring Diagram
14. WIRING DIAGRAM Ground(Chassis) Ground(Chassis) Power receptacle Ground(Chassis) Green/Yellow White Varistor Receptacle Receptacle Black Black Black White White Black Black White White Green/Yellow Green/Yellow Main power-supply switch 26V 0V H2 H1 SE1 SE2 P.W.B. P.W.B. Black Black Transformer Switch Switch Black Black... - Page 18 HEAD OFFICE 4-5, Shiokusa 2-chome, Naniwa-ku, Osaka 556-0024 JAPAN TEL:+81-6-6561-3225 FAX:+81-6-6561-8466 http://www.hakko.com E-mail:sales@hakko.com OVERSEAS AFFILIATES U.S.A.: AMERICAN HAKKO PRODUCTS, INC. TEL: (661) 294-0090 FAX: (661) 294-0096 Toll Free (800)88-HAKKO 4 2 5 5 6 http://www.hakkousa.com HONG KONG: HAKKO DEVELOPMENT CO., LTD. TEL: 2811-5588 FAX: 2590-0217 http://www.hakko.com.hk E-mail:info@hakko.com.hk...
Need help?
Do you have a question about the FX-889 and is the answer not in the manual?
Questions and answers