Table of Contents
Advertisement
Quick Links
Download this manual
See also:
Instruction Manual
Soldering Starion
Instruction Manual
Thank you for purchasing the HAKKO FX-801 soldering station.
Please read this manual before operating the HAKKO FX-801.
Keep this manual readily accesible for reference.
TABLE OF CONTENTS
............................................................ 5
●
●
........................................................ 1
................................................... 1
......................................................... 3
........................................................ 4
........................................ 10
.....................................................16
.....................................17
...........................................18
............................19
.................. 2
Advertisement
Table of Contents

Related Manuals for Hakko Electronics FX801


Summary of Contents for Hakko Electronics FX801
-
Page 1: Table Of Contents
Soldering Starion Instruction Manual ● Thank you for purchasing the HAKKO FX-801 soldering station. Please read this manual before operating the HAKKO FX-801. Keep this manual readily accesible for reference. ● TABLE OF CONTENTS 1. PACKING LIST ............1 2. SPECIFICATIONS ........... -
Page 2: Packing List
1. PACKING LIST Please check to make sure that all items listed below are included in the package. HAKKO FX-801 Station Power cord HAKKO FX-8002 Soldering iron Heat resistant pad Iron holder (with cleaning wire) Instruction manual Connecting cable HAKKO FX-8002 Heat resistant pad Power HAKKO FX-801... -
Page 3: Warnings, Cautions And Notes
3. WARNINGS, CAUTIONS AND NOTES Warnings, cautions and notes are placed at critical points in this manual to direct the operator’s attention to significant items. They are defined as follows: Failure to comply with a WARNING may result in serious injury or death. WARNING: Failure to comply with a CAUTION may result in injury to the operator, or damage to the CAUTION :... -
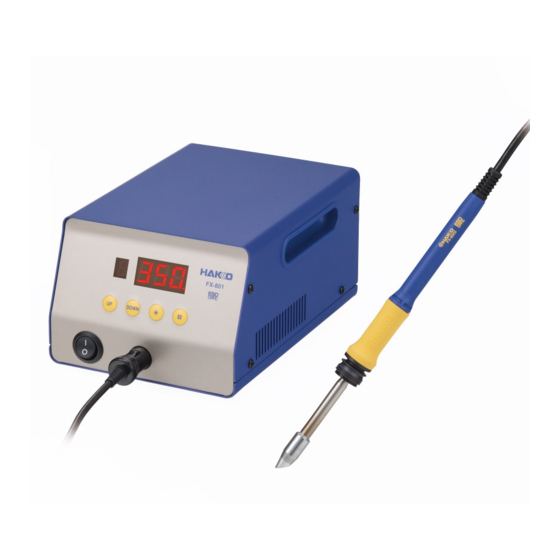
Page 4: Part Names
4. PART NAMES ● HAKKO FX-801 Preset number display Setting display Control button Power switch Receptacle Fuse Jack... -
Page 5: Initial Setup
5. INITIAL SETUP A. Iron holder The iron receptacle has two grooves. If the edge ● Loosen the adjusting screws to change the angle of the iron tip is likely to come into contact with the of the iron receptacle as you like, then tighten the iron holder or the iron holder becomes hot, use the screws. -
Page 6: Operation
6. OPERATION The HAKKO FX-801 has the following four control buttons. When press for less than one second, enters preset number selection screen. When press and hold for at least one second, enters preset temperature changing screen. Increase the value in the appropriate display window. Decrease the value on the display. - Page 7 Changing temperature setting CAUTION The temperature setting range is from 50 to 500℃. (from 120 to 940℉) ●If you enter a value outside the temperature setting range, the display returns to the hundreds digit, and you have to enter a correct value. Example:350 to 400℃...
- Page 8 Selecting the preset number You can call up the preset temperature by pressing the buttons. Initial preset temperature is 0:300℃, 1:350℃, 2:375℃, 3:400℃, 4:450℃ and 5:500℃. Example:preset number 0 (300℃) to No.3 (400℃) 1. Press the button once. Preset number display will begin to flash. 2.
- Page 9 Entering the tip offset value Example:If the measured temperature is 410℃ and set temperature is 400℃, the difference is -10℃. (need to decrease by 10℃) So, enter the figure which 10 is deducted from present offset value. 1. Press and hold the button for at least one second.
- Page 10 Restriction on setting changes (Password function) It is possible to restrict certain setting changes to the unit. There are three choices for the password setting. (The factory default is "0 : Open") 0 : Open 1 : Partial 2 : Restricted Move to the parameter setting mode ○...
-
Page 11: Parameter Setting
7. PARAMETER SETTING Parameter name Parameter number Value Initial value Temperature display ℉( )/℃( ) ℃(℉*) 6 min. Auto sleep time setting 0 - 29 min. 300℃ Low temperature error setting 30 - 300℃ (54 - 540℉) Buzzer setting OFF( )/ON( ) ON ( ) (S-E sound , C-E sound) ON ( ) Buzzer setting... - Page 12 ● : ℃ or ℉ temperature display selection 1. When the display changes to , the station enters the mode for changing the temperature display. will be switched alternately if you press the ( ) button. 3. The display will return to if you press the ...
- Page 13 ● : Low temperature error setting When the temperature drops below a set limit, an error is displayed and the buzzer sounds. When the temperature returns within the allowable range, the buzzer stops. Low temperature setting range : for Celsius: 30 to 300ºC for Fahrenheit: 54 to 540ºF Example : When the set temperature is 350ºC and the low temperature error setting is 100ºC, a warning buzzer sounds when the temperature drops to 250ºC.
- Page 14 ● : Auto shutoff on/off setting When the auto shutoff function is set to on and no operation is performed for 30 minutes ( Initial value ) after the iron is set in the iron holder, the buzzer sounds and the auto shutoff function will be enabled.
- Page 15 ● : Password setting If selecting the Restricted, perform the setting for password. If selecting the Partial, choose whether or not the password function is needed when changing the set temperature, the preset number and the offset value and set the password. 1.
- Page 16 ● : Auto shutoff time setting Set auto shutoff time. The setting is available within 30 to 60 minutes in increments of one minute. 1. Auto shutoff time (30 minutes early) will be displayed if you press the button when displayed.
-
Page 17: Maintenance
8. MAINTENANCE Performing proper and periodic maintenance extends product life and contributes to the quality of soldering work. Efficient soldering depends upon the temperature, the quality and quantity of the solder and flux. Apply the following service procedure as dictated by the conditions of the usage. WARNING Since the soldering iron can reach a very high temperature, please work carefully. -
Page 18: Checking Procedure
9. CHECKING PROCEDURE WARNING Unless otherwise directed, carry out these procedures with power switch OFF and the power UNPLUGGED. ■Check for a broken heater or sensor Verify the electrical integrity of the heater and sensor. Measure the resistance of the heater and sensor while at room temperature (15℃ to 25℃; 59 to 77℉) It should be 3.4Ω±10%. -
Page 19: Error Messages
10. ERROR MESSAGES ● Sensor error When there is possibility that a failure has occured in the sensor or heater (including the sensor circuit), is displayed and a buzzer sounds. ● Soldering iron error is displayed and a buzzer sounds if the iron cable is not attached to the station or wrong soldering iron is connected. -
Page 20: Trouble Shooting Guide
11. TROUBLE SHOOTING GUIDE ● The unit does not operate when the power switch is turned ON. CHECK : Is the power cord and/or the connection plug disconnected? ACTION : Connect it. CHECK : Is the fuse down? ACTION : Investigate why the fuse blew and then replace the fuse. If the fuse blows again, send the unit in for repair. - Page 21 ●The low-temperature alarm tolerance error is displayed. CHECK : Is the tip too small for the items to be soldered? ACTION : Use a tip with a larger thermal capacity. CHECK : Is the setting value for the low-temperature alarm tolerance too low? ACTION :...
- Page 22 焊鐵部 插頭 電路板 HEAD OFFICE 4-5, Shiokusa 2-chome, Naniwa-ku, Osaka 556-0024 JAPAN TEL:+81-6-6561-3225 FAX:+81-6-6561-8466 http://www.hakko.com E-mail:sales@hakko.com OVERSEAS AFFILIATES U.S.A.: AMERICAN HAKKO PRODUCTS, INC. TEL: (661) 294-0090 FAX: (661) 294-0096 Toll Free (800)88-HAKKO 4 2 5 5 6 http://www.hakkousa.com HONG KONG: HAKKO DEVELOPMENT CO., LTD. TEL: 2811-5588 FAX: 2590-0217 http://www.hakko.com.hk E-mail:info@hakko.com.hk...
Need help?
Do you have a question about the FX801 and is the answer not in the manual?
Questions and answers