
Related Manuals for Convaid Rodeo RD 12


Summary of Contents for Convaid Rodeo RD 12
- Page 1 ENGLISH User’s Guide Rodeo Lightweight Tilt-In-Space Wheelchair READ INSTRUCTION BEFORE USING SAVE THIS BOOK FOR FUTURE REFERENCE...
- Page 2 Convaid. © Copyright 2017 by Convaid. All rights reserved.
-
Page 3: Table Of Contents
Table of Contents Product Overview Definition of Symbols………………………………………………… Warnings………………………………………………………………… Rodeo With Seating Overview………………………………………. Rodeo Without Seating Overview………………………………….. Specifications With Seating………………………………………..Specifications Without Seating……………………………………… Setting Up Contents in the box……………………………………………………… How To Remove Chair from box……………………………………... Preparing the Chair for Use…………………………………………… Push Handle Adjustment ………………………………………………. Wheel Lock Operation………………………………………………..Unfolding the Chair……………………………………………………… Folding the Chair…………………………………………………………. Fitting Guide Seat Back Height……………………………......... Seat Width…………………………………..........Seat Depth……………………………………........Seat Depth Adjustment Without Seating…………………………..Seat Depth Adjustment With Seating………………………………..Tilt Adjustment……………………………………………...... Recline Function……………………………………………....Fabric Removal……………………………………………………... Seat Upholstery Attachment…………………………………………… Pelvic Positioning Belt……………………………………………..Two-Point Positioning Belt…………………………………………….. Three-Point Positioning Belt…………………………………………… H-Harness with Padded Covers………………........Footplate Adjustment……………............Individual Footplates…………………………………………………….. Foot Positioners……………………………………………………..Footbox Cover……………………………………………………..... Wheels Specifications……………………………………........Rear Tire Removal………………………………………………………..Rear Tire Installation………………………………………………………. - Page 4 Headrest Extension………………………………………......Padded Headwing…………………………………………………………… Occi Headwing………………………………………........Adjustable Canopy…………………………………........Oxygen Tank Bag…………………………………………………………..I.V. Pole…………………………………………………………..... Elevating Leg Rest………………………………………………………….. Medial Thigh Support (Abductor)………………………………………... Lateral Thigh Support (Adductor)………………………………………... Anti-Tip Tubes..................Caster Locks………………………………………………………………..Utility Bag…………………………………………………………………..Shoe Holders………………………………………………………………..Optional Attendant Hand Brake………………………………………..Upper Extremity Support Surface (Tray)………………………………..Calf Panel…………………………………………………………………..Height Adjustable Flip-Up Armrests………………………………………. Solid & Mesh Side Panels………………………………………....Seat Cushions…………………………………………………………………. Fitting…………………………………………………………………....Caution…………………………………………………………………..... Transit Models Transit Option……………………………………………………………..Transit Mode Instructions……………………………………...... Recommended Clear Zones in Vehicle……………………………... Providing Clear Space & Padding……………………………………..Proper Use of Equipment……………………………………...... Restraining the Wheelchair Occupant ……………………………... Using Postural Belts & Supports……………………………………..Trays & Other Wheelchair Components……………………………..WTORS Manufacturers……………………………………………….... Important Information Maintenance, Operating & Safety Instructions………………..... Warranty……………………………………………………………..Back Cover...
- Page 5 If instructions are not clear and further explanation is necessary, please contact your Convaid provider. If you do not follow all instructions and warnings, damage to the chair or serious injury may occur. The latest version of all instructions and product safety notice are available on the Convaid website (www.convaid.com) and can be printed...
- Page 6 CONVAID USER’S GUIDE This symbol indicates a wheelchair which cannot be used in motor vehicle as vehicle seat. This wheelchair does not comply with WC19 (RESNAWC-4:2012 or ISO7176-19:2008) and cannot be used as a vehicle seat to transport the user in a vehicle.
- Page 7 WARNING: Changes & Adjustments Adjustments made to the chair will change the balance and function of the chair and may increase risk of tip over. Consult your Convaid Service Deal- er before making adjustments. Warranty will be voided if modifications that change the structure of frame of the chair are made without manufacturer’s authorization.
- Page 8 CONVAID USER’S GUIDE WARNING: Do not go up or down stairs without the assistance of another person or with user in the chair. If devices such as ramps or ele- vators are available, please use them. If they are not available, then the chair should be carried over the obstacle by two people without the user in the chair.
- Page 9 WARNING: Many of the screws, bolts, and nuts used on this chair are specialized or high-strength fasteners. Only use fasteners purchased through Convaid or a Convaid service dealer. WARNING: Do not use the chair unless it has proper tire pressure.
-
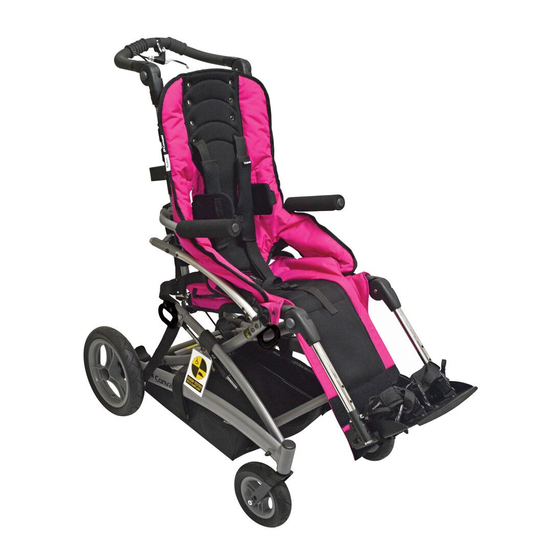
Page 10: Rodeo With Seating Overview
CONVAID USER’S GUIDE Rodeo With Seating Overview Chair Warning Label One Piece Height Adjustable Push Handle Tilt Adjustment Lever Height Adjustable Flip-Up Armrest (Option) Swing Away Laterals (Option) Transit Anchor (Option) Single Foot Activated Elevating Leg rest Wheel Lock Bar 11.5” x 2.5” Rear Solid Wheels... -
Page 11: Rodeo Without Seating Overview
CONVAID USER’S GUIDE Rodeo Without Seating Overview Chair Warning Label Back Canes Tilt Adjustment Lever Depth Adjustable Solid Seat Pan (Option) Release Strap Recline 11.5” x 2.5” Rear Solid Wheels One Piece Angle Adjustable Footplate Fig. 2 7.5” x 2” Front Solid Wheels... - Page 12 CONVAID USER’S GUIDE RODEO SPECIFICATIONS WITH SEATING Model Size RD 10 RD 12 RD 14 RD 16 Seat Width** 10” 12” 14” 16” Seat Depth** 7” - 12” 9” - 14” 11” - 16” 13” - 18” Seat Back Height 21”...
- Page 13 CONVAID USER’S GUIDE RODEO SPECIFICATIONS WITHOUT SEATING Model Size RD 10 RD 12 RD 14 RD 16 Seat Width** 10” 12” 14” 16” Seat Depth** 9.5” - 13.5” 11” - 15” 13” - 17” 15” - 19” Seat Back Height 21”...
-
Page 14: How To Remove Chair From Box
Convaid recommends the initial fitting, adjustments, and setup take place with the help of your Convaid Representative and/or Convaid Service Dealer. However, if the instructions contained in this user’s guide are followed carefully, a caregiver or attendant will be able to set up and assem-... -
Page 15: Push Handle Adjustment
CONVAID USER’S GUIDE Setting Up Push Handle Adjustment 1. Press both gray buttons on the outside of the pivot joints of the push handle simultaneously. Fig. 3 2. While holding the buttons down, move the push handle up or down to the desired position. -
Page 16: Unfolding The Chair
CONVAID USER’S GUIDE Unfolding the Chair 1. Lay chair down with seat facing upward. Fig. 7 2. Unbuckle closure strap. Fig. 8 3. Push in gray buttons on leg rest extensions and swing them out and upward until parallel with the ground. Fig. 9 & 10 4. -
Page 17: Folding The Chair
CONVAID USER’S GUIDE WARNING: Look to see that safety lock pins are visible and fully exposed on both sides. (Fig. 15) Adjust push handle and footplate into desired position. If applicable, lower armrests, unfold lateral trunk supports and place seat cushion onto seat upholstery. - Page 18 CONVAID USER’S GUIDE Fig. 23 Fig. 24 Fig. 25 Push in gray buttons on leg rest extensions, swing them upward until parallel with the ground. (Fig. 26) Detach the calf panel and fold up footplate. Fig. 27 To disengage safety lock, grasp red levers and simultaneously squeeze them together with one hand.
-
Page 19: Seat Back Height
CONVAID USER’S GUIDE Fitting Guide Correct seating and positioning encourages good posture, which in turn aids circulation, breathing and digestion. Please take the time to properly adjust the chair to fit the user. If the user is not correctly positioned, check the accessories section of this user’s guide to see if one or more of our acces- sories would help to facilitate posture or consult a physical therapist. -
Page 20: Seat Depth
CONVAID USER’S GUIDE Seat Depth Measure from the most posterior portion of the buttocks to the back of the knee. Subtract from that measurement 1-2” (25mm-51mm) to allow adequate clearance between the seat and the back of the knee. Fig. 38 Fig. -
Page 21: Seat Depth Adjustment With Seating
CONVAID USER’S GUIDE Seat Depth Adjustment With Seating 1. Push the gray buttons on the leg rest extensions; swing them upward until parallel with the ground. Fig. 42 2. Peel off seat upholstery from the mesh seat support. Fig. 43 3. Remove bolt with a 5/32” Allen wrench. Fig. 44 4. -
Page 22: Recline Function
CONVAID USER’S GUIDE Recline Function HELPFUL HINT: For ease of use, lift the push handle upwards during the entire recline process. Upright Position Step: 1 Rotate Push Handle downward: Push-in the Gray Push Buttons located on the side of the push handle, at the same time, rotate the Push Handle downward. Fig. 50 Gray Push Button Fig. 50 & 51... -
Page 23: Fabric Removal
CONVAID USER’S GUIDE Fabric Removal Chair upholstery may be removed to facilitate cleaning. Removing seat upholstery and under seat mesh support: Fig. 55-58 1. Remove screws at the front of seat tube. Fig. 55 2. Unfasten the Velcro on the seat upholstery and the under seat mesh support located at the back of the seat. -
Page 24: Seat Upholstery Attachment
CONVAID USER’S GUIDE Seat Upholstery Attachment The seat upholstery is attached to the mesh seat support with Velcro. The mesh support is attached to the seat frame with Velcro and Velcro straps. The mesh can be tightened or loosened from the side or rear to give the seat a supportive contour. -
Page 25: Three-Point Positioning Belt
CONVAID USER’S GUIDE Three-Point Positioning Belt To Buckle: Slip the metal clasp on the belt strap into the crotch strap buckle. Fig. 68 To Release: Press the gray button on the buckle and pull out the clasp. Fig. 68 Depth Adjustable Strap: The depth adjustable strap prevents the user from sliding out of the chair. -
Page 26: Footplate Adjustment
CONVAID USER’S GUIDE Footplate Adjustment Fig. 30a All Convaid footplates are height adjustable. To determine the correct seat-to-footplate height, measure from Fig. 73 the back of the knee to the bottom of the heel. Fig. 73 Note: By flipping the footplate upside-down, it allows you to accommodate shorter leg drops than the chair is otherwise able to do in standard configuration. -
Page 27: Individual Footplates
CONVAID USER’S GUIDE Individual Footplates To adjust minimum seat to footplate height: 1. Flip and swap the individual footplate assemblies. Fig. 78 & 79 2. Use a 5/32” Allen wrench to loosen the nuts and bolts from each footplate. 3. Slide the footplate out and adjust the lock pin to the upper locking position. -
Page 28: Foot Positioners
CONVAID USER’S GUIDE Foot Positioners Adjustable foot positioners hold feet in position on the footplate. The foot positioners may be criss-crossed over the top of the foot to secure the entire foot. Fig. 80 The foot positioners can also be converted to an ankle strap. -
Page 29: Footbox Cover
CONVAID USER’S GUIDE Footbox Cover To install footbox cover to one-piece footplate: 1. Attach the footbox cushion to the footbox base using the Velcro. Fig. 87 Note: Make sure the front flap of the box cushion is facing forward when attaching the cushion. 2. Secure the cushion to the footbox by wrapping the front flap of the cushion underneath the footbox. Fig. 88 3. After securing the cushion to the footbox, attach the cover by wrapping it over the footbox base. -
Page 30: Specifications
CONVAID USER’S GUIDE Wheels Specifications The Rodeo comes standard with 7.5" x 2" (190mm x 51mm) front and 11.5" x 2.5" (290mm x 60mm) rear solid tires. When ordering replacements or pneumatic wheels, please have the following information available: •... -
Page 31: Rear Tire Installation
CONVAID USER’S GUIDE Rear Tire Installation Fig. 93 Fig. 94 WARNING: Always make To install, slide wheel onto rear axle and push with ball of hand sure the wheels are until it clicks into place. installed properly. You will hear a “click” when the wheel lock into place. -
Page 32: Heavy Duty Under Storage Basket
CONVAID USER’S GUIDE Accessories Convaid offers a wide variety of supports to help properly position the user. Note: Convaid’s chairs provide a semi-contour fit around the body. The user must be fitted correctly into the chair to achieve optimal posture and comfort. Heavy Duty Under Storage Basket The Heavy Duty Under Storage Basket is designed for large or heavy support equipment, such as a ventilator. It is made of texteline mesh and durable plastic and suspends from the chair frame by Velcro straps. -
Page 33: Adjustable Firm Trunk Support
CONVAID USER’S GUIDE Adjustable Firm Trunk Supports The lateral Thoracic supports help maintain midline positioning of the trunk. To adjust the lateral Thoracic supports: 1. Release the double sided Velcro support straps on the back of the chair to allow for vertical height adjustment of the lateral trunk support. Fig. 100 2. -
Page 34: Headrest Extension
CONVAID USER’S GUIDE Headrest Extension Extends back height to provide head support of taller individuals. The Headrest extension fits easily into sockets of the back frame. To adjust height, move rubber grommets on the mounting posts to desired position. Fig. 104 & 105 Fig. 104 Fig. 105 Padded Headwing The padded headwing provides firm support for midline positioning. Fig. 106 The headwing can be attached at any height by wrapping the Velcro straps around the back of the frame or headrest extension. -
Page 35: Occi Headwing
CONVAID USER’S GUIDE Occi Headwing The Occi Headwing comfortably positions the head in alignment. To attach, thread the straps through the slits in the back upholstery and attach at the back of the chair. For added secure- ment, thread laces through the grommet holes in the upholstery, and tie. Fig. 108–113. If the Occi Headwing is mounted to the headrest extension, wrap the straps around the headrest extension and secure by lacing the threads through the grommet holes. -
Page 36: Adjustable Canopy
CONVAID USER’S GUIDE Adjustable Canopy Adjustable Canopy Installation: 1. Align plastic canopy retaining clips with frame of the chair. Push on clips with the ball of your hand until they snap into Installation: place. Fig. 114 & 115 1. Ali gn plasti c canopy retai ni ng cli ps wi th frame of 2. -
Page 37: I.v. Pole
CONVAID USER’S GUIDE I.V. Pole The folding I.V. pole offered on the Rodeo accommodates the user when intravenous fluids, medication, or G-tube feeding are necessary. Fig. 119 1. The pole easily secures to the Rodeo by clamping the pole mount on the side mobility base tubing. Fig. 120 & 121. Place bolt into hole of clamp and screw on using 5/32”... -
Page 38: Medial Thigh Support (Abductor)
CONVAID USER’S GUIDE Fold or Swing-Away Lateral Supports To fold or swing-out the lateral trunk supports, squeeze the latch located at the bottom of Lateral Support Bar, and fold the pad inwards or outwards. (Fig. 127 & 128). Make sure the lateral trunk supports are folded when you fold the chair. -
Page 39: Lateral Thigh Support (Adductor)
CONVAID USER’S GUIDE Lateral Thigh Support (Adductor) Pulls thighs together to improve hip alignment and stabilize sitting posture. Degree of adduction can be varied. 1. Cross the adductor flaps over the user’s thighs. 2. Wrap straps under and around the seat tube and at- tach with the buckle under seat. Fig. 130 Fig. -
Page 40: Anti-Tip Tubes
CONVAID USER’S GUIDE Anti-Tip Tubes 1. To install the anti-tip tube, align the tube with the end of the round frame tubing located next to the rear wheel. Fig. 133 2. Push the spring button while positioning the anti-tip tube onto the round frame tubing, and then push until the “release button”... -
Page 41: Shoe Holders
CONVAID USER’S GUIDE Shoe Holders 1. Thread the 3-Bar Slide onto the strap with the curved side down. Feed the strap through the molded strap slot. If you have the padded version, thread the Pad onto the strap as shown Fig. 138 2. -
Page 42: Upper Extremity Support Surface (Tray)
CONVAID USER’S GUIDE Upper Extremity Support Surface (Tray) The trays are great for feeding and for trunk stabilization. They fea- ture a safety lip and are easy to clean. 1. Depress spring button on underside of armrest until tray mount tube pops out. 2. Grasp tray mount and extend until locked into position. Fig. 145 3. -
Page 43: Calf Panel
CONVAID USER’S GUIDE Calf Panel The calf panel provides support for the lower legs. To attach, wrap the calf panel around leg rest extensions and Velcro to the back of the panel. Make sure it Velcros to the calf panel support (seat upholstery leg extension) Fig. -
Page 44: Solid & Mesh Side Panels
CONVAID USER’S GUIDE Solid & Mesh Side Panels The side panels are designed to keep the occupant’s arms inside the chair and to provide added security. The side panels are attached to the chair with 1 screw at the top and 2 Velcro straps at the bottom. - Page 45 CONVAID USER’S GUIDE Seat Cushions Support: General Use Cushion Flat foam with wooden insert. Fig. 158 • Promotes stability and posture control and provides comfort for the user. • Waterfall front eliminates pressure points at the back of the knees. • Cost effective cushion choice.
- Page 46 CONVAID USER’S GUIDE Fitting The fitting of the cushion should be done by an experienced clinician. When fitted correctly, the cushion will help provide stable support and promote good posture. Consult the clinician for ques- tions regarding individual needs. Select the cushion size to match the seat width and depth of the chair. Measure the distance be- tween the buttocks and the back of the knees.
- Page 47 CONVAID USER’S GUIDE Caution The height and weight of the occupant, in conjunction with a seat cushion may affect the center of gravity and cause the wheelchair to become unstable, potentially resulting in injury. Prior to use, assess the stability of the wheelchair by sitting in it with the cushion attached.
-
Page 48: Transit Option
Note: Tray, storage basket, canopy and oxygen tank bag must be removed during transport in bus or van, except when medically necessary. Note: Convaid recommends the use of all Transit Required Accessories during transportation in a motor vehicle; which include the H-harness with 3-point pelvic belt (used for... - Page 49 CONVAID USER’S GUIDE Wheelchair Lateral Stability and Belt Restraint Accommodation Rating Wheelchair Model Mass (Weight) of Test Rating Lateral Stability ** Wheelchair (lb./kg) (A,B,C,D)* (in./mm) RD-10T 29/13 0.51/13.0 RD-12T 33/15 0.79/20.0 RD-14T 37/17 0.79/20.0 RD-16T 39/18 2.17/55.1 *A = Excellent; B = Good; C = Fair; D = Poor ** “Lateral stability”...
- Page 50 CONVAID USER’S GUIDE WARNING: When riding aboard a motor vehicle, it is preferred that the wheelchair user transfer into the vehicle’s manufacturer’s seat and use a federally approved, crash-tested seat. WARNING: During transit, a five-point harness must be used for occupant weight less than 51 lb (23 kg). WARNING: Rodeo was dynamically crash tested in a forward facing con- figuration using an appropriately sized crash-test dummy restrained by both upper-torso (shoulder) and lower-torso (lap) belts.
-
Page 51: Recommended Clear Zones In Vehicle
WARNING: Do not use the chair if it has been involved in a crash. In the event that your Rodeo is involved in a crash, please contact the Convaid Service Dealer or Convaid Customer Service Representative in order to arrange an evaluation of your Rodeo. -
Page 52: Proper Use Of Equipment
Position the wheelchair between the front and rear tiedown anchor points, allowing for the correct angle of adjustment of the tiedown straps, as illustrated in Fig. 165. Your Convaid transit wheelchair can be easily secured by four-point strap- type tiedowns by attaching the hook end fittings of the tiedown straps to the four red Fig. 165 securement-point brackets located on the four tubular legs of the wheelchair or by threading tiedown straps through the openings in the securement points. - Page 53 CONVAID USER’S GUIDE PREFERRED ANGLES OF FRONT AND REAR TIEDOWN N STRAPS (Fig. 167) AND PREFERRED LOCATIONS OF FLOOR ANCHOR POINTS (Fig. 166). Fig. 166 Fig. 167 Fig. 168 Fig. 169 FIG. 168: FRONT TIEDOWN STRAPS ANGLED AWAY FROM SIDES OF WHEELCHAIR.
- Page 54 CONVAID USER’S GUIDE STANDARD METAL CLIP (FIG. 170) AT LOWER END OF SHOULDER BELT AND AT END OF OPTIONAL WHEELCHAIR-ANCHORED LAP BELT USED TO CONNECT TO PIN/BUSHING (FIG. 171) ON LAP BELT OR ON WHEEL- CHAIR SECUREMENT POINT BRACKETS. Fig. 170...
-
Page 55: Restraining The Wheelchair Occupant
The optional belt, which has been dynamically tested in accordance with Annex A of WC19, may be ordered from Convaid at a nominal additional cost. To attach the lap belt to the wheelchair, secure the metal clips at the ends of the lap belt (Fig. 170) to the pin/bushing connectors located on the wheelchair’s rear securement-point brackets. -
Page 56: Using Postural Belts & Supports
CONVAID USER’S GUIDE Note: Steeper side view pelvic-belt angles are especially important if the pelvic belt is intended to be used for postural support in addition to occupant restraint in a frontal crash. Steeper angles will reduce the tendency for a vertical gap to develop between the user and the belt due to com- pliance of seat cushions and belt movement, thereby reducing the tendency for the user to slip under the belt for the belt to ride up on the soft abdomen during normal use. -
Page 57: Trays & Other Wheelchair Components
WTORS Manufacturers Convaid is a wheelchair manufacturer and does not offer wheelchair tiedown and occupant re- straint systems (WTORS). However, products that comply with current WTORS standards can be obtained from the following companies that specialize in crash-tested WTORS: Q’Straint, Sure-Lok, Unwin and Ortho Safe specialize in crash-tested tie-down systems and are... -
Page 58: Maintenance, Operating & Safety Instructions
2. Intended Convaid’s Rodeo is a lightweight non-rigid high strength aluminum wheelchair with a tilt and recline mobility system for everyday indoor and outdoor use on flat, firm terrain. The Convaid Rodeo is an attendant propelled device, its’ intended function and use is to provide mobility to persons with physical disabilities who are frequently or permanently non-ambulatory and limited to a sitting position. - Page 59 CONVAID USER’S GUIDE 4. Safety Instructions • Follow folding/unfolding instructions. • Never leave occupied chair unattended. • Do not attempt to take occupied chair up or down stairs, escalators, steep inclines, or icy or slippery surfaces. • To avoid tipping, do not overload the chair, or hang heavy items on the push handles.
- Page 60 CONVAID USER’S GUIDE • When going down a curb, approach the curb backwards. Lower the rear wheels down the curb and continue backwards, taking the weight off the front wheels so they can be gently low- ered. • When transferring user to or from chair, apply wheel lock.
- Page 61 • Armrests & foam • Frame • Contacting a Convaid Dealer for service • or repair*** Use a non-toxic, hypoallergenic lubricant for all moving parts of the frame Follow cleaning instructions for appropriate user hygiene NOTE: Repair or replacement of non-removable, worn or broken parts must be performed by a qualified service facility.
- Page 62 Before extended storage periods, and before reuse, the entire chair needs to be serviced, cleaned and disinfected. 8. Reuse Your Convaid chair should undergo a wipe-down disinfection before reuse. Please use a non-tox- ic, biodegradable disinfectant solution suitable for surface disinfection. Please check the following components (see MAINTENANCE CHART) for operation, intactness, etc.
- Page 63 Positioning accessories should be correctly adjusted and secure. CE Mark Authorized Representative B.S. Partnership 41 Dan-Y-Coed Road, Cardiff, CF23 6NB, UK Convaid Service Dealer Please record the Convaid Dealer from which you purchased your chair: Company:___________________________________________________ Address:____________________________________________________ Phone:______________________________Website:_________________ Contact:_______________________________Email:_________________ Serial #:_____________________________________________________ Or contact Convaid Customer Service at...
-
Page 64: Warranty
Limited Warranty Convaid warrants to the original retail purchaser of the Convaid product, that if any part thereof proves functionally defective in material or workmanship within the specified warranty period, such defective part will be repaired or replaced (at Convaid’s discretion) free of charge. Warranty service may be Performed by Convaid service center or (at Convaid’s discretion) the factory.
Need help?
Do you have a question about the Rodeo RD 12 and is the answer not in the manual?
Questions and answers