Table of Contents
Advertisement
Quick Links
Advertisement
Table of Contents

Related Manuals for IBASE Technology IBT210


Summary of Contents for IBASE Technology IBT210
-
Page 1: User Manual
IBT210 User Manual 2016 May Ver. A1... - Page 3 IBT210 User Manual Copyright © 2014All Rights Reserved. No part of this manual, including the products and software described in it, may be reproduced, transmitted, transcribed, stored in a retrieval system, or translated into any language in any form or by any means, except documentation kept by the purchaser for backup purposes, without the express written permission.
-
Page 4: Table Of Contents
1.2 System Specifications ..................7 1.2.1 Hardware Specifications ................. 7 1.2.2 Dimensions ....................10 1.2.3 I/O View ...................... 12 1.3 Exploded View of the IBT210/-PE Assembly............. 14 1.3.1 Parts Description ..................15 1.4 Packing List ..................... 18 1.4.1 Optional Items ..................... 18 CHAPTER 2 MOTHERBOARD INTRODUCTION ............ -
Page 5: Setting Up Your System
IBT210 User Manual Safety Information Your IBT210 is designed and tested to meet the latest standards of safety for information technology equipment. However, to ensure your safety, it is important that you read the following safety instructions Setting up your system ... -
Page 6: Care During Use
IBT210 User Manual Care during use Do not walk on the power cord or allow anything to rest on it. Do not spill water or any other liquids on your system. When the system is turned off, a small amount of electrical current still flows. -
Page 7: Acknowledgments
Acknowledgments AMI is a registered trademark of AMI Software International, Inc. Microsoft Windows is a registered trademark of Microsoft Corporation. FINTEK is a registered trademark of FINTEK Electronics Corporation. REALTEK is a registered trademark of REALTEK Electronics Corporation. ... -
Page 8: Chapter 1 Introduction
210mm(W) by 265mm(D) by 134mm(H) for expansion slot version, the IBT210 unit comes with a wall mount kit. We also provide the DC power adaptor for optional item if necessary . The model is currently available with either a 2.5-inch 64GB industrial grade SSD or CFAST slot installation. -
Page 9: System Specifications
1.2 System Specifications 1.2.1 Hardware Specifications Engineer Specifications Motherboard Customized motherboard of MB210 ® CPU type Intel Generation Desktop Core i5/i3/Celeron DT Processor ® - Intel Core i7-4770TE (2.3Ghz) TDP=45W ® - Intel Core i5-4570TE (2.7Ghz) TDP=35W ® - Intel Core i5-4590T (2.0Ghz) TDP=35W ®... - Page 10 IBT210 User Manual ® ® - Intel Celeron G1820TE (2.2Ghz) TDP=35W **Yellow = Haswell Refresh** ® Intel Q87/H81Platform Controller Hub Chipset - 23 x 22 mm package size, 0.65mm ball pitch ® Graphics Core I processor Integrated Intel HD Graphics 4000 Controller Memory 2 x DDR3-1600 SO-DIMM 2 GB, Max.
- Page 11 - 1 x SMbus for 2 pins [TBD] Power Supply DC-input 1x 3-pins pluggable terminal block for 12~24V DC input (for bare wire) Mechanical 210mm(W) x 265mm(D) x 71.6mm(H) (IBT210) Dimension 210mm(W) x 265mm(D) x 134mm(H) (IBT210-PE) 3.6kg (IBT210), 4.3kg (IBT210-PE) Weight Aluminum...
-
Page 12: Dimensions
IBT210 User Manual 1.2.2 Dimensions IBT210 Drawing... - Page 13 IBT210-PE Drawing Copyright © 2014...
-
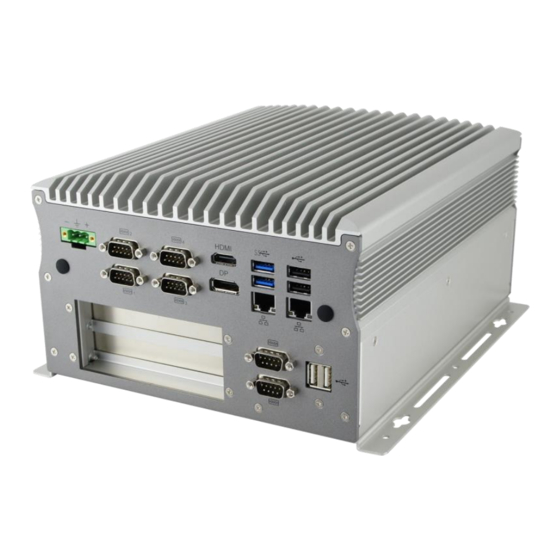
Page 14: I/O View
IBT210 User Manual 1.2.3 I/O View... - Page 15 Copyright © 2014...
-
Page 16: Exploded View Of The Ibt210/-Pe Assembly
IBT210 User Manual 1.3 Exploded View of the IBT210/IBT210-PE Assembly IBT210... -
Page 17: Parts Description
IBT210-PE 1.3.1 Parts Description IBT210 Copyright © 2014... - Page 18 IBT210 User Manual IBT210-PE...
- Page 19 Copyright © 2014...
-
Page 20: Packing List
IBT210 User Manual 1.4 Packing List Item No. Description Driver DVD Wall mount kit 1.4.1 Optional Items Description WiFi Solution WIRELESS;PCI-E MINI CARD 802.11B/G/N WiFi module [AW-NE238H] External Antenna WiFi Antenna From Wifi module to Rear/Front panel Internal cable-1/2 MPCIE-EXT V-B1 Bracket, RoHS; Extend Half to Full Bracket size. -
Page 21: Chapter 2 Motherboard Introduction
CHAPTER 2 MOTHERBOARD INTRODUCTION 2.1 Introduction ® The MB210 motherboard is based on the latest Intel Q87/H81 chipset. The platform ® supports onboard 4 generation Intel Core processor family features an integrated dual-channel DDR3 memory controller as well as a graphics core. ®... - Page 22 IBT210 User Manual SO-DIMM x 2, Max.=16GB (Non-ECC) [Horizontal type] ® Intel Generation Core DT processor integrated HD Gfx, Direct X 11.1, OpenGL 3.2, Open CL 1.2 DVI-D x 1 (Thru port B, with level shifter ASM1442K) DisplayPort x 1 (Thru port C)
- Page 23 1 x DC to DC power converter @5V/2W [C0711020050053100P] 2 x RS422/485 transceiver SP485EEN-L [C014485EEN0002000P] COM #2 (RS232 only) support ring-in with power @500 mA (selectable for 5V or 12V) COM #3~COM #6 (RS232 only) Hardware Monitor (2 thermal inputs,4 voltage monitor inputs & 2 Fan headers) CPU FAN x1 (PWM Fan type, 4-pins connector) SYS FAN x1 (DC FAN type, 3-pins signal via PCI-E(x4) slot...
- Page 24 IBT210 User Manual - 2x Mini PCI-E sockets [Full-sized] , [both support USB 2.0] [refer to MI808] - Support mSATA thru either one Mini-PCI-E socket Onboard Header/Connector 2 x 5 pins DF11 box header x1 for Digital IO 1 x 4 pins [2 x 2]ATX power connector for DC-input...
-
Page 25: Board Dimensions
2.2 Board Dimensions Copyright © 2014... -
Page 26: Setting The Jumpers
IBT210 User Manual 2.3 Setting the Jumpers Jumpers are used on MB210 to select various settings and features according to your needs and applications. Contact your supplier if you have doubts about the best configuration for your needs. The following lists the connectors on MB210 and their respective functions. - Page 27 JBAT1: Clear CMOS Contents JBAT1 Setting Function Pin 1-2 Normal Short/Closed (Default) Pin 2-3 Clear CMOS Short/Closed JP1: Clear ME Contents Setting Function Pin 1-2 Normal Short/Closed (Default) Pin 2-3 Clear CMOS Short/Closed JP6: Flash Descriptor Security Override (Factory use only) Flash Descriptor Security Override...
- Page 28 IBT210 User Manual JP9: COM1Terminal Selection Flash Descriptor Security Override Terminal Disable Open (Default) Pin 1-2, Short/Closed Terminal Enable Pin 3-4, Short/Closed JP10: RS-422/RS-485 Selection Flash Descriptor JP10 Security Override RS-422 Pin 1-2, Short/Closed RS-485 Pin 3-4, Short/Closed JP11: AT/ATX Mode Selection...
- Page 29 Connector Locations on MB210 Copyright © 2014...
- Page 30 IBT210 User Manual CN2: USB2.0 (UB1112C-8HS6-4F) /USB3.0 Connector (UEA1112C-8HS6-4F) CN3: CRT + DVI-D Connector (QH11121-DBGH-4F, BX4) CN4: Audio Connector (JA23331-HA6Q-4F (E)) CN5: CFAST Connector (CY101-1100191 v1.2) CN6: SATA Connector (WATM-07DBN4B2B8UW4) CN7: RJ45 + USB3.0 Connector (JFM38U1B-B313-4F) CN8: RJ45 + USB2.0 Connector (JFM38U1B-21U5-4F)
- Page 31 J1: Reset Button Connector (Techbest 2001-WS-02-LF) Pin # Signal Name Reset BTN Ground Copyright © 2014...
- Page 32 IBT210 User Manual J2: SPI Flash Connector (Factory use only) (2mm) Signal Pin # Pin # Signal Name Name Protect Pin SPI_CS# +3.3V SPI_SO SPI_HOLD# SPI_WP# SPI_CLK Ground SPI_SI J3, J12: DDR3 SO-DIMM Socket J4: SATA Power Connector (1600-4SD) Pin # Signal Name...
- Page 33 J5: LPC Debug Connector (Factory use only) (2mm) Signal Name Pin # Pin # Signal Name LPC_AD0 Reset# LPC_AD1 LPC_FRAME# LPC_AD2 +3.3V LPC_AD3 Ground CLK_33MHz Protect Pin J6, J7: Mini PCIE Connector (Foxconn AS0B226-S99Q-7H) J8: iSMART Debug Connector (Factory use only) (E-CALL 0110-161-040) Copyright ©...
- Page 34 IBT210 User Manual J9: Digital I/O Connector (豪國DF11-10S-PA66H) Signal Name Signal Name Ground VCC5 OUT3 OUT1 OUT2 OUT0 J10: DC-in Connector (4M-ATX-S) Pin # Signal Name Power Ground Case Ground +12V to +24V +12V to +24V...
- Page 35 J11: DC-inN Connector (DINKLE_5EHDRM-03P) Pin # Signal Name +12V to +24V Case Ground Power Ground CPU_FAN1: CPU Fan Power Connector (HF27040-M1) Pin # Signal Name Ground +12V Rotation detection Control LED1: HDD Active LED PCIE1: Include PCI-E x1, USB2.0, SYS_FAN, SATA, COM TX/RX Signal Connector PCIE2: PCI-E x16 Connector Copyright ©...
- Page 36 IBT210 User Manual...
-
Page 37: Chapter 3 Bios Setup
CHAPTER 3 BIOS SETUP This chapter describes the different settings available in the AMI BIOS that comes with the board. The topics covered in this chapter are as follows: BIOS Introduction The BIOS (Basic Input/Output System) installed in your computer system’s ROM supports Intel processors. -
Page 38: Main Settings
IBT210 User Manual Main Settings Aptio Setup Utility – Copyright © 2012 American Megatrends, Inc. Main Advanced Chipset Boot Security Save & Exit Choose the system default language Total memory 8192 MB (DDR3) Memory Frequency 1600 Mhz System Language [English]... -
Page 39: Advanced Settings
Advanced Settings This section allows you to configure and improve your system and allows you to set up some system features according to your preference. Aptio Setup Utility – Copyright © 2012 American Megatrends, Inc. Advanced Main Chipset Boot Security Save &... - Page 40 IBT210 User Manual PCI Latency Timer Value to be programmed into PCI Latency Timer Register VGA Palette Snoop Enables or Disables VGA Palette Register Snooping. PERR# Generation Enables or Disables PCI Device to Generate PERR#. SERR# Generation Enables or Disables PCI Device to Generate SERR#.
- Page 41 S3 Video Repost Enables or Disables S3 Video Repost. Wake up event Settings Aptio Setup Utility – Copyright © 2012 American Megatrends, Inc. Advanced Main Chipset Boot Security Save & Exit → ← Select Screen Wake on PCI PME [Enabled] ↑↓...
- Page 42 IBT210 User Manual Aptio Setup Utility – Copyright © 2012 American Megatrends, Inc. Advanced Main Chipset Boot Security Save & Exit CPU Configuration Intel(R) Core(TM) i5-4590T CPU @ 2.00GHz CPU Signature 306c3 Processor Family Microcode Patch FSB Speed 100 MHz...
- Page 43 Active Processor Cores Number of cores to enable in each processor package. Overclocking lock FLEX_RATIO(194) MSR. Limit CPUID Maximum Disabled for Windows XP. Execute Disable Bit XD can prevent certain classes of malicious buffer overflow attacks When combined with a supporting OS(Windows Server 2003 SP1, Windows XP SP2, SuSE Linux 9.2, RedHat Enterprise 3 update3.) Intel Virtualization Technology When enabled, a VMM can utilize the additional hardware capabilities...
-
Page 44: Sata Configuration
IBT210 User Manual SATA Configuration Aptio Setup Utility – Copyright © 2012 American Megatrends, Inc. Advanced Main Chipset Boot Security Save & Exit SATA Controller(S) [Enabled] SATA Mode Selection [AHCI] ► Software Feature Mask Configuration Serial ATA Port 0 Empty... - Page 45 Shutdown Temperature Configuration Aptio Setup Utility – Copyright © 2012 American Megatrends, Inc. Advanced Main Chipset Boot Security Save & Exit ACPI Shutdown Temperature [Disabled] → ← Select Screen ↑↓ Select Item Enter: Select Change Field F1: General Help F2: Previous Values F3: Optimized Default F4: Save ESC: Exit...
- Page 46 IBT210 User Manual Schedule Slot Setup the hour/minute for system power on. AMT Configuration Aptio Setup Utility – Copyright © 2012 American Megatrends, Inc. Advanced Main Chipset Boot Security Save & Exit Intel AMT [Enabled] BIOS Hotkey Pressed [Disabled] MEBx Selection Screen...
- Page 47 OEMFLag Bit 1: Enable/Disable BIOS hotkey press. MEBx Selection Screen OEMFLag Bit 2: Enable/Disable MEBx Selection Screen. Hide Un-Configure ME Confirmation OEMFLag Bit 6: Hide Un-Configure ME without password Confirmation Prompt. Un-Configure ME OEMFLag Bit 15: Un-Configure ME without password. Amt Wait Timer Set timer to wait before sending ASF_GET_BOOT_OPTIONS.
- Page 48 IBT210 User Manual USB Configuration Aptio Setup Utility – Copyright © 2012 American Megatrends, Inc. Advanced Main Chipset Boot Security Save & Exit USB Configuration USB module Version 8.10.28 USB Devices: 1 Keyboard, 2Hubs Legacy USB Support [Enabled] → ←...
- Page 49 EHCI Hand-off This is a workaround for OSes without EHCI hand-off support. The EHCI ownership change should be claimed by EHCI driver. USB MASS Storage Driver Support Enable/Disable USB Mass Storage Driver Support. USB Transfer time-out The time-out value for Control, Bulk, and Interrupt transfers. Device reset time-out USB mass storage device start unit command time-out.
- Page 50 IBT210 User Manual Standby Power on S5 This function is supported only with MB210EF(with EuP/ErP function). Serial Port 1 Configuration Set parameters of Serial Port 0 (COMA) Serial Port 2 Configuration Set parameters of Serial Port 1 (COMB) Serial Port 3 Configuration...
-
Page 51: Chipset Settings
F1: General Help +1.5V :+1.504V F2: Previous Values VSB5V :+4.992V F3: Optimized Default VCC3V :+3.312V F4: Save VSB3V :+3.360V ESC: Exit VBAT :+3.184V Smart Fan Function Smart Fan Mode Select. Chipset Settings This section allows you to configure and improve your system and allows you to set up some system features according to your preference. -
Page 52: Pci Express Configuration
IBT210 User Manual ↑↓ Select Item ► PCH Azalia Configuration Enter: Select Change Field PCH LAN Controller [Enabled] F1: General Help Wake on LAN [Enabled] F2: Previous Values F3: Optimized Default F4: Save ESC: Exit PCI Express Configuration PCI Express Configuration settings. -
Page 53: Boot Settings
Change Field CPU SA Audio Device (B0:D3:F0) [Enabled] F1: General Help Enable NB CRID [Disabled] F2: Previous Values F3: Optimized Default ► Graphics Configuration F4: Save ESC: Exit VT-d Check to enable VT-d function on MCH. CHAP Device (B0:D7:F0) Enable or disable SA CHAP Device. Thermal Device (B0:D4:F0) Enable or disable SA Thermal Device. - Page 54 IBT210 User Manual Quiet Boot [Disabled] Fast Boot [Disabled] Boot mode select [LEGACY] FIXED BOOT ORDER Priorities → ← Select Screen Boot option #1 [Hard Disk] ↑↓ Select Item Boot option #2 [CD/DVD] Enter: Select Boot option #3 [USB Hard Disk]...
- Page 55 CSM16 parameters CSM16 configuration Enable/Disable, Option ROM execution settings,etc. Aptio Setup Utility – Copyright © 2012 American Megatrends, Inc. Boot Main Advanced Chipset Security Save & Exit → ← Select Screen CSM16 configuration ↑↓ Select Item Enter: Select CSM16 Module Version 07.71 Change Field F1: General Help...
- Page 56 IBT210 User Manual CSM parameters OpROM execution, boot options filter, etc. Aptio Setup Utility – Copyright © 2015 American Megatrends, Inc. Boot Main Advanced Chipset Security Save & Exit → ← Select Screen Launch CSM [Enabled] ↑↓ Select Item Boot option filter...
-
Page 57: Security Settings
Security Settings This section allows you to configure and improve your system and allows you to set up some system features according to your preference. Aptio Setup Utility – Copyright © 2012 American Megatrends, Inc. Security Main Advanced Chipset Boot Save &... - Page 58 IBT210 User Manual Save & Exit Settings Aptio Setup Utility – Copyright © 2015 American Megatrends, Inc Advanced Main Chipset Boot Security Save & Exit Save Changes and Exit Discard Changes and Exit Save Changes and Reset Discard Changes and Reset Save Options →...
- Page 59 Discard Changes Discard Changes done so far to any of the setup options. Restore Defaults Restore/Load Defaults values for all the setup options. Save as User Defaults Save the changes done so far as User Defaults. Restore User Defaults Restore the User Defaults to all the setup options. Copyright ©...
-
Page 60: Chapter 4 Drivers Installation
IBT210 User Manual CHAPTER 4 DRIVERS INSTALLATION This section describes the installation procedures for software and drivers. The software and drivers are included with the motherboard. If you find the items missing, please contact the vendor where you made the purchase. -
Page 61: Intel Chipset Software Installation Utility
4.1 Intel Chipset Software Installation Utility The Intel Chipset Drivers should be installed first before the software drivers to enable Plug & Play INF support for Intel chipset components. Follow the instructions below to complete the installation 1.Insert the DVD that comes with the board. Click Intel and then Intel(R) 8 Series Chipset Drivers. 2. - Page 62 IBT210 User Manual 4. Click Yes to accept the software license agreement and proceed with the installation process. 5. On the Readme File Information screen, click Next to continue the installation.
- Page 63 6. The Setup process is now complete. Click Finish to restart the computer and for changes to take effect. Copyright © 2014...
-
Page 64: Vga Drivers Installation
IBT210 User Manual 4.2 VGA Drivers Installation 1.Insert the DVD that comes with the board. Click Intel and then Intel(R) 8 Series Chipset Drivers. 2. Click Intel(R) HD Graphics Driver. 3. When the Welcome screen appears, click Next to continue. - Page 65 4. Click Yes to agree with the license agreement and continue the installation. 5. On the screen shown below, click Install to continue. Copyright © 2014...
- Page 66 IBT210 User Manual 6. Setup complete. Click Finish to restart the computer and for changes to take effect.
-
Page 67: Realtek Hd Audio Driver Installation
4.3 Realtek HD Audio Driver Installation 1. Insert the DVD that comes with the board. Click Intel and then Intel(R) 8 Series Chipset Drivers. 2. Click Realtek High Definition Audio Driver. 3. On the Welcome to the InstallShield Wizard screen, click Yes to proceed with and complete the installation process. -
Page 68: Lan Drivers Installation
IBT210 User Manual 4. The InstallShield Wizard Complete. Click Finish to restart the computer and for changes to take effect. 4.4 LAN Drivers Installation 1.Insert the DVD that comes with the board. Click Intel and then Intel(R) 8 Series Chipset Drivers. - Page 69 2. Click Intel(R) PRO LAN Network Driver. 3. When the Welcome screen appears, click Next. Copyright © 2014...
- Page 70 IBT210 User Manual 4. Click Next to to agree with the license agreement. 5. Click the checkbox for Drivers in the Setup Options screen to select it and click Next to continue. 6. The wizard is ready to begin installation. Click Install to begin the installation.
-
Page 71: Intel Management Engine Interface
7. When Install Shield Wizard is complete, click Finish. 4.5 Intel Management Engine Interface 1.Insert the DVD that comes with the board. Click Intel and then Intel(R) 8 Series Chipset Drivers and then Intel(R) ME 9.0 Drivers. 2. When the Welcome screen to the InstallShield Wizard for Intel® Management Engine Components, click the checkbox for Install Intel®... - Page 72 IBT210 User Manual 3. Click Yes to to agree with the license agreement. 4. When the Setup Progress screen appears, click Next. Then, click Finish when the setup progress has been successfully installed.
-
Page 73: Usb 3.0 Drivers
4.6 USB 3.0 Drivers 1.Insert the DVD that comes with the board. Click Intel and then Intel(R) 8 Series Chipset Drivers. 2. Click Intel(R) USB 3.0 Drivers. 3. When the Welcome screen to the Install Shield Wizard for Intel® USB 3.0 extensible Host Controller Driver, click Next. - Page 74 IBT210 User Manual 4. Click Yes to to agree with the license agreement and continue the installation.
-
Page 75: Appendix
Appendix Mounting IBT210 to the wall Copyright © 2014... -
Page 76: Mounting Pe-Unit To The Wall
IBT210 User Manual Mounting IBT210-PE to the wall You can install IBT210 on plastic (LCD monitor), wood, drywall surface over studs, or a solid concrete or metal plane directly. Ensure the installer uses at least four M3 length 6mm screws to secure the system on wall. Four M3 length 6mm screws are recommended to secure the system on wall. -
Page 77: Wall Mounting Requirements
fastener selection and installation, follow the fastener manufacturer’s recommendations. Wall Mounting Requirements Note: Before mounting the system on wall, ensure that you are following all applicable building and electric codes. When mounting, ensure that you have enough room for power and signal cable routing. -
Page 78: Watchdog Timer Configuration
IBT210 User Manual Watchdog Timer Configuration The WDT is used to generate a variety of output signals after a user programmable count. The WDT is suitable for use in the prevention of system lock-up, such as when software becomes trapped in a deadlock. Under these sorts of circumstances, the timer will count to zero and the selected outputs will be driven. - Page 79 char SIO; printf("Fintek 81866 watch dog program\n"); SIO = Init_F81866(); if (SIO == 0) printf("Can not detect Fintek 81866, program abort.\n"); return(1); }//if (SIO == 0) if (argc != 2) printf(" Parameter incorrect!!\n"); return (1); bTime = strtol (argv[1], endptr, 10); printf("System will reset after %d seconds\n", bTime);...
- Page 80 IBT210 User Manual //Enable WDTO Set_F81866_LD(0x07); //switch to logic device 7 Set_F81866_Reg(0x30, 0x01); //enable timer bBuf = Get_F81866_Reg(0xF5); bBuf &= (~0x0F); bBuf |= 0x52; Set_F81866_Reg(0xF5, bBuf); //count mode is second Set_F81866_Reg(0xF6, interval); //set timer bBuf = Get_F81866_Reg(0xFA); bBuf |= 0x01;...
- Page 81 bBuf = Get_F81866_Reg(0xF5); bBuf |= 0x20; Set_F81866_Reg(0xF5, bBuf); //start counting //--------------------------------------------------------------------------- void DisableWDT(void) unsigned char bBuf; Set_F81866_LD(0x07); //switch to logic device 7 bBuf = Get_F81866_Reg(0xFA); bBuf &= ~0x01; Set_F81866_Reg(0xFA, bBuf); //disable WDTO output bBuf = Get_F81866_Reg(0xF5); bBuf &= ~0x20; bBuf |= 0x40; Set_F81866_Reg(0xF5, bBuf);...
- Page 82 IBT210 User Manual //--------------------------------------------------------------------------- // THIS CODE AND INFORMATION IS PROVIDED "AS IS" WITHOUT WARRANTY OF ANY // KIND, EITHER EXPRESSED OR IMPLIED, INCLUDING BUT NOT LIMITED TO THE // IMPLIED WARRANTIES OF MERCHANTABILITY AND/OR FITNESS FOR A PARTICULAR // PURPOSE.
- Page 83 ucDid = Get_F81866_Reg(0x20); if (ucDid == 0x07) //Fintek 81866 { goto Init_Finish; F81866_BASE = 0x00; result = F81866_BASE; Init_Finish: return (result); //--------------------------------------------------------------------------- void Unlock_F81866 (void) outportb(F81866_INDEX_PORT, F81866_UNLOCK); outportb(F81866_INDEX_PORT, F81866_UNLOCK); //--------------------------------------------------------------------------- void Lock_F81866 (void) outportb(F81866_INDEX_PORT, F81866_LOCK); //--------------------------------------------------------------------------- void Set_F81866_LD( unsigned char LD) Unlock_F81866();...
- Page 84 IBT210 User Manual Unlock_F81866(); outportb(F81866_INDEX_PORT, REG); outportb(F81866_DATA_PORT, DATA); Lock_F81866(); //--------------------------------------------------------------------------- unsigned char Get_F81866_Reg(unsigned char REG) unsigned char Result; Unlock_F81866(); outportb(F81866_INDEX_PORT, REG); Result = inportb(F81866_DATA_PORT); Lock_F81866(); return Result; //--------------------------------------------------------------------------- //--------------------------------------------------------------------------- // THIS CODE AND INFORMATION IS PROVIDED "AS IS" WITHOUT WARRANTY OF ANY...
- Page 85 #define F81866_DATA_PORT (F81866_BASE+1) //--------------------------------------------------------------------------- #define F81866_REG_LD 0x07 //--------------------------------------------------------------------------- #define F81866_UNLOCK 0x87 #define F81866_LOCK 0xAA //--------------------------------------------------------------------------- unsigned int Init_F81866(void); void Set_F81866_LD( unsigned char); void Set_F81866_Reg( unsigned char, unsigned char); unsigned char Get_F81866_Reg( unsigned char); //--------------------------------------------------------------------------- #endif //__F81866_H Copyright © 2014...
Need help?
Do you have a question about the IBT210 and is the answer not in the manual?
Questions and answers