Table of Contents
Advertisement
Quick Links
Advertisement
Table of Contents

Related Manuals for SHOWTEC Arc-Bar 3


Summary of Contents for SHOWTEC Arc-Bar 3
- Page 1 Arc-Bar 3 ORDERCODE 41350...
- Page 2 For more information: iwant@showtec.info You can get some of the best quality, best priced products on the market from Showtec. So next time, turn to Showtec for more great lighting equipment. Always get the best -- with Showtec ! Thank you!
-
Page 3: Table Of Contents
Showtec Showtec Arc-Bar 3 Product Guide ™ Warning..…...................…………………………………….………….……. Unpacking Instructions…………………………………………………………………………………………………. Contact Us…………………………………………………………………………………………………………….….. Safety-instructions……………………………………………………………………………………………………….. Operating Determinations……………………………………………………………………………………………. Rigging………………………………………………………………………………………………………………….… Interlocking Multiple Fixtures………………………………………………………………………….……………… Description..…................……….……………………………………………. Features…….……………………………………………………………………………………….……...…………….. DMX Channel Summary……………………………………………………………………………………………….. Overview………………………………………………………………………………………………………………….. Backside…………………………………………………………………………………………………………………... Installation................…...…………………………………….…………….… Set Up and Operation..............……..…………………………….……………… Fixture Linking…………………....……..……………………………………………..…………………………… Data Cabling…………………....……..……………………………………………..…………………………… DMX Addressing without ID addressing.……………………....……..………………………………………. -
Page 4: Warning
Save the carton and all packing materials. In the event that a fixture must be returned to the factory, it is important that the fixture be returned in the original factory box and packing. Your shipment includes: • Arc-Bar 3 • 1X Powercable • 1X XLR to 3-pin special connection cable •... -
Page 5: Safety-Instructions
SAFETY INSTRUCTIONS Every person involved with the installation, operation and maintenance of this device has to: be qualified follow the instructions of this manual CAUTION! Be careful with your operations. With a dangerous voltage you can suffer a dangerous electric shock when touching the wires! Before your initial start-up, please make sure that there is no damage caused by transportation. -
Page 6: Operating Determinations
For replacement use fuses of same type and rating only. The user is responsible for correct positioning and operating of the Arc-Bar 3. The manufacturer will not accept liability for damages caused by the misuse or incorrect installation of this device. -
Page 7: Rigging
The Arc-Bar 3 can be placed on a flat stage floor or mounted to any kind of truss by a clamp. Improper installation can cause serious damage to people and property ! -
Page 8: Interlocking Multiple Fixtures
Interlocking Multiple Fixtures The figure below shows how multiple units can be interlocked together to create a 'panel' or 'blinder' arrangement. The 'male' and 'female' connections enable the fixtures to be interlocked together in the way shown in the figure below. Note: When multiple units are mounted together, it is not necessary to attach every single unit to the truss, wall or weight supporting system. -
Page 9: Description
Description of the device Features Arc-Bar 3 is a LED system from Showtec. • IP rating: IP-65 • Output/LED: 1W • Total LEDs: 54 (18x Red, 18x Green, 18x Blue) • 12-channel DMX-512 LED bank system • Separate DMX channels for red, green, blue, cyan, magenta, yellow and whi te •... -
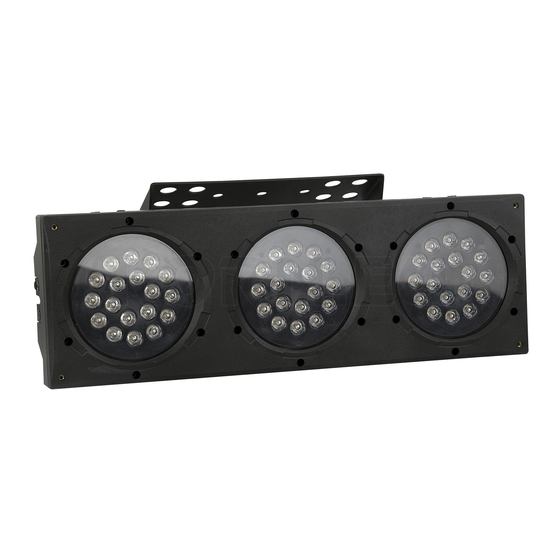
Page 10: Overview
Overview Fig. 1 1) 3x18 LEDS; Total 54 LEDs 2) Mountingbracket for Truss mounting Backside Fig. 2 3) Screws for connecting device side by side and/or on top of eachother 4) Adjustment Screw DMX signal connector (IN) 6) DMX signal connector (OUT) 7) Power IN 8) Power OUT 9) LCD Display + Nenu Buttons (Set / Up / Down / Ext) -
Page 11: Installation
The Arc-Bar 3 uses 12 channels. Important: Fixtures on a serial data link must be daisy chained in one single line. To comply with the EIA-485 standard no more than 32 devices should be connected on one data link. -
Page 12: Dmx Addressing Without Id Addressing
DMX512 ADDRESSING WITHOUT ID ADDRESSING 1) Connect a DMX controller (example 50403 Showdesigner) to the series of Arc-Bars. 2) Each Arc-Bar has 12 DMX channels (DMX address Arc-Bar #1=1, Bar #2=13, Bar #3=25, Bar #4=37, etc.). 3) The ID address has not been set, so therefore when using the controller CH10 must be inactive ( CH10=0 ). -
Page 13: Dmx Addressing With Id Address
DMX512 ADDRESSING WITH ID ADDRESS 1) Connect a DMX controller (example 50403 Showdesigner) to the series of Arc-Bars. 2) Each Arc-Bar has 12 DMX channels (DMX address Arc-Bar #1=1, Bar #2=13, Bar #3=25, Bar #4=37, etc.). 3) Any DMX address in the range from 001 to 244 may be used. 4) Each DMX address may carry up to 66 separate ID addresses. -
Page 14: Adas With Id Address
ADAS WITH ID ADDRESS (Automatic DMX Addressing System) 1) Connect a DMX controller (example 50403 Showdesigner) to the series of Arc-Bars. 2) Select ADAS ON from the Settings menu. 3) The ID Address should be set in the SETTINGS menu, on each unit in ascending values (i.e. 1,2,3...). 4) ADAS addressing is based on the ID address as follows: ADAS DMX Address = { ADAS fader * (ID Address -1)}+ 1. -
Page 15: Control Panel
Control Panel Fig. 5 A. Display D. Down Button B. [SET] Button E. EXIT Button C. UP Button... -
Page 16: Menu Overview
MENU OVERVIEW... -
Page 17: Creating A Static Color
Press the UP/DOWN buttons to scroll through 5 options of the menu: Creating a static color When you press SET in menu Static color, you can use your colors or strobe. When you press SET again (choosing RED), the display shows: You can use the up/down buttons to select the percentage of Red (0-255). -
Page 18: Dmx 512 Address
DMX 512 Address When you press SET in menu DMX 512 address to set the DMX address. You can choose your DMX address between 0-244. Activating an Auto Program When you press SET in menu Auto Program, you can choose one of the 8 built-in programs. When you press SET again (choosing Auto), the display shows:... -
Page 19: Changing The Settings
Changing the Settings When you press SET in menu settings, you can choose: 1) ID address [01-66] 2) ID ON/OFF [OFF] 3) ADAS fader no [000-512] 4) ADAS ON/OFF [OFF] 5) ADAS copy [OFF] 6) ADAS copy ON/OFF [OFF] When you press SET again (choosing ID address), the display shows: You can use the up/down buttons to select the ID address (0-66) Ad 1) Enter the ID Address to set the ID address for the unit. -
Page 20: Menu Map
Menu Map Main Function Sub-Function Selection Description Green • User can combine Red, Green and Blue Blue 000 – 255* to generate a custom color Static Color Yellow (0 – 100%) • Select intensity over pre-composed Cyan colors yellow, cyan, purple and white Purple *strobe range •... -
Page 21: Dmx Protocol
BASIC INSTRUCTIONS FOR DMX512 OPERATION DMX MODE 1 RED, GREEN & BLUE COLOR SELECTION • CH1, CH2 & CH3 control the intensity ratio of each of the RED, GREEN & BLUE LEDs. • When the slider is at the highest position (255) the intensity of the color is the maximum. •... -
Page 22: Dmx Control Mode 1
DMX Control Mode 1 Channel Value Function 000 – 004 No Function 005 – 255 0 – 100 % Green 000 – 004 No Function 005 – 255 0 – 100 % Blue 000 – 004 No Function 005 – 255 0 –... - Page 23 Channel Value Function Module Selection 000 – 004 #1=ON, #2=ON, #3=ON 005 – 034 #1=ON 035 – 064 #2=ON 065 – 094 #3=ON 095 – 124 #1=ON, #2=ON 125 – 154 #2=ON, #3=ON 155 – 184 #1=ON, #3=ON 185 – 214 #1=ON, #2=ON, #3=ON 215 –...
-
Page 24: Basic Instructions For Dmx512 Operation Dmx Mode 2
BASIC INSTRUCTIONS FOR DMX512 OPERATION DMX MODE 2 MODULE #1, MODULE #2 & MODULE #3 SELECTION • CH1, CH2 & CH3 allow quick-and-simple control of the three LED MODULEs. • Control of the LED MODULEs can be used in conjunction with all other channels in DMX MODE 2. STROBE •... -
Page 25: Dmx Control Mode 2
DMX Control Mode 2 Channel Value Function Module 1 000 – 004 No Function 005 – 034 035 – 064 Green 065 – 094 Blue 095 – 124 Yellow 125 – 154 Cyan 155 – 184 Purple 185 – 255 Pink-White Module 2 000 –... -
Page 26: Dmx Value - Id Addresses
DMX Value – ID Addresses Select all ID addresses ID address #34 10-19 ID address #1 ID address #35 20-29 ID address #2 ID address #36 30-39 ID address #3 ID address #37 40-49 ID address #4 ID address #38 50-59 ID address #5 ID address #39... -
Page 27: Examples
Example 1 CH 1 to select RED for MODULE #1 (ID Add. 1) CH 2 to select OFF for MODULE #2 (ID Add. 1) Step 1 CH 3 to select OFF for MODULE #3 (ID Add. 1) CH 9 255 to select DMX mode 2 CH 10 11 to select ID Add. -
Page 28: Example 2
Example 2 255 to select RED for all MODULES (ID Add. 1) CH 1 CH 2 to select NO GREEN for all MODULES (ID Add.1) Step 1 CH 3 to select NO BLUE for all MODULES (ID Add.1) CH 9 to select DMX mode 1 CH 10 to select ID Add. -
Page 29: Beam Angles
Beam Angles... -
Page 30: Connection Cables
Maintenance The Arc-Bar 3 requires almost no maintenance. However, you should keep the unit clean. Disconnect the mains power supply, and then wipe the cover with a damp cloth. Do not immerse in liquid. -
Page 31: Product Specifications
Product Specification Ordering Information Showtec Arc-Bar 3 ......................41350 Arc-Bar 3 Weight & Dimensions Length.............................570 mm Width ..............................190 mm Height .............................210 mm Weight .............................7,92 kg Power Operating Voltage ....................90V ~ 240V 50/60 Hz AC input..........................IEC 60320 C14 Fuse Main........................20mm Glass 2A Fast Blow Quantity ..................54 Total, (Red 18, Green 18, Blue 18)
Need help?
Do you have a question about the Arc-Bar 3 and is the answer not in the manual?
Questions and answers