Table of Contents
Advertisement
Quick Links
Advertisement
Table of Contents

Related Manuals for Ampetronic MLD7


Summary of Contents for Ampetronic MLD7
- Page 1 MLD5 Installation Handbook www.ampetronic.com...
-
Page 3: Box Contents
WARNING – To reduce the risk of fire or electric shock, do not expose this apparatus to rain or moisture. The apparatus shall not be exposed to dripping or splashing and no objects filled with liquids, such as vases, shall be placed on the apparatus. TO PREVENT ELECTRIC SHOCK DO NOT REMOVE THE COVER. THERE ARE NO USER SERVICEABLE PARTS INSIDE. REFER SERVICING TO QUALIFIED PERSONNEL Ampetronic MLD5 Installation Handbook Page 1 ... -
Page 4: Quick Start
For more complex installations, you may need ancillary equipment such as microphone pre- amplifier(s), adaptor(s) for use with 100V line, or signal processing units. See Accessories or contact Ampetronic for advice. QUICK START For those who have a good appreciation of loop systems, the following is a very quick guide to setting up the amplifier: All you need is an ac power source, a signal source and a Phased Array loop pair. See ‘Designing Induction Loops’ handbook (supplied) or contact Ampetronic for advice. Installation a. Turn all controls fully anti-clockwise. b. Connect loop cables. c. Connect signal input(s). d. Connect power. See points 6 and 7 in SAFETY section. e. If rack mounted remove all rubber feet from units. DO NOT re-fit the feet fixing screws as this may cause damage and invalidate the warranty Operation 1. Switch ON – check ‘ear symbol’ flashes during self test and illuminates continuously when checks are complete. 2. Apply input signal and increase the input control until two green COMPRESSION LEDs are illuminated on the peaks of the signal. 3. Select phase shift required 0 or 90°. 4. Adjust the CURRENT controls until the CURRENT LEDs illuminate to achieve the desired peak currents. 5. Repeat step 2 for any other inputs used. 6. Listen to the magnetic field produced inside the loop area using a receiving device (e.g. Ampetronic ILR3), or examine the performance in more detail with a field strength meter. 7. Adjust MLC control to achieve a flat frequency response. Page 2 Ampetronic MLD5 Installation Handbook... -
Page 5: Block Diagram
LEVEL INPUT 2 GAIN POWER OUTPUT AMPLIFIER INPUT 2 CLIP B RED L.E.D. GREEN L.E.D. LOOP B RED L.E.D. PHASE SWITCH GREEN L.E.D. 0/90° GREEN L.E.D. GREEN L.E.D. GREEN L.E.D. YELLOW L.E.D. CURRENT B Ampetronic MLD5 Installation Handbook Page 3... -
Page 6: Installation
Values above this figure may cause the CLIP LED to illuminate. See troubleshooting section for advice on how to correct this and get your system working. The ‘Designing Induction Loops’ handbook contains more details on loop and feed cables. The correct design and positioning of the actual loop is vital for satisfactory system performance. If in doubt consult Ampetronic for advice. CONNECTION & SET-UP It is advised that the loop system is initially set up using a local audio source such as a CD player, which is not connected into any other system. This avoids the complication of ground loops and feedback etc, whilst the unit is set up. The following procedure describes the installation of a stand-alone MLD5, and does not incorporate connection of other ancillary units such as microphone pre-amps, mixing desks, or signal processing units. 1. Turn all controls fully anti-clockwise. 2. Connect the feed cables from the loops into the NL4 loop connectors supplied as shown: Page 4 Ampetronic MLD5 Installation Handbook... - Page 7 Note: Ideally, each input signal level should be set up to achieve 6dB (one LED) of COMPRESSION with the quietest level of input likely to be used. This will maximize the dynamic range of the system and ensure satisfactory performance. 10. Repeat the above procedure for each input used. When adjusting each input, make sure the signals are removed from the other inputs. This ensures that all signals are set to equivalent loudness and drive the compressor properly. Ampetronic MLD5 Installation Handbook Page 5...
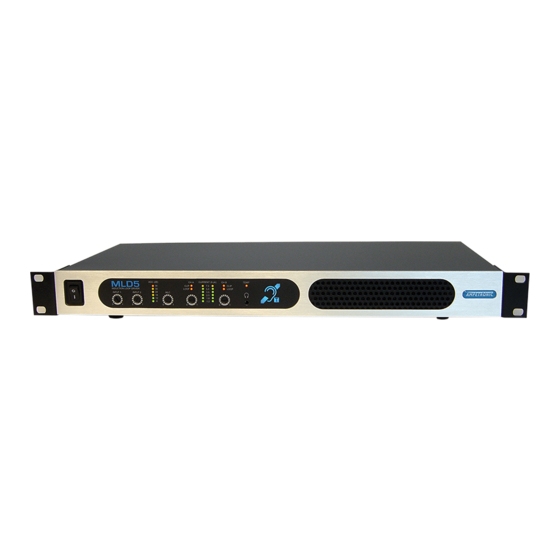
- Page 8 METAL LOSS CORRECTOR (MLC): Screwdriver adjustable control which compensates for the frequency dependant effects of metal in the looped environment. OUTPUT CHANNEL WARNING LEDs: ‘CLIP’ LED signifies output voltage is clipping, ‘LOOP’ LED signifies a cable specification error or damage. See troubleshooting for details. OUTPUT CHANNEL CURRENT ADJUSTMENT: Screwdriver adjustable control which sets the level of output current delivered to the loop. OUTPUT CHANNEL CURRENT LEDs: Indicates the peak current delivered to the loop. TEMPERATURE WARNING LED: Indicates that the internal heatsink is too hot. Loop current is not delivered to either channel. See toubleshooting for details. MONITOR: 3.5mm jack socket for use with stereo headphones to listen to the signal being delivered to the loop. POWER INDICATOR LIGHT: Flashes continuously when amplifier has failed self test and is in safe mode. See troubleshooting for details. FRONT VENT: Fan assisted ventilation inlet with filter. DO NOT cover. Page 6 Ampetronic MLD5 Installation Handbook...
- Page 9 INPUT 1 INPUT 1 REAR VENT: Fan assisted ventilation outlet. DO NOT cover. LOOP OUTPUT(S): Neutrik ‘Speakon’ high current connections to loop cable(s). STATUS: Connection to relay contacts providing remote fault indication. DC OUTPUT: 2-pin connection for ancillary units. PHASE SHIFT SELECTOR: Selectable 90° phase shift between outputs. XLR INPUTS: Socket for balanced MIC or LINE signals. INPUT GAIN BOOST SELECTOR SWITCH: Gain selector (ON = +15dB) INPUT SELECTOR SWITCH: Mode select between MIC and LINE input signals. INPUT PHANTOM POWER SELECTOR SWITCH AC POWER: Standard 3-pole IEC320 connector containing primary fuse for the unit. Ampetronic MLD5 Installation Handbook Page 7...
-
Page 10: Troubleshooting
Note: You can listen to the actual loop signal by using a pair of headphones plugged into the monitor socket. Channel A = left, channel B = right. CLIP LED(s) illuminated Indicates that the output voltage is clipping. Occasional lighting of this indicator is normal on peaks of signal. • Turn down the CURRENT control on the channel(s) in question to avoid causing the output voltage to clip. • Check the loop is not open circuit, short circuit, or connected to earth (see instability or high frequency noise section of Troubleshooting) • Check the loop is within specified limits. TEMP LED illuminated Indicates that the internal heatsink is too hot. Loop current is not delivered to either channel. • Ensure that the unit is installed in a location with sufficient ventilation Page 8 Ampetronic MLD5 Installation Handbook... - Page 11 ‘Designing Induction loops’ handbook. Low magnetic field strength Due to insufficient CURRENT or excessive metal loss. May require a special loop design to achieve acceptable performance, contact Ampetronic for advice. Instability or high frequency noise 1. It is possible for the loop cables to be grounded under fault conditions, resulting in instability which may sound like high frequency noise, buzz or whistling. The results of this type of fault are unpredictable and may appear as any combination of the front panel indication errors 2. This fault is easy to determine. Simply unplug the loop cables from the amplifier and test with a resistance meter between either of the loop wires and a good earth point such as a metal radiator. There should be an infinitely high reading i.e. no connection at all. Any reading indicates a failure of the loop cable insulation and you will need to either repair or replace the loop cable. 3. Instability can be caused by using poor quality signal cables, long unbalanced (2-wire) signal runs to the inputs, or by running input cables in close proximity with the loop wire over an appreciable distance. Loop amplifiers are capable of delivering high currents at audio frequencies. If the loop cables are run close to sensitive signal cables it may be possible to induce a signal back into the input of the amplifier causing feedback. Cable runs and loop Ampetronic MLD5 Installation Handbook Page 9...
- Page 12 4. Remote (and apparently unconnected) PA systems can sometimes pick up loop signals. This is usually because the loop cable becomes damaged (see point 1 of Instability) or induces signals into the remote system through long unbalanced cables. Always run long audio signal cables as 3-wire balanced circuits and keep away from loop cables. 5. See also point 1 of Instability Failed AC power fuse in rear of unit Unplug the loop and AC power supply from amplifier, and replace the failed fuse with the spare fuse in AC power input fuse tray. Reconnect the AC power supply and switch on. If the fuse fails again, return the unit to Ampetronic for evaluation - it may well be covered under warranty, which will be invalidated by removing the cover. If the fuse does not fail a 'loop error' may be indicated, but shows that the unit is working correctly. Re-connect the loop and switch the power off then on again to reset loop error. If the fuse fails when the loop is re-connected to the unit, then the loop could be shorted to electrical mains (and building) earth. This can happen even if no audio signal is present, as the short to earth is likely to cause an instability / oscillation / feedback condition to develop. A loop cable short to earth most commonly occurs where flat copper tape is installed on a metal-clad raised access flooring system. If the insulation on the flat copper tape is abraded (for example by a piece of metal swarf trapped below the copper tape), the conductor could short to the earthed tiles. When installing on raised access floors, it is advisable to insulate beneath the flat copper tape installation using Ampetronic PWT or similar tape. The loop short to earth may only be completed when a person steps on the tape in the affected location, which can create significant difficulties when diagnosing the cause of fuse failure. Contact Ampetronic for further advice if a unit is suffering recurring but untraceable failure of the rear panel fuse. ACCESSORIES Details of all products and services provided by Ampetronic can be found at www.ampetronic.com Page 10 Ampetronic MLD5 Installation Handbook...
-
Page 13: Technical Specifications
Output current reduction (3dB max) 92 (output returns at approx. 60) °C Output mute (illuminates TEMP LED) Any of the above faults also cause the status relay contacts to open. LOOP RESISTANCE TESTING; Checks the resistance of the load on startup (The POWER LED flashes during this period) and only allows operation if within limits. The LOOP LEDs are illuminated if loads are outside limits 8 approx. 8 approx. 8 approx. Startup time Ω Lower limit Ω Upper limit No limit No limit No limit Upper limit (link removed) Ampetronic MLD5 Installation Handbook Page 11... -
Page 14: Warranty
The warranty could be invalidated if the instructions in this handbook are not followed correctly, or if the unit is misused in any way. DECLARATION OF CONFORMITY Manufacturer: Ampetronic Ltd. Unit 2, Trentside Business Village, Farndon Road, Newark, Nottinghamshire, NG24 4XB, United Kingdom. Declares that the product: Description: Induction Loop Driver Type name: MLD5 Conforms to the following Directive(s) and Norm(s): Directive 2004/108/EC EMC: EN55103-1 : 2009 Emission EN55103-2 : 2009 Immunity Directive 2006/95/EC Safety: EN60065 : 2002+A12:2011 Directive 2011/65/EU RoHS Date: May 2013 J.R. Pieters Managing Director, Ampetronic Ltd. Page 12 Ampetronic MLD5 Installation Handbook... -
Page 15: Installation Notes
INSTALLATION NOTES: ................................................................................................................................................................................................................................................................................................................................................................................................................................................................................................................................................................Ampetronic MLD5 Installation Handbook Page 13... - Page 16 Contents Copyright © Ampetronic Ltd 2013. All rights reserved.
Need help?
Do you have a question about the MLD7 and is the answer not in the manual?
Questions and answers