Table of Contents
Advertisement
Advertisement
Table of Contents
Troubleshooting

Related Manuals for Ampetronic d series


Summary of Contents for Ampetronic d series
- Page 1 D Series Installation Handbook & User Guide www.ampetronic.co...
-
Page 3: Table Of Contents
Using the D Series Drivers with a TP-Link Nano Router . . . . . . . . . . . . . . . -
Page 4: Safety & Box Contents
. The apparatus shall not be exposed to dripping or splashing and no objects filled with liquids, such as vases, shall be placed on the apparatus. TO PREVENT ELECTRIC SHOCK DO NOT REMOVE THE COVER. THERE ARE NO USER SERVICEABLE PARTS INSIDE. REFER SERVICING TO QUALIFIED PERSONNEL Page 2 Ampetronic D Series Installation Handbook & User Guide Serial No. +12V... -
Page 5: Introduction
Depending on a number of factors regarding the installation of the loop and the set-up of the driver AC POWER INPUT www.ampetronic.co Induction Loop Driver the D Series drivers can provide compliance with IEC60118-4 for perimeter loop areas of up to 2 x D14-2 Serial No. +12V... -
Page 6: Installation
The following is a quick guide to installing and setting up the driver: All you need is an AC power source, a signal source, a loop pair (or single loop cable) and a loop layout drawing. See ‘Designing Induction Loops’ handbook available from the Ampetronic website or contact Ampetronic for advice . Location The unit may be free standing or 19” rack mountable using the rack ‘ears’ supplied . Fitting of the ‘ears’... -
Page 7: Tools & Equipment
The ‘Designing Induction Loops’ handbook contains more details on loop and feed cables . The correct design and positioning of the actual loop is vital for satisfactory system performance . If in doubt consult Ampetronic for advice . Ampetronic D Series Installation Handbook & User Guide Page 5... -
Page 8: Quick Start Guide
If you are unfamiliar with Ampetronic D Series products please pay close attention to the setup procedure in order to take advantage of the advanced features that these drivers offer . The D Series drivers analyse the loops that they are connected to at switch-on to check that they have the required characteristics. If the loop resistance exceeds 10Ω then the error LED will illuminate and a warning about high loop resistance is displayed . -
Page 9: Start Up Tests
Start Up Tests When D Series drivers are switched on they execute a series of tests that check the driver’s internal systems and also the loops that they are connected to . These tests take about 5 seconds and the display reads “DIAGNOSTICS IN PROGRESS”... -
Page 10: Features Overview
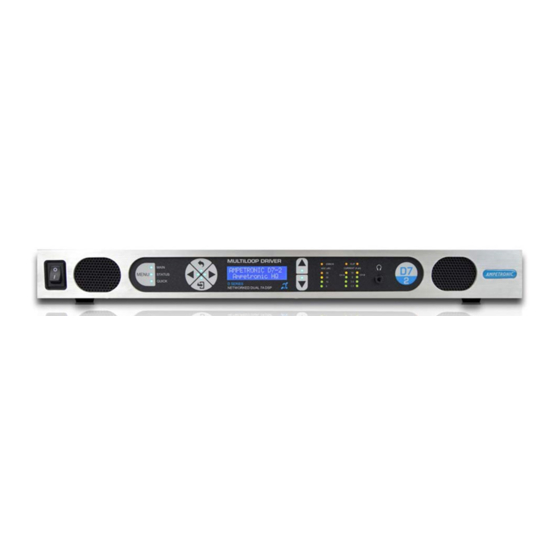
VALUE SELECTOR - UP/DOWN: Increasing or decrease the value displayed on the screen ERROR LED: Check the ‘Status’ menu for loop, amplifier and temperature errors and access fault codes to use when contacting Ampetronic . See troubleshooting for details . AUTOMATIC GAIN CONTROL (AGC) LEDs: Indicates the status of the AGC in dB . - Page 11 SERIAL NUMBER: For use when registering your warranty or reporting a fault . Network Audio Input (Optional) XLR INPUTS: Socket for balanced MIC or LINE signals (Use input 2 for AES3) FUSE: Open to replace fuse (type dependent on driver model & supply voltage) AC POWER: Standard 3-pole IEC320 connector containing primary fuse for the unit . Ampetronic D Series Installation Handbook & User Guide Page 9...
-
Page 12: Front Panel Menu Guide
LCD display for 2 seconds and the LED next to the active menu is lit . The three menus operate slightly differently and are optimised for different tasks . Ampetronic D Series Installation Handbook & User Guide Page 10... -
Page 13: Main Menu Structure
MLC settings this can mean that the driver seems to pause momentarily between button presses as there is a time required for calculation of the new filter coefficients. Note: Only Current, Config, Diagnostics and Ethernet menus are available in Slave mode. Tier 1 Menu Structure Home Screen 1 . Input 2 . Current 3 . Test Signals 4 . MLC Setup 5. Config 6 . Diagnostics 7 . Ethernet Ampetronic D Series Installation Handbook & User Guide Page 11... -
Page 14: Input Menu Structure
1 .4 Input 2 Mode MIC + Phantom 1 .2 Input 2 Mode 1 .2 Input 2 Mode Line 1 .2 Input 2 Mode 1 .2 Input 2 Mode DANTE Digital AES nd adjusta Page 12 Ampetronic D Series Installation Handbook & User Guide... -
Page 15: Current Menu Structure
3 .1 Signal Type Continuous 3 .1 Signal Type Pink Noise 3 .2 Tone Freq 3 Test Signals 100Hz 3 .2 Tone Freq 1/3rd octave values 100-5000 3 .2 Tone Freq 5000Hz Ampetronic D Series Installation Handbook & User Guide Page 13... -
Page 16: Mlc Menu Structure
4 MLC 200Hz 4 .3 Custom Knee 1/3rd octave values 200-5000kHz 4 .3 Custom Knee 5000Hz 4 .2 Custom High 4 MLC Slope 2 = X.XXdB 4 .4 Custom High Page 14 Ampetronic D Series Installation Handbook & User Guide... -
Page 17: Settings Menu Structure
5 .4 12 DC Out 12V ON if Fault NOTE: Slave mode must be set to Standard when NOT driving a Combiner to increase 5 .4 12 DC Out voltage or current . 12V OFF if Fault Ampetronic D Series Installation Handbook & User Guide Page 15... -
Page 18: Diagnostics Menu Structure
1 .635R 123uH 6 Diagnostics 6 .3 Loop B R&L 6 .3 Loop B R&L 1 .635R 123uH 6 Diagnostics Amplifier re-starts 6 .4 Re Run Diags Returns to home screen Page 16 Ampetronic D Series Installation Handbook & User Guide... -
Page 19: Ethernet Menu Structure
7 Ethernet xxx.xxx.xxx.xxx 7 .7 Gateway Addr 7 Ethernet 7 .8 Set Amp name 7 .8 Set Amp name XXXXXXXXXXXXX Amplifier re-starts 7 Ethernet Returns to home 7 .9 Sys Restart screen Ampetronic D Series Installation Handbook & User Guide Page 17... - Page 20 IP Address 010 .002 .000 .144 System Error E .G . 1 Output B Clip System Error E .G . 2 Active faults are shown here if present Power Derate Ampetronic D Series Installation Handbook & User Guide Page 18...
-
Page 21: Quick Menu Structure
Quick Menu Mic + Phantom Input 1 gain -30.0 dB Input 2 Mode Mic + Phantom Input 2 gain -30.0 dB Current A&B -16.0 dB Signal Type MLC Preset Custom Setting Ampetronic D Series Installation Handbook & User Guide Page 19... -
Page 22: Ethernet Interface
8. ETHERNET INTERFACE D Series drivers feature a web interface that can be viewed in a web browser . Although optimised for the Chrome browser, any browser can be used to view the interface . The web interface is used to monitor and adjust the driver . -
Page 23: Settings Tab
. To alter a value it is necessary to click on the slider handle and move it . The value is not sent to the Ampetronic D Series Installation Handbook & User Guide Page 21... - Page 24 Line, Mic or Mic + Phantom . Input Gain 2: Controls the gain of the input 2 channel. Values of 0 to -80dB in 0 .1dB steps are allowed . Input 2 mode: The type of input required for input 2 . A drop down menu selectable from Line, Mic, Mic + Phantom, AES or DANTE if fitted. Page 22 Ampetronic D Series Installation Handbook & User Guide...
-
Page 25: Driver Configtab
These controls allow you to enable regaular status Emails from the driver. These controls are effective immediately and do not require a restart. Power Cycle: Compression Current A Current B Ampetronic D Series Installation Handbook & User Guide Page 23... -
Page 26: Status Tab
Right Click on this link and save to a location on your device: - Right click and select “Save link as” . This will bring up a dialogue box for you to save Choose File: Clicking this button will allow you to navigate to the location of the XML file that you want to load into the driver. Page 24 Ampetronic D Series Installation Handbook & User Guide... - Page 27 Either No Error if the driver is running correctly or a list of the error messages in red . See chapter 10 Troubleshooting for a complete description of the error codes, what causes them and how to fix the system to remove them . Ampetronic D Series Installation Handbook & User Guide Page 25...
-
Page 28: Email Notifications
. These settings are controlled only through the web interface – there is no menu on the front panel that alters these settings . The controls for the Email system can be found on the Config tab of the web interface. See section 8 Ethernet interface of this manual for further information . Page 26 Ampetronic D Series Installation Handbook & User Guide... -
Page 29: Using A Wireless Router
Using a wireless router when a network is not available Using a network connection to set up the D Series drivers from an Ethernet enabled device makes loop commissioning a much quicker and less frustrating process . It is even better if the device is wireless and utilising the Loopworks Measure App and Receiver . -
Page 30: Wireless Network Troubleshooting
5 seconds . If you miss this, the IP address of the driver is available by navigating to either the status menu or the main menu . 5 . Now in the address bar of your browser, enter the IP address that you read from the driver. You should see the web interface of the D Series driver . N.B. Remember that the username of the driver login page is “admin” and the password is “ampetronic”. -
Page 31: Dante Audio Networking
CLIP AGC (dB) CURRENT (A pk) urrent To connect your D Series driver to a Dante controlled network you will need to connect the driver to nt =-52.0dB CH A CH B a networked switch via the Dante network port on the rear of the unit . -
Page 32: Telnet Commands
Sets the phase shift mode 1 = “channel B shifted by 90” “true” enables, pwlc Controls Emails on power cycling “false” disables “true” enables erlc Controls Emails on error conditions “false” disables Page 30 Ampetronic D Series Installation Handbook & User Guide... - Page 33 “cur=-4 .3 “ Example 2: Switch the mode of input channel 2 to “Mic with Phantom” . “i2m=2 “ Example 3: Get the mac address of the driver . “mac” Ampetronic D Series Installation Handbook & User Guide Page 31...
-
Page 34: Troubleshooting
. The following error messages all indicate an error in the internal circuitry of the driver . Please contact Ampetronic technical support if any of these errors are seen quoting the error message text . OUT A IDLE OVERCURRENT... - Page 35 Ethernet cable is plugged into the driver or the DHCP system re-assigns a new IP address . SLAVE MODE ENABLED: This message is seen when a plug is inserted into the slave in socket on the driver . Ampetronic D Series Installation Handbook & User Guide Page 33...
- Page 36 • Switch the unit off and turn back on . Note: You can listen to the actual loop signal by using a pair of headphones plugged into the monitor socket. Channel A = left, channel B = right Page 34 Ampetronic D Series Installation Handbook & User Guide...
- Page 37 • Check the loop is within specified limits. Low magnetic field strength Due to insufficient CURRENT or excessive metal loss. May require a special loop design to achieve acceptable performance, contact Ampetronic for advice . Instability or high frequency noise 1 . It is possible for the loop cables to be grounded under fault conditions, resulting in instability which may sound like high frequency noise, buzz or whistling .
-
Page 38: Updating Firmware & Web Interface
AC power input fuse tray . Reconnect the AC power supply and switch on . If the fuse fails again, return the unit to Ampetronic for evaluation - it may well be covered under warranty, which will be invalidated by removing the cover . -
Page 39: Technical Specifications To Iec 62489-1
Audio System Frequency Response: 80Hz to 6 .5kHz Distortion: THD+N <0 .2% 1kHz sine at full current Automatic Gain Control: The AGC is optimised for speech . Dynamic range >36dB Ampetronic D Series Installation Handbook & User Guide Page 37... - Page 40 Width 430mm Depth 290mm Height 44mm Mounting Options: Freestanding 1U 19” rack mount (brackets included) Weight: D14-2: 6 .9kg D10-2: 5 .5kg D10-1: 4 .37kg D7-2: 4 .62kg Environment: IP20 rated; 20 to 90% relative humidity; 0 to 35ºC Ampetronic D Series Installation Handbook & User Guide Page 38...
-
Page 41: Glossary Of Terms
. Often referred to as loudness . DHCP Short for ‘Dynamic Host Configuration Protocol’, a protocol for assigning dynamic IP addresses to devices on a network . Supports a mix of static and dynamic IP addresses . Driver A term used for the specific technology utilised by AFIL amplifiers to differentiate them from generic audio amplifiers. Ampetronic D Series Installation Handbook & User Guide Page 39... - Page 42 Multicast (one-to-many or many-to-many network distribution where information is addressed to a group of destination computers simultaneously . Utilised by Dante to increase the number of channels available . Output In the case of AFILS, the Output(s) refer to the connection for the Loop cables (or feeder cables). In the case of the D Series these are Neutrik NL4 connectors. Ampetronic D Series Installation Handbook & User Guide Page 40...
- Page 43 . Utilised in the AFIL Driver to provide power to a LAN Router or for connecting a USB drive to update firmware. WAN Wide area network (WAN) cover a large geographic distance. XLR XLR connectors are a style of electrical connector, primarily found on professional audio, equipment used to transmit a balanced mono audio signal or unbalanced stereo signal . Ampetronic D Series Installation Handbook & User Guide Page 41...
-
Page 44: Warranty
. Operation of this equipment in a residential area is likely to cause harmful interference in which case the user will be required to correct the interference at his own expense . Page 42 Ampetronic D Series Installation Handbook & User Guide... -
Page 45: Installation Notes
............................... Ampetronic D Series Installation Handbook & User Guide... - Page 46 ............................... Page 44 Ampetronic D Series Installation Handbook & User Guide...
- Page 47 ............................... Ampetronic D Series Installation Handbook & User Guide...
- Page 48 Contents Copyright © Ampetronic Ltd 2016. All rights reserved.
Need help?
Do you have a question about the d series and is the answer not in the manual?
Questions and answers