Table of Contents
Advertisement
Quick Links
CURRENT,VOLTAGE,Type K
CALIBRATOR
Model : CC-423
OPERATION MANUAL
PLEASE READ THIS MANUAL CAREFULLY BEFORE OPERATION
3, Hagavish st. Israel 58817 Tel: 972 3 5595252, Fax: 972 3 5594529
Your purchase of this 3 in 1
CALIBRATOR METER
with Source & Measurement
marks a step forward for you
into the field of
precision measurement.
Although this meter a
complex and delicate
instrument, its durable
structure will allow
many years of use if
proper operating
techniques are
developed. Please read
the following
instructions carefully
and always keep this
manual within easy
reach.
MRC.1.18
mrc@mrclab.com
Advertisement
Table of Contents

Related Manuals for MRC CC-423


Summary of Contents for MRC CC-423
- Page 1 CURRENT,VOLTAGE,Type K CALIBRATOR Model : CC-423 Your purchase of this 3 in 1 CALIBRATOR METER with Source & Measurement marks a step forward for you into the field of precision measurement. Although this meter a complex and delicate instrument, its durable...
-
Page 2: Table Of Contents
TABLE OF CONTENTS 1. FEATURES........................2. SPECIFICATIONS......................3. FRONT PANEL DESCRIPTION..................4. SOURCE PROVIDE PROCEDURE................... 4-1. CURRENT SOURCE PROVIDE PROCEDURE ............4-2. VOLTAGE SOURCE PROVIDE PROCEDURE ............4-3. Type K SOURCE PROVIDE PROCEDURE ............. 5. MEASUREMENT PROCEDURE..................5-1. CURRENT MEASURE PROCEDURE............... 5-2. -
Page 3: Features
1. FEATURES Multi-Source output : 1. Current source, 2. Voltage source, 3. Type K Temp. source. Three kinds measurement function : 1. Current measurement, 2. Power and current measurement, 3. Type K Temp. measurement. Portable instrument for calibrating process devices. Adjustable 0-24 mA current source. - Page 4 0 to 50 ℃. Operating Temperature Less than 85% R.H. and Humidity Power Supply * Alkaline or heavy duty DC 1.5 V battery ( UM3, AA ) x 6 PCs, or equivalent. * DC 9V adapter input. ( AC/DC power adapter is optional ).
- Page 5 2-2 Electrical Specifications (23. 0 ± 5 ℃) Current source Current source Range Display Accuracy Resolution 0.05 - 24.00 mA 0.01 mA ±( 0.25 % FS ) * Output 0-20 mA current for loads up to 500 ohms. Output > 20 mA current for loads up to 400 ohms. * FS : full scale Voltage source Voltage source...
- Page 6 Current measure Current measure Range Display Accuracy Resolution 0 - 24.00 mA 0.01 mA ±( 0.25 % FS + 1 d ) * input load 10 ohm * FS : full scale Power and current measurement of two wire loop Power and current measurement of two wire loop Range Display...
-
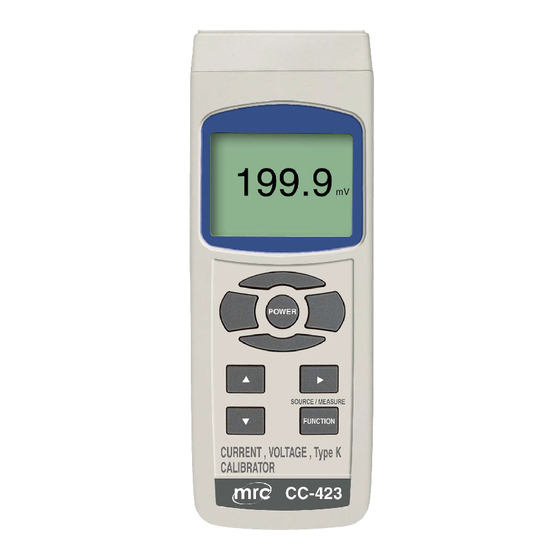
Page 7: Front Panel Description
3. FRONT PANEL DESCRIPTION Fig. 1 3-1 Display 3-11 DC 9V Power Adapter Input Socket 3-2 ◄ button ( Backlight Button) 3-12 Battery Cover Screws 3-3 Power Button 3-13 Tripod Fix Nut 3-4 ► button 3-14 Stand 3-5 ▲ Button 3-15 Battery Compartment/Cover 3-6 ▼... -
Page 8: Source Provide Procedure
4. SOURCE PROVIDE PROCEDURE 4-1. CURRENT SOURCE PROVIDE PROCEDURE 1) Power on the meter by press the " Power button " ( 3-3,Fig. 1 ) > 2 sec. 2) Press the " Source/Measure Button " ( 3-8, Fig. 1 ) select to SOURCE Model . -
Page 9: Type K Source Provide Procedure
4-3. Type K SOURCE PROVIDE PROCEDURE 1) Power on the meter by press the " Power button " ( 3-3,Fig. 1 ) > 2 sec. 2) Press the " Source/Measure Button " ( 3-8, Fig. 1 ) select to SOURCE Model . -
Page 10: Type K Measure Procedure
Fig. 2 1) Power on the meter by press the " Power button " ( 3-3,Fig. 1 ) > 2 sec. 2) Press the " Source/Measure Button " ( 3-8, Fig. 1 ) select to Measure Model . 3) Press the " FUNCTION button " ( 3-7, Fig. 1 ) select to Power/mA Measure Function. -
Page 11: Advanced Setting
6. ADVANCED SETTING Under do not execute the Datalogger function, press the " Function Button " ( 3-7, Fig. 1 ) continuously at least 3 seconds will enter the " Advanced Setting " mode. Then press the " Function Button " (3-7, Fig. -
Page 12: Power Supply From Dc Adapter
7. POWER SUPPLY from DC ADAPTER The meter also can supply the power supply from the DC 9V Power Adapter ( optional ). Insert the plug of Power Adapter into " DC 9V Power Adapter Input Socket " ( 3-11, Fig. 1 ). The meter will auto select to DC 9V Power Adapter . 8.
Need help?
Do you have a question about the CC-423 and is the answer not in the manual?
Questions and answers