Table of Contents
Advertisement
Quick Links
Advertisement
Table of Contents

Related Manuals for MRC CLRM-200


Summary of Contents for MRC CLRM-200
- Page 1 High-Quality Portable Colorimeter PLEASE READ THIS MANUAL CAREFULLY BEFORE OPERATION 3, Hagavish st. Israel 58817 Tel: 972 3 5595252, Fax: 972 3 5594529 mrc@mrclab.com MRC.VER.01-10.13...
- Page 2 Operating Instruction of Universal Test Components Application: used to test liquid reagent, paste (such as ketchup and coating), powder (such as coffee), etc. I. Component Structure The structure of universal test components is shown in Figure 1. ①Base; ②Baffle; ③Square Integrator; (31) Measuring Port of the Square Integrator ④Cuvette;...
- Page 3 i. Place 310 colorimeter according to Figure 2. The measuring port of 310 is butted up against that of square integrator, as shown in Figure 3. Then, use ⑥push plate 310 colorimeter and tighten ⑦the screw. Check whether to hold 310 colorimeter is loose or not.
- Page 4 Figure 2 The Matching Between 310 Colorimeter and Universal Test Components Figure 3 The Local Matching Between 310 Colorimeter and Universal Test Components III. Notes i. Keep ③the square integrator clean. After finishing the measurement, please cover the ⑤cover plate and keep the square integrator closed. ii.
-
Page 5: Table Of Contents
Contents Product Description ........................1 Cautions ............................1 I. Button Description ........................2 II. Interface Description ......................3 III. Battery Description and Installation .................. 3 IV. 200 Colorimeter Operating Instruction ............... 6 (I) Turning Power On ....................6 Preparations Before Power On ................6 Turning Power On .................... -
Page 6: Product Description
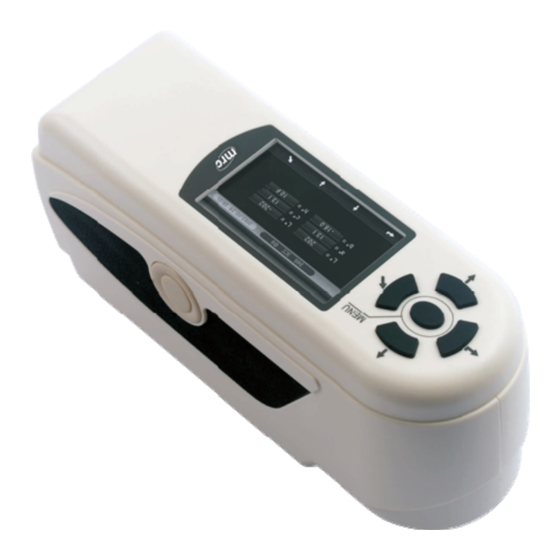
Product Description 200 colorimeter is researched and developed in accordance with CIE (International Commission on Illumination) and CNS (China National Standards). 200 colorimeter is a high precise colorimeter with simple user interface and stable performance. It can be powered by both Li-ion battery and external DC power supply. -
Page 7: Button Description
I. Button Description The following is a brief introduction of the buttons. We will give more detailed information about its function separately in next chapters. Figure 1 Button Function Button Function Introduction Testing Menu Up/Print Down/Save Enter Back... -
Page 8: Interface Description
II. Interface Description Figure 2 Interface Description Interface Description Power Switch: Press the button to turn on the colorimeter. Press the button again. The button will pop up. Then the colorimeter is turned off. DC Interface: Connect with AC adapter. It is used to connect to external power source. - Page 9 Please use original Li-ion battery. Do not use other batteries, or it will cause irreversible damage. Please take out the battery to prevent the colorimeter from the damage of battery leakage if you don’t use it for a long time. When using external power source or connecting USB interface to PC, if you press the power switch, it will charge the Li-ion battery.
- Page 10 Figure 4 Battery Installation Installing Battery When installing battery, be sure the power switch is popped out (The power source of colorimeter is cut off). Then remove the battery cover. Insert the Li-ion battery into battery compartment and push it gently in right direction. Put the battery cover on Li-ion battery, and then push it up.
-
Page 11: 200 Colorimeter Operating Instruction
Turning Power On Press the power switch on the back side of the instrument, the LCD screen will display MRC logo. After a few seconds, it will enter Standard Measurement interface automatically, and the default display is L*a*b*C*H. White Calibration and Black Calibration Note: White and black calibration is not required for 200 colorimeter. -
Page 12: Measurement
Figure 5 Main Menu Figure 6 Manual Calibration (II) Measurement 1. Locating and Measuring Method 200 colorimeter is locating through the facula. The method: enter “Standard Measurement” or “Sample Measurement” interface, press the “Testing” key and hold it. The facula will appear at the moment. You can observe the matching status between the facula and the measured sample. -
Page 13: 3.Sample Measurement
measurement or other operations, press “Back” button continuously to enter standard measurement. a) Standard Measurement after Power On After power on, the colorimeter will display “Standard Measurement”, as shown in Figure 7. Then, align measuring aperture to the standard, press “Testing” key, the screen will display color parameters of this standard. -
Page 14: Save Data
Figure 8 Sample Measurement Interface Note: During the measurement (Approx. 1 sec), all buttons are ineffective. (III) Save Data There are two methods to save data. Auto Save Press “MENU” button to enter the main menu, as shown in Figure 5. Select “Settings”... -
Page 15: 2.Manual Save
Figure 10 Auto Save 2.Manual Save In Figure 10, select “Off”, then the data will not be saved automatically. If you want to save data when measuring, please press “Down/Save” button after each measurement. (IV) Connect 200 Colorimeter to the PC Press “MENU”... -
Page 16: Ⅴ)Print
Figure 12 “Communicating” Interface (Ⅴ)print Only when the colorimeter is in “Standard Measurement”, “Sample Measurement” or “Record” interfaces, you can print data through the printer. Connect colorimeter to the printer. When the colorimeter is in one of the above interfaces, press and hold (about 5 second) “Up /Print” button to start the printer. -
Page 17: System Function Description
V. System Function Description Except “Standard Measurement” and “Sample Measurement” interfaces, you should enter other function interfaces through the main menu. Main menu is shown in Figure 13. Figure 13 Main Menu Interface Record and Standard Entering a) Record Select “Record” in main menu to enter “Standard Record”, as shown in Figure 14. The figure shows the standard parameters. -
Page 18: Calibration
Note: “↖Delete﹡” means press Back key “↖” and hold it for 3 seconds, then the record will be deleted. Figure 15 Sample Parameters under the T002 Standard b) Standard Entering In some cases, it’s needed to measure color difference under a saved standard. Then, you can select “Record”... -
Page 19: Tolerance Setting
Note: When performing black calibration, direct the measuring port to the air. Be sure the black calibration is starting in a dark, no bright light source environment. Keep the measuring port more than 3m away from any reflective items (hands, desks, walls etc.). Then, manual white calibration and black calibration are completed. -
Page 20: Usb Communication
Figure 17 Tolerance Setting USB Communication Select “Comm” in the main menu to enter an interface shown in Figure 18. According to the prompt, connect 200 colorimeter to the PC with USB cable. When communication successful, instrument will enter “Communicating…” interface, as shown in Figure 19. Figure 18 USB Communication Interface... -
Page 21: Delete Records
Figure 19 “Communicating…” Interface 5. Delete Records Select “Delete” in main menu to enter the interface shown in Figure 20. There are two options: “Delete All Samples” and “Delete All Records”. Figure 20 Delete Records a) Delete All Samples When select “Delete All Samples”, it will delete all samples in the instrument and save the standard records. -
Page 22: Language Selection
Figure 20 “Delete All Samples” Warning Interface Figure 21 “Delete All Records” Warning Interface 6. Language Selection Select “Language” in the main menu to enter an interface shown in Figure 22. You can select the language according to your need by pressing “Up” and “Down” buttons. -
Page 23: Display Mode
Figure 22 Language Selection Interface 7. Display Mode Select “Display” in the main menu to enter an interface, as shown in Figure 23. You can select different color spaces according to your need. This selection will change the display in “Standard Measurement” and “Sample Measurement” interfaces. -
Page 24: Function Setting
Function Setting Select “Settings” in the main menu to enter an interface shown in Figure 25. You can select the object according to your need by pressing “Up” and “Down” buttons. Press “Enter” to enter the corresponding setting interface. After completing these settings, press “Enter”... - Page 25 make settings by pressing the button “Up” and “Down”, then press “Enter” to enter corresponding setting interface, as shown in Figure 28, Figure 29, Figure 30 and Figure 31. In Figure 28 and Figure 29, you can set display format of time and date by pressing “Up” and “Down”. Press “Enter” to save the settings and return to the previous menu.
- Page 26 Figure 29 Set Date Figure 30 Time Format Setting Figure 31 Date Format Setting c) Select “Settings” - “Print Setting” to enter an interface shown in Figure 32. This interface is used for selecting print mode. After connecting the instrument to the printer, if select “Open” and save it, the printer will print the measured data automatically after each measurement.
- Page 27 save it, you need to press and hold “Up/Print” button to print the measured data after each measurement. Figure 32 Print Setting Interface d) Select “Settings” - “Backlight Time” to enter an interface shown in Figure 33. When the instrument is in idle state, you can set the backlight time to save electricity consumption.
- Page 28 Figure 34 Brightness Setting Interface Select “Settings” - “Power Management” to enter an interface shown in Figure 35. You can check battery capacity through this interface. Figure 35 Battery Capacity Interface g) Select “Settings” - “Restore Factory Set” to enter an interface shown in Figure 36.
- Page 29 Figure 36 Restore Factory Set...
-
Page 30: Ⅵ. Product Parameters
Ⅵ. Product Parameters Product Features ● This instrument adopts illumination locating, fully considers users’ need and adheres to user-friendly design. It has original illumination locating. ● White and black calibration is not required for 200 colorimeter. This function can ensure the precision of this instrument, and it eliminates complex manual white and black calibration which greatly improves the convenient use of the colorimeter. -
Page 31: Product Specifications
2. Product Specifications CLRM200 Model Display Mode CIE L*a*b *C*H* ; CIE L*a*b ΔE*ab Color Difference Formula Illuminating/viewing 8/d (8° illumination angle/diffuse viewing) geometry Light Source LED blue light excitation Detector Silicon photoelectric diode Φ8mm Measuring Aperture Observer: CIE 10° Standard Observer Measuring Conditions Illuminant: CIE Standard Illuminant D65 Measuring Range... -
Page 32: Appendix
Appendix 1. The Color of Objects There are three major elements to perceive color: light, object and observer. Any change of these three elements will influence the observer’s color perception. When the light source and the observer don’t change, then the object will determine the observer’s color perception. -
Page 33: Human Eyes To Distinguish Colors
2. Human Eyes to Distinguish Colors The color difference unit, NBS, is derived from the unit of color difference formula which is established by Judd-Hunter. In 1939, the American Bureau of Standards adopts this color difference formula and calculates the color difference according to it. When the absolute value is 1, it is called “The NBS Color Difference Unit”.
Need help?
Do you have a question about the CLRM-200 and is the answer not in the manual?
Questions and answers