Table of Contents
Advertisement
Curtarolo (Padova) Italy
www.avselectronics.com
USER MANUAL
CAPTURE
CERTIFIED QUALITY
SYSTEM
UNI EN ISO 9001: 2008
IST0866V2.2
MULTIMAC SRL
Spett.le:
COLORI:
QUADRICRIMIA
DOPO AVER CONTROLLATO
SI DÀ IL "VISTO SI STAMPI"
SI PREGA DI CONTROLLARE TUTTI GLI ELEMENTI, NON SOLO LE CORREZIONI EFFETTUATE; NON SIAMO RESPONSABILI DI EVENTUALI ER
COLORE. N.B.: In fase di realizzazione i colori di stampa possono subire delle variazioni in base al tipo di carta o eventuale plastificazione, comunque sono sempre soggetti a
dei relativi costi anche se solo in parte eseguito, con l'emissione di regolare fattura • Sono comprese nel preventivo una bozza del lavoro da stampare, eventuali altre bozze e
(foto, cd, dvd o altro materiale) fornito dal cliente per l'esecuzione del lavoro, vanno richiesti alla consegna, dopo la quale non si garantisce la restituzione • Gli impianti stampa ve
possiamo garantire la reperibilità • I quantitativi ordinati sono soggetti ad una tolleranza in più o in meno dal 5% al 10% e il cliente è tenuto al pagamento della quantità effettiva rice
il committente non potrà nè chiedere risarcimenti nè disdire l'ordine con il rifiuto della merce, adducendo motivi di ritardo • Reclami eventuali, relativi alla qualità e quantità del
merce e non danno il diritto alla sospensione dei pagamenti • Trascorsi 30 gg dall'invio della presente senza alcun riscontro da parte Vostra, provvederemo ad eliminare com
- 1 -
0312
BOZZA 1057
Codice:
RIBOBINATURA:
E1
E2
SI RICHIEDE UN'ALTRA BOZZA CON CONSEGUENTI CORREZIO
EN 50131-1
EN 50131-3
EN 50131-6
CEB T031
30/07/2
Data:
E3
E4
I1
Advertisement
Table of Contents

Related Manuals for AVS Electronics CAPTURE

Summary of Contents for AVS Electronics CAPTURE
- Page 1 Curtarolo (Padova) Italy www.avselectronics.com USER MANUAL COLORI: RIBOBINATURA: CAPTURE QUADRICRIMIA DOPO AVER CONTROLLATO SI DÀ IL “VISTO SI STAMPI” SI RICHIEDE UN’ALTRA BOZZA CON CONSEGUENTI CORREZIO SI PREGA DI CONTROLLARE TUTTI GLI ELEMENTI, NON SOLO LE CORREZIONI EFFETTUATE; NON SIAMO RESPONSABILI DI EVENTUALI ER COLORE.
- Page 2 ZONE PHYSICAL INPUT DESCRIPTION - 2 -...
- Page 3 TELEPHONE NUMBER DESCRIPTION 01:........................02:........................03:........................04:........................05:........................06:........................07:........................08:........................09:........................10:........................11:........................12:........................13:........................14:........................15:........................16:........................- 3 -...
- Page 4 USER CODE DESCRIPTION - 4 -...
- Page 5 O. C. PHYSICAL INPUT DESCRIPTION - 5 -...
-
Page 6: Table Of Contents
Index A500 - A500Plus description ....................8 Functions described in this manual ................... 9 Display lighting ........................9 Zone circuit test ........................9 Alarm display ........................9 LED signalling A500 - A500 Plus ..................9 Visualizzation / User Commands ..................10 Visualizzation ........................ - Page 7 Remaining Credit ......................19 Intensity of GSM Net ....................19 Expiry Date of Sim Card ..................... 19 Information SIM in the XGSM 485 / XGSM 485 PRO module .......... 20 Remaining Credit SIM A e/o SIM B ................20 Intensity of GSM Net ....................20 Expiry Date of Sim Card .....................
-
Page 8: A500 - A500Plus Description
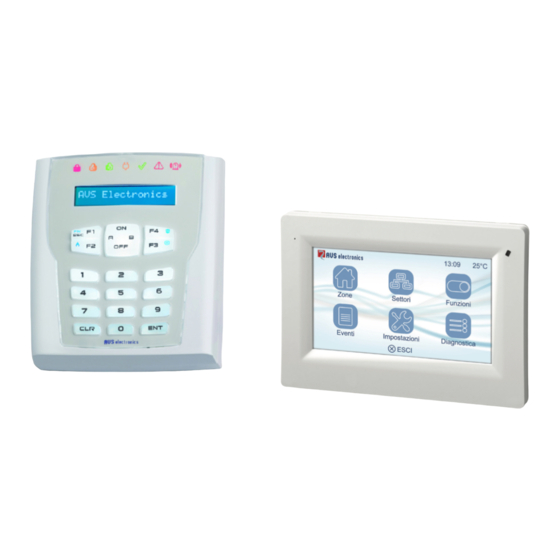
KEYPAD A500 - A500Plus A500 - A500Plus description GREEN LED - ACCESSORY LED GREEN LED - SYSTEM READY YELLOW LED - ACCESSORY LED RED LED - TAKE CARE, VISUALIZATION ON DISPLAY RED LED - SIGNALLING OF ARMED SYSTEM NOT USED PUSHBUTTON - B: MULTIFUNCTION COMMANDS YELLOW LED - PRESENCE OF 220V MAINS []... -
Page 9: Functions Described In This Manual
Functions described in this manual • The functions described in this manual must be enabled by the installer. • Some of the functions could not be active and visualization might have small variations. • To identify pushbuttons and LEDs that are explained in various functions, refer to the table in chapter “Keyboard”... -
Page 10: Visualizzation / User Commands
Visualizzation / User Commands The User visualizations are linked to the settings made by the installer and can be of two types: Sett. Flat: Allows the User to visualize the areas in groups of 16 knOn-AnP Sett.: 0203040608 Compact: Allows the User to visualize only the competing areas s t a t e : o k o n - - a r p e in groups of 5 at the time Description of visualization n. -
Page 11: User Codes
User Codes The User Code allows the user to inter-act with the system to arm/disarm the system and to make other operations This code is strictly personal ad secret, it is recommended not to divulge it for security reasons. The user code is made of 4 to 5 digits, followed by pushbutton ENT in order to be recognized or it can be made of 6 digits, in this case it is not necessary to press ENT The flexibility of the user code allows the installer to vary the settings according to system po- tential, with no risk for security. -
Page 12: Enabling And Disabling User Codes
Enabling and Disabling User Codes Enter the User Code Note: if the user code is associated to multiple sectors and the “Skip sector selection” option is not active, you will be asked to select the sector to work in. ... -
Page 13: Quick Arm
Quick Arm Press (ON) (ON) (ENT) ON Arming: ___________ Note: if the sequence of pushbuttons is pressed on a keypad associated to a sector, that sector is armed; if it is associated to more sectors, these will be simultaneously armed. Normal Arming The display shows the current date and hour ... -
Page 14: Summary Table Of The A - B Keys
Summary table of the A - B keys Description of the functions associated to the multi-function keys Keypad 1 ( ____________________________________________________________ ) ( ____________________________________________________________ ) Keypad 2 ( ____________________________________________________________ ) ( ____________________________________________________________ ) Keypad 3 ( ____________________________________________________________ ) ( ____________________________________________________________ ) Keypad 4 ( ____________________________________________________________ ) ( ____________________________________________________________ ) -
Page 15: Normal Arming With Zone Timers Off
Normal Arming with Zone Timers Off The function “OFF TIMES” allows the User to eliminate the system input and output time, thus granting max security. In fact, eliminating these time lapses during partial arming will cause an immediate alarm in case of intrusion attempt, with no risky and unuseful delay. This function is linked to the configuration of the Macro and should be agreed with the installer during programming This function will automatically de-activate at following disarming of the system. -
Page 16: Quick Disarming
Quick disarming Display shows time and date and arming mode Digit User Code Note: if the user code is associated to multiple sectors and the “Skip sector selection” option is not active, you will be asked to select the sector to work in. ... -
Page 17: By-Pass And Rearming Of Zone
By-pass and Rearming of zone When the system is off, you can make the exclusion zone. There are two possible ways to exclude a zone; for one of them it is necessary to remind the number of zone to exclude/include; for the other one it is necessary to look through the menu of the reference zones to exclude/include Example: Zone 2 must be by passed. -
Page 18: Disabling Of The Buzzer
Disabling of the buzzer The sound of the internal buzzer in each keypad can be disabled. Digit User Code Note: if the user code is associated to multiple sectors and the “Skip sector selection” option is not active, you will be asked to select the sector to work in. ... -
Page 19: Information Sim In The Gsm Module
Information SIM in the GSM module Remaining Credit It is possible to check the SIM Card remaining credit. Digit User Code Note: if the user code is associated to multiple sectors and the “Skip sector selection” option is not active, you will be asked to select the sector to work in. ... -
Page 20: Information Sim In The Xgsm 485 / Xgsm 485 Pro Module
Information SIM in the XGSM 485 / XGSM 485 PRO module Remaining Credit SIM A e/o SIM B It is possible to check the SIM Card to SLOT A and/or to SLOT B remaining credit. Digit User Code Note: if the user code is associated to multiple sectors and the “Skip sector selection” option is not active, you will be asked to select the sector to work in. -
Page 21: Informazioni Id Panel (Panel Id)
Informazioni ID panel (Panel ID) It is possible view the code associated to the control panel. This code is required to complete the registering on the website www.myavsalarm.com to enable the App Manager. Digit User Code Note: if the user code is associated to multiple sectors and the “Skip sector selection” option is not active, you will be asked to select the sector to work in. -
Page 22: Zone Test
Zone test You can perform a manual test of the alarm zones to check that they are working properly. Note: alarm zones are displayed based on the peripheral they belong to (controller, satellite and keypad) and the physical terminal block they are connected to (e.g., M.BA 1 = Base Terminal Block 1 or M.ES.5 = Expansion Terminal Block 5). -
Page 23: Commands With Help Text
Commands with HELP text You can perform any operations allowed by your code using a “HELP Text” menu Digit User Code Note: if the user code is associated to multiple sectors and the “Skip sector selection” option is not active, you will be asked to select the sector to work in. ... -
Page 24: Enable Installer
Enable Installer Enables the installer to program via keypad, direct connection via USB or a remote connection via telephone line (with EN 50131 conformity active) Digit User Code: Note: if the user code is associated to multiple sectors and the “Skip sector selection” option is not active, you will be asked to select the sector to work in. -
Page 25: Description Of The Ice Keypad
ICE KEYPAD Description of the ICE keypad 01/11/15 MICROPHONE - FUTURE USES LOGO - ACCESS TO NOTIFICATIONS CENTRE ACCESS IN KEYPAD MODE ACCESS IN APP MODE 01/11/15 13:09 SYSTEM DATE AND TIME 25° C TEMPERATURE DETECTED BY KEYPAD LED - FUTURE USES RED LED - POWER OFF (White) or POWER ON (Red) GREEN LED - SYSTEM NOT READY (White) or SYSTEM READY (Green) ACCESS IN QUICK ARM MODE... -
Page 26: Functions Described In This Manual
Functions described in this manual • The following functions must be enabled by the installer. • Some functions may not be active and could vary slightly on the display. • To identify the buttons and LEDs described for the various functions, refer to the table in chapter "Keypad Description"... -
Page 27: App Mode
App mode: Back - Key in the six-digit user code to enter: Zone Partitions Functions Events Settings Diagnostic EXIT - Select the required menu: • Zones: Click on the icon to view and manage the zones of the system. Use the "Up/Down" arrows to scroll between the zones; those with descriptions in red are "in alarm mode/open". -
Page 28: Ice Quick Mode (If Enabled In Setup)
• Functions: Click on the icon to view and manage the functions (Home Commands). Use the arrows at the side to scroll between the various functions. This menu gives the: Name of function / Function status Green icon: function enabled / Grey icon: function NOT enabled •... -
Page 29: Remote Telephone Control Of The System
Remote Telephone Control of the system The RTC (Remote Telephone Control) function, permits access to determined control panel operations using a DTMF telephone connected to the telephone system or a mobile telephone. How to call the system ! Dial the telephone number where the control panel is installed . When the telephone has rung the number of time required, a synthesized voice will announce that the User Code must be entered. -
Page 30: Management Of Sms On The Way Out
Management of SMS on the way out The control panel has the possibility of sending specific messages according to the events generated.. These messages can be both technical or alarm messages and/or of inputs restore. Technical Messages: they are related to situations such as supplying anomalies, as battery and are automatically dialled making use of a library of per-recorded messages. -
Page 31: Summary-Chart Of Multi-Function Pushbuttons
Command #answ# and the SMS of #state ... # Only command #answ# and the SMS of #state ... # envision the sending of a reply message; the others do not generate feedback (not even in case of error). Command #answ# The command #answ# sends, in one or more SMS, confirmation of the controlled operations;... - Page 32 Via Valsugana, 63 35010 (Padova) ITALY Tel. 049 9698 411 / Fax. 049 9698 407 avs@avselectronics.it www.avselectronics.com support@avselectronics.it AVS ELECTRONICS S.p.a. has the right to modify the product at any time with no warning - 32 -...
Need help?
Do you have a question about the CAPTURE and is the answer not in the manual?
Questions and answers