Akai DPS24 Operator's Manual
Digital personal studio
Hide thumbs
Also See for DPS24:
- Reference manual (252 pages) ,
- Service manual (29 pages) ,
- Operator's manual (22 pages)
Table of Contents
Advertisement
Quick Links
Advertisement
Table of Contents

Related Manuals for Akai DPS24


Summary of Contents for Akai DPS24
- Page 1 DIGITAL PERSONAL STUDIO...
-
Page 2: Important Notice
Important Notice The material in this document is copyright to AKAI professional M.I. Corp., and may not be quoted or reproduced in any form without written permission from the company. LIMITED SOFTWARE WARRANTY POLICY All the software provided with, or purchased especially for, AKAI professional products has been tested for functionality. - Page 3 Use only a household AC power supply. Never use a DC power supply. • If water or any other liquid is spilled into or onto the DPS24, disconnect the power, and call your dealer. • Make sure that the unit is well-ventilated, and away from direct sunlight.
- Page 4 WARNING For U.K. customers only WARNING THIS APPARATUS MUST BE EARTHED IMPORTANT This equipment is fitted with an approved non-rewireable UK mains plug. To change the fuse in this type of plug proceed as follows: 1) Remove the fuse cover and old fuse. 2) Fit a new fuse which should be a BS1362 5 Amp A.S.T.A or BSI approved type.
-
Page 5: Fcc Warning
32-En COPYRIGHT NOTICE The AKAI professional DPS24 is a computer-based device, and as such contains and uses software in ROMs. This software, and all related documentation, including this Operator’s Manual, contain proprietary information which is protected by copyright laws. All rights are reserved. No part of the software or its documentation may be copied, transferred or modified. -
Page 6: Table Of Contents
Table of Contents INTRODUCTION ....................1 FEATURES ........................1 OVERVIEW ......................2 DPS24 STRUCTURE ....................2 GETTING AROUND THE DPS24 ................3 INPUTS ........................4 RECORD/EDIT SELECT KEYS ..................5 GROUPS ........................6 SUB-GROUPING CHANNELS TO THE STEREO L/R BUS ........... 6 Q-STRIP FUNCTION KEYS/CHANNEL ENCODERS ............ - Page 7 TABLE OF CONTENTS DSP MODE ......................51 STRETCH ........................52 PITCH SHIFT ......................54 BPM .......................... 54 VARI-SPEED ......................55 REVERSE ........................56 NORMALISE ......................56 MIXER MODE ..................... 57 CHANNEL ......................... 59 CHANNEL DYNAMICS PROCESSOR ................ 62 STEREO CHANNELS ....................63 MIXVIEW ........................
- Page 8 TABLE OF CONTENTS EXT SYNC KEY ....................101 APPENDIX ......................103 MIDI Implementation Chart ..................103 Block Diagrams ....................... 104 Installation of Options - To Service Technicians ............107 IB-24LTC/IB-24ADT ................107 IB-24SCSI.................... 107 Hard Disk Drive.................. 108 CD-R/CD-RW Drive ................109 SPECIFICATIONS ....................110 INDEX .......................112...
-
Page 9: Introduction
INTRODUCTION FEATURES Thank you for purchasing the DPS24 24-track personal studio. The DPS24 is packed full of highly professional features that allow you to make digital multi-track recordings and mixdowns in one convenient unit. These include: • 24-track hard disk recorder/editor offers non-compressed 16/24-bit linear operation at 32/44.1/48/96kHz sampling rates with non-destructive multi-track real-time editing (cut, copy, paste, insert, move, etc.). -
Page 10: Overview
Also in this typical studio (but not shown here) would be compressors, noise gates and so forth. If you are familiar with this setup, then you already understand most of the DPS24 as this is pretty much what the DPS24 offers! -
Page 11: Getting Around The Dps24
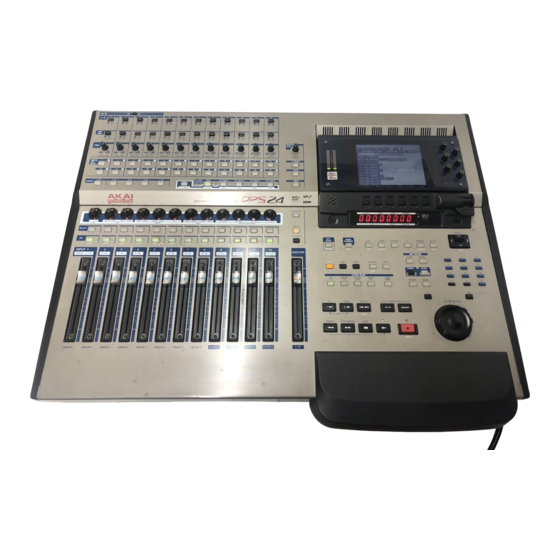
GETTING AROUND THE DPS24 GETTING AROUND THE DPS24 This section deals with the DPS24’s control surface. Although we would like to think that most of it should be fairly self-explanatory, please read this section to gain a full understanding of the DPS24’s functions. -
Page 12: Inputs
OVERVIEW INPUTS Across the top of the panel are controls associated with the twelve analogue input channels A / B LINE / MIC LINE MIC LINE MIC LINE MIC LINE MIC LINE MIC LINE MIC LINE MIC LINE MIC LINE MIC LINE MIC LINE MIC LINE MIC... -
Page 13: Record/Edit Select Keys
3 and 4 to, say, Tracks 13 and 14 for a stereo bounce-down, you would assign them all to GROUP 5/6. NOTE : Because of the flexible patching facilities in the DPS24, it is possible to override the default group routing arrangement so the default assignment shown alongside the record track numbers may not be applicable if you have changed them. -
Page 14: Groups
OVERVIEW GROUPS Below the RECORD/EDIT SELECT keys to the left of the panel are the ASSIGN keys: A / B LINE / MIC LINE MIC LINE MIC LINE MIC LINE MIC LINE MIC LINE MIC LINE MIC LINE MIC LINE MIC LINE MIC LINE MIC LINE MIC... -
Page 15: Q-Strip Function Keys/Channel Encoders
OVERVIEW NOTE : Channels which are routed to a sub-group need to be taken out of the stereo L/R bus to avoid them appearing twice - once through the direct connection of the channel to the stereo L/R bus and secondly through its connection to the stereo L/R bus via the subgroup. -
Page 16: Q-Channel Select/Q-Channel Encoders
L / R One of the most useful features of the DPS24 is that the row of encoders directly above the faders can be switched to become a complete channel’s worth of parameters allowing you to have ‘hands-on’ control of panning, EQ and FX/Aux sends. - Page 17 OVERVIEW Furthermore, the function of the Q-STRIP FUNCTION keys described earlier also change when the Q-CHANNEL is enabled: FX/AUX 1 FX/AUX 2 FX/AUX 3 FX/AUX 4 Q-STRIP FUNCTION EQ ON The labelling underneath the keys denotes their function when in Q-CHANNEL ‘mode’ and you have ‘hands-on’ control to bypass the EQ and to switch FX/AUX 1-4 as pre- or post-fade.
-
Page 18: Q-Strip/Channel Encoders
OVERVIEW Q-STRIP/CHANNEL ENCODERS Around the encoders is a collar of LEDs that show the encoder’s value. As the control is moved, so these LEDs illuminate to show its position. However, the way these LEDs illuminate depend on the control’s function. PAN POSITION / EQ FREQUENCY When used as a pan pot, the LEDs around the encoders illuminate as follows: When the encoder is set to MID, the red LED at the bottom illuminates as well. -
Page 19: Faders/Fader Banks
INPUTS 12 general purpose mixer channels which can be used to mix the DPS24’s various input sources. The channels can also be used to add EQ and dynamics and also to send the channels to either the internal effects and/or the AUX bus. - Page 20 By default, these provide control the stereo returns of the internal effects with balance control and FX/Aux sends. However, these channels can be re-patched to mix any of the DPS24 input sources. FX SEND 4 channels providing control of the 4 fx bus master levels.
-
Page 21: Master Section
R bus which, by default, appears at the STEREO OUT. NOTE : Due to the DPS24’s flexible patching system, it is possible to route audio sources other than the L/R bus to the STEREO L/R output. If another audio source is patched to the STEREO output, the MASTER fader will not affect that audio source’s level. -
Page 22: Monitor Section
OVERVIEW MONITOR SECTION Directly above the MASTER section is the MONITOR section: A / B LINE / MIC LINE MIC LINE MIC LINE MIC LINE MIC LINE MIC LINE MIC LINE MIC LINE MIC LINE MIC LINE MIC LINE MIC LINE MIC MONITOR LEVEL... - Page 23 This switches the monitor output from the MAIN outputs to the NEARFIELD connec- tions on the rear panel. Typically, the MAIN outputs of the DPS24 will be connected to a high quality, high power amp/speaker monitoring system whilst the NEARFIELD outputs will be con- nected to a smaller system, perhaps even a domestic hi-fi amp powering smaller speak- ers.
-
Page 24: Lcd 'Pod
OVERVIEW LCD ‘POD’ Top right of the panel is the adjustable LCD ‘pod’: A / B LINE / MIC LINE MIC LINE MIC LINE MIC LINE MIC LINE MIC LINE MIC LINE MIC LINE MIC LINE MIC LINE MIC LINE MIC LINE MIC MONITOR LEVEL... -
Page 25: Main Control Section
Here, you find the following functions: EXT SYNC This allows you to sync the DPS24 to external timecode. When the key is pressed (and the LED illuminated) the DPS24 will not play and/or record unless it is receiving exter- nal timecode. - Page 26 OVERVIEW SETUP Allows you to set global parameters that affect the DPS24 as a whole. Its SHIFT function allows access to the CD-R functions for backing up to, mastering to and playing back from the (optional) CD-R. CURSOR Allows you to move around the screen where applicable. Its SHIFT function allows you to zoom in horizontally and/or vertically on track and/or waveform displays in certain modes.
- Page 27 When playback is stopped, you hear the inputs. When INPUT MONITOR is switched on, you hear the inputs through the tracks se- lected for record at all times (i.e. during playback, recording and when the DPS24 is stopped).
-
Page 28: Mix Scene
L / R In a single DPS24 project, you can store and recall up to 100 ‘mix scenes’. These are ‘snapshots’ of the mixer’s settings such as EQ, fader position, FX sends, etc. The following table shows what is and isn’t stored in scene:... - Page 29 OVERVIEW When you press RECALL, a pop-up is also shown on the LCD: As well as the numeric keypad, you can use the CURSOR UP/DOWN keys to move through the list and you can press the ENTER key or F6 - RECALL - to recall the selected scene. The prompt will close when the scene is recalled.
- Page 30 OVERVIEW To store a mix scene, press STORE (the key will flash). You will see something like this pop-up prompt: You should use the CURSOR keys to move up or down the list of available mix scenes to select an ‘unused’ mix scene if you want to store a new scene.
-
Page 31: Transport Keys
STOP Stops playback, rewind, fast forward, etc. PLAY Plays the selected project. Pressing PLAY whilst recording will cause the DPS24 to drop-out of record. RECORD This allows you to record. To drop into record whilst the project is playing, press and hold PLAY and then simultaneously press RECORD (i.e. -
Page 32: Edit Play Keys
OVERVIEW EDIT PLAY KEYS Above the main transport keys are special ‘edit play’ keys: A / B LINE / MIC LINE MIC LINE MIC LINE MIC LINE MIC LINE MIC LINE MIC LINE MIC LINE MIC LINE MIC LINE MIC LINE MIC LINE MIC MONITOR... -
Page 33: Autolocator
OVERVIEW AUTOLOCATOR Next to the EDIT PLAY keys are the AUTOLOCATE keys: A / B LINE / MIC LINE MIC LINE MIC LINE MIC LINE MIC LINE MIC LINE MIC LINE MIC LINE MIC LINE MIC LINE MIC LINE MIC LINE MIC MONITOR LEVEL... -
Page 34: Using The Autolocator
Pressing ENTER or GOTO will simply locate to the memorised point. However, pressing GOTO+PLAY (F3/4) will locate to the selected memory and will automatically put the DPS24 into play. Whichever key you press to locate, the prompt closes when you press it. - Page 35 OVERVIEW You can also locate to a specific timecode position by pressing SHIFT+GOTO. This will pop up a prompt where you can enter the timecode value using the numeric keypad: To store a locate memory, press the MEMORY key followed by a two-digit number followed by ENTER. This will store the current NOW time into the selected locate memory.
-
Page 36: Jog/Shuttle Wheel
OVERVIEW JOG/SHUTTLE WHEEL The DPS24 features a combined JOG/SHUTTLE wheel: A / B LINE / MIC LINE MIC LINE MIC LINE MIC LINE MIC LINE MIC LINE MIC LINE MIC LINE MIC LINE MIC LINE MIC LINE MIC LINE MIC... -
Page 37: Screen Conventions
SCREEN CONVENTIONS LCD LAYOUT For the main ‘working screens’ (i.e. the MAIN SCREEN and the MIXER modes), the LCD design is quite consist- ent: MAIN SCREEN MIXER SCREEN Both show the track meters in the upper half of the screen with the lower half given over to track display or mixer channel display. - Page 38 SCREEN CONVENTIONS Similarly, the various editing pages are consistently similar: Here you see the track display but as metering is not so important when performing edits, the upper half of the display is used to display the waveforms of the track(s) being edited. The off-line DSP editing pages are almost identical to the screen shown above.
-
Page 39: Prompts
SCREEN CONVENTIONS PROMPTS The DPS24 uses prompts to guide you through certain function of the user interface. For example: The DPS24 also uses progress displays for functions that take time. For example:... -
Page 40: Naming
SCREEN CONVENTIONS NAMING It is possible to name things on the DPS24 from the front panel. However, we thoroughly recommend that you connect a PS2 keyboard as this makes naming MUCH easier and suitable keyboards for the purpose can be bought very cheaply at any high street store that sells computers. -
Page 41: Illuminated Keys
SCREEN CONVENTIONS This is a double width ‘go to’ key. Some soft keys are also uses as ON/OFF switches: Indicates that a function is on. Indicates that a function is off. Double width equivalents also exist: ILLUMINATED KEYS Illuminated keys will light when selected as you would expect. However, some of these keys have SHIFT functions (for example, SHIFT+EDIT = DSP). -
Page 42: Moving Around The Lcd
Here, you simply select the FX channel and the FX type with the cursor keys and set the parameters directly with the Q-LINK controls. Most of the DPS24’s are like this and have no parameters to set via tedious cursor movement. - Page 43 SCREEN CONVENTIONS To edit the value you can..• Enter a number directly using the numeric keypad • Use the numeric keypad’s +/- keys to nudge values • Use the Q6 as a typical DATA ENTRY encoder In this example, however, you would probably prefer to use the Q-CHANNEL function to set the functions shown. Some pages, however, have quite a lot of fields and unfortunately, there is no option but to cursor around them and use the numeric keypad’s DATA +/- keys to set values.
-
Page 44: Rear Panel
These RCA phono connectors offer SPDIF digital audio input and output. The input is freely assignable to chan- nels within the DPS24 and the output can accept a wide variety of internal audio sources (the default is the master stereo L/R output). - Page 45 The MIDI OUT connector can generate MIDI Time Code so that sequencers, etc., may be synchronised to the DPS24. The MIDI OUT can also generate MIDI events such as volume and pan allowing the DPS24 to control (mix) external equipment (for example, samples, sound modules, etc.).
-
Page 46: Front Panel
FRONT PANEL FRONT PANEL PHONES LEVEL HI-Z 1 CD-RW/CD-R DRIVE An optional IDE CD-RW or CD-R drive may be installed here. 2 HI-Z GUITAR INPUT An electric guitar (or bass guitar) may be DI’d into this high impedance input. Note that when this input is used, it uses Input Channel 12 and Inputs 12A and 12B on the rear panel are overridden and cannot be used. -
Page 47: Powering Up The Dps24
If your DPS24 does not power up as described above - for example, you get an error message saying “NO DRIVES DETECTED” or your CD drive (if installed) doesn’t show up at the bottom of the screen or whatever - you should contact your AKAI professional dealer or technical support immediately. -
Page 48: Dps24 Modes
(optional) CD-R. One powerful aspect of the DPS24’s operation is that you do not have to stop playback (or whatever else you may be doing) to access the different modes or other functions on the unit. Thus, you can be recording and perhaps during record, switch to AUTOMATION mode to set some automation parameters up in advance. -
Page 49: Main Screen
MAIN MAIN SCREEN When a project is loaded, pressing the MAIN SCREEN key will show this screen: You can see an overview of the project plus level metering of inputs, the eight groups, the FX sends and returns and disk tracks. You may zoom in/out on the GRID overview horizontally by pressing SHIFT+ </> (you cannot zoom in vertically). -
Page 50: Grid (Graphic Interface Display)
MAIN GRID (GRaphic Interface Display) Pressing SHIFT+MAIN SCREEN shows and expanded track display: Functionality is the same as the MAIN SCREEN except, of course, you can see the GRID more clearly. This ex- panded view also allows you to see autolocate points shown as white triangles across the bottom of the display and the track numbers on the left side of the GRID. -
Page 51: Edit Mode
EDIT MODE Editing on the DPS24 is simple and non-destructive. You simply mark an IN/OUT region and subject that region to editing. It is possible to edit multiple tracks. When editing, you are not altering the actual audio data - instead, you are simply changing pointers to that audio thus editing is quick as you are not physically copying/removing/moving actual audio data around. - Page 52 EDIT When you press SHIFT and an EDIT SELECT track key, one track is shown: If you press SHIFT and another EDIT SELECT track key, two tracks will be shown: When editing, you can use the JOG wheel to fine tune your edit - jog to the point in the waveform display and press IN (or OUT) to re-define the edit region.
-
Page 53: Editing And Automation
EDIT Using SHIFT+CURSOR </>, you may zoom in/out on the waveform horizontally: You can also use SHIFT+CURSOR UP/DOWN to increase (or decrease) vertical (i.e. amplitude) resolution for the selected track(s). EDITING AND AUTOMATION When performing edits that cause audio to move, it is necessary to edit any automation data that exists in that region accordingly. -
Page 54: Copy
The editing functions on the DPS24 include a Q-LINK control that allows you to decide whether automation data will be affected by the edit or not. This parameter exists on all the audio edit functions allowing you to decide how the automation will be affected when editing. -
Page 55: Cut
EDIT Pressing COPY [F6] will copy the region to the clipboard from where it may be subse- quently pasted and/or inserted elsewhere in the project. NOTE : It is possible to copy edits between projects. Select the track(s) you want to edit, mark your edit region and press COPY. -
Page 56: Erase
EDIT ERASE Pressing ERASE will pop-up this prompt: Erase will remove the audio to the clipboard but subsequent audio will not slip in time. INSERT Pressing INSERT pops-up this window: The contents of the clipboard are inserted at the NOW time and all subsequent audio is shifted in time. -
Page 57: Paste
EDIT You can specify the number of times the inserted cue will repeat when inserted using Q5 (up to 99). This will insert in the cue n times with each one appended to the end of the previous one. For example, with 4 repeats specified, you would get this result: Before After 2 3 2 3 2 3 2 3... -
Page 58: Move
EDIT As with INSERT, using Q5, you may specify the number of times the pasted cue will be repeated (up to 99). However, the results are somewhat different: Before After 2 3 2 3 2 3 2 3 No of Pastes = 4 NOTE : In this case, it could be that multiple repeats could paste over existing audio on the track. -
Page 59: Dsp Mode
DSP MODE Pressing SHIFT+EDIT gives access to the off-line DSP functions: As you can see, the screen layout is virtually identical to the main real-time EDIT screen. Operation is also the same..Jog over the point where you want the off-line edit to start and mark an IN point as appropriate. Do the same to mark the OUT point. -
Page 60: Stretch
STRETCH This allows you to expand/compress the length of the edit region without changing its pitch. Pressing STRETCH pops-up this window: Using Q2, you can select the timestretch preset. All the stretch-related DSP processes have a series of presets optimised for certain types of material. These are: SPEECH 1 This works well on female speech. - Page 61 BALLAD This works well on material that has long, sustained LF content. Musically, it is effective for processing slow ballads and handles long bass notes quite well but you may occasionally experience slight ‘flamming’ (i.e. double triggering) with some percussive sounds.
-
Page 62: Pitch Shift
The process can be aborted at any time by pressing F6. This will leave the original untouched. NOTE : This progress display is shown for all the off-line editing processes. PITCH SHIFT Allows you to change the pitch of the selected edit region without changing its length. Pressing PITCH shows this window: As in the TIMESTRETCH page, you may select a preset, adjust it manually and set the tuning offset you want to apply. -
Page 63: Vari-Speed
Here, you can select a preset, adjust it manually, set the tempo you want the edit region to play at referenced to the source tempo. To match tempos, you need to know the tempo of the original audio. This is entered in the SOURCE TEMPO field. -
Page 64: Reverse
REVERSE Allows you to reverse the selected edit region so that it plays backwards. Pressing REVERSE pops-up this window: There are no parameters to adjust for this function. Because the length of the processed version doesn’t change, the SLIP function is not shown. -
Page 65: Mixer Mode
MIXER MIXER MODE Pressing the MIXER key shows this screen: Here, you can see an overview of all the channels’ level settings. This shows the inputs, the eight groups, the FX send/returns and disk track levels and meters. Using Q6, you may view different parameters:... - Page 66 MIXER...
-
Page 67: Channel
MIXER CHANNEL In the main MIXER page, pressing CHANNEL (F1) will show something like this screen: This shows the settings for a selected channel. The page is designed so that you can use the Q-Channel to set the main parameters (pan, EQ, sends, etc.) and the Q- Link controls to set the others. - Page 68 MIXER DATA ENTRY This allows Q6 to be used to enter data as a conventional encoder, the idea being that you move the cursor to the appropriate field and use Q6 to set its value. However, you may find it easier to use the channel’s actual control (fader, pan pot, FX/Aux send, EQ (in Q-Channel), etc.
- Page 69 MIXER When a pair of sends are configured as a stereo send, the display changes. Here, AUX 3 and 4 are configured as a stereo send feeding the STUDIO outputs to facilitate a foldback mix for monitoring in a separate record area. For further informa- tion on setting up the FX/AUX routings, please refer to the relevant section later in this manual.
-
Page 70: Channel Dynamics Processor
MIXER CHANNEL DYNAMICS PROCESSOR Each input and disk track has its own dynamics processor which is accessed in the DYN page: The parameters are: COMP/EXPANDER Allows you to select whether the processor is a compressor or an expander. The controls described below are the same for either selection. -
Page 71: Stereo Channels
MIXER Pressing N.GATE [F2] shows the following screen: The parameters are: THRESHOLD Sets the threshold for the noise gate. HYSTERESIS Smoothes the closure of the gate and prevents ‘chatter’ if the gate is rapidly opening and closing with a decaying signal around the threshold level. RANGE Allows a certain proportion of the signal to always pass through. -
Page 72: Mixview
MIXER When two channels are linked as stereo, anything you do on one channel will be reflected on the other (including level, EQ, FX/Aux sends). However, some parameters remain independent. These are Pan, input source, phase invert and attenuation. The channel’s dynamics processors are similarly linked and any setting you make to one will be reflected in the other. However, when a pair of channels are linked, the channels’... -
Page 73: Solo Setup
MIXER Here, you can see the same for the Inputs, FX send master levels, FX return and the 8 x Group sends. The master fader or stereo L/R bus meters are not shown as these are always visible on the front panel. Neither of these pages are ‘editable’... -
Page 74: Using Solo
MIXER When you select PFL, you see this: When SIP is selected, this graphic is shown: The SOLO LEVEL parameter on Q1 sets the level of the solo’d signal. This is most useful when PFL is selected (i.e. the signal appears at full level) to prevent the solo’d signal blowing your speakers! These setting affect all channels equally and are not specific to any given channel. -
Page 75: Fx/Aux Setup
MIXER FX/AUX SETUP Pressing FX/AUX SETUP in the main MIXER page shows this screen: Here you can set up the configuration of the FX/Aux busses. The Q-Link functions are: FX/AUX 1/2 Allows you to configure FX/AUX 1/2 as two mono sends or one stereo send. When configured as STEREO, the graphics change: The control normally used to set the send level for FX1/Aux 1 now sets the level for the stereo send and the control normally used to set the send level for FX/Aux 2 now sets... -
Page 76: Talkback
TALKBACK The DPS24’s internal talkback mic is permanently hardwired to the STUDIO outputs and is activated using the TALKBACK button located above the MASTER fader. NOTE : The talkback mic only appears at the STUDIO L and/or R outputs are used/enabled in the FX/AUX SETUP page. -
Page 77: Patch Mode
Similarly you could patch in a CD or DAT or other stereo digital audio source via the Digital In L/R inputs. If you have an AKAI professional S5000/6000 with the optional ADAT board fitted, you can patch the ADAT inputs to the channels to have a digital feed of the sampler’s individual outputs. - Page 78 PATCH Digital In R FX2 R Aux In L FX3 L Aux In R FX3 R 2-Track L FX4 L 2-Track R FX4 R ADAT 1 - 8 - - - - - (no assignment) Stereo bus L Stereo bus R This flexible assignment allows many possibilities.
- Page 79 PATCH Here, you can patch internal audio sources to any of the DPS24’s outputs. Basically, in this page, any audio source within the DPS24 can be assigned to any of the physical output connectors on the rear panel. The available audio...
- Page 80 PATCH DISK RECORD GROUP ASSIGN allows you to select which groups the 24 disk tracks will be routed to and any track may be assigned to groups 1-8. As with the input channels, that routing is done in pairs. Regarding the NOTE above, you may find it easier to assign disk tracks to groups in the same way.
- Page 81 Using the cursor keys, you can move up and down the list of available presets and, using the SELECT key [F6], totally re-configure the DPS24’s internal patching. In this way, you can have presets suitable for track laying and overdubbing, presets for mix down and so on.
-
Page 82: Automation
AUTOMATION AUTOMATION Pressing AUTOMATION shows this screen: Down the right are the various automation parameters that can be set. They are: RECORD EVENTS Allows you to choose which events will be recorded. The options are: All controls will be recorded FX/AUX SEND Only FX/AUX send control movements will be recorded. - Page 83 AUTOMATION Other controls will be recorded into the automation data as soon as they are moved. CHANNEL ON status will be recorded as soon as a key is pressed. NOTE : Of course, the above depends on the setting of the RECORD EVENTS parameter. If, for example, RECORD EVENTS is set to PAN, only PAN control movements will be recorded if any PAN controls are moved.
-
Page 84: About The Automation
To record in AUTO DROP mode, select AUTO DROP using Q2, locate to the position where you want automation to begin and press PLAY on the main transport section of the DPS24. Nothing will be recorded until you move a fader or, if they are enabled, a pan control or FX/Aux send. - Page 85 AUTOMATION Also, if you make a mistake, using AUTO, you can grab the fader/control during automation record and overwrite the original control movement. For example, a level change going into the chorus might not be quite right. Rewind to a point just before the mistake, enable AUTO record and press PLAY.
-
Page 86: Trim Faders
IMPORTANT NOTE ABOUT SCENE 00 : INITIAL SCENE When using the DPS24’s automation, it is important to understand the importance of Scene 00, the Initial Scene. Scene 00 holds the initial state of the mixer for the project and is recalled whenever a project is loaded or an automation pass is started. - Page 87 AUTOMATION The window shows the fader(s) selected for trimming. In the event of a mistake (or if you change your mind) you can reset all the channels using RESET ALL (F3/4) or you can use the CURSOR UP/DOWN keys to select a particular fader and reset just that one using RESET SELECTED (F2/3).
-
Page 88: Effects Mode
EFFECTS MODE Pressing FX shows (something like) this screen: You can see the four effects channels and the effect type assigned to them. A graphic depiction of the selected channel’s effect is shown and the effect’s parameters are available down the right side of the panel for editing. Channels are selected using the CURSOR UP/DOWN keys: The effect assigned to the selected channel is shown in the EFFECTS list and its parameters are available for imme- diate editing. - Page 89 To select effect types, move the cursor to the EFFECT list using the CURSOR > key: The cursor moves to the right hand column where you can select effects. To select a different effect, use CURSOR UP/DOWN. The new effect is not active until RECALL [F3] is pressed. Pressing RECALL will assign the effect type to the selected effects channel: The FX Channel shows the new effect assignment and the new effect’s parameters are available for editing.
-
Page 90: Editing Effects
EDITING EFFECTS To edit an effect, no special mode is required - simply change the Q-LINK controls. The edit remains valid for the effects channel until either another effects preset is selected or another project is loaded/created. NOTE : If you edit an effects preset but then go on to select another preset, if you re-select the effects preset you edited, its original values will be recalled, NOT your edited values. - Page 91 To select an actual effect within a given category, you should press the CURSOR > key to move to the EFFECT list: You may now select an effect and assign it to the selected FX channel using RECALL [F3]. It is possible to delete effects using the DELETE key [F3]. It is possible to rename effects using the RENAME key [F4].
-
Page 92: Effects Send/Return Levels
EFFECTS SEND/RETURN LEVELS Effects levels are governed by the amount sent to them via the FX sends on each channel. The MASTER FX/AUX SEND levels, however, are set in the MASTER channel’s CHANNEL view page in the MIXER mode (they can also be adjusted using the default assignments in the USER BANK on Channels 1-4 (internal FX) and Channels 5-8 (AUX sends)). -
Page 93: Adding Effects To A Foldback Mix
3. Add a hint of reverb to Disk Channel 4. Route that reverb’s FX RETURN to the stereo L/R bus..The vocal will be recorded ‘dry’ but the vocal reverb will be heard on the control room monitors and headphone output. -
Page 94: Project Mode
Pressing PROJECT shows this screen: Here, you can see a list of projects which may be loaded into the DPS24. The list also shows the date it was created. To load a project, simply use the CURSOR UP/DOWN keys to select the project and press LOAD [F6]. The project will be loaded and you will receive a confirmation pop-up. -
Page 95: Backing Up Projects
PROJECT Here, you can backup, restore, delete and rename projects. To rename a project, use the CURSOR UP/DOWN keys to select the project to rename. Pressing RENAME will pop- up the usual naming prompt and you can rename the selected project in the usual way. Press RENAME [F6] at this prompt to confirm and commit the rename (or press CANCEL to abort). -
Page 96: Restoring Projects
PROJECT RESTORING PROJECTS Pressing RESTORE shows this screen: This page allows you to restore a backup onto the Internal HD. To restore a backup, press RESTORE [F6]. You will receive an “ARE YOU SURE” prompt and you should respond accordingly. If you proceed, you will see a progress display. If the backup exists across several CDs, you will be prompted to insert the appropriate CD during the backup process. -
Page 97: Virtual Tracks
V. TRACKS VIRTUAL TRACKS Pressing SHIFT+PROJECT gives access to the ‘virtual’ tracks function: To assign a virtual track to a ‘physical’ track, first select the ‘physical’ track you wish to replace using the CURSOR UP/DOWN keys. Once the track you want to replace is selected, press CURSOR > to move to the list of VIRTUAL TRACKS and use the CURSOR UP/DOWN keys to scroll through them. -
Page 98: Setup Mode
SETUP SETUP MODE The SETUP page allows you to set certain functions that affect the DPS24 as a whole. Pressing SETUP shows this page: Here, you can set the following functions using Q1-Q6: SAMPLE RATE Here, you can set the sample rate for the DPS24. The options are 32kHz, 44.1kHz, 48kHz and 96kHz. - Page 99 This sets the MIDI Machine Control (MMC) ID for the unit. This should match the ID of your external MIDI device. The ID of the device that transmits MMC should match the DPS24’s MMC ID so that you can control the DPS24’s transport via MMC. Please refer to the manual that came with the external device or software for more information on setting the device ID.
-
Page 100: Selecting Fx Channels
SETUP DISK The DISK page allows you to format the internal disk drive. Pressing DISK will show something like this screen: Pressing FORMAT DISK will show something like this screen: Details of the drive will be shown. If you change your mind, press EXIT otherwise.. -
Page 101: Selecting Fx Types
QUICK FORMAT also formats the disk but because it does not do the lengthy surface test, it is relatively fast. It should only be done if the drive is known to be error free otherwise the DPS24 might try to use bad blocks on the disk. -
Page 102: Tempo Maps
TEMPO MAPS Pressing TEMPO in the main SETUP page takes you to this page: Here, you can set up a ‘tempo map’ so that a sequencer that is being synchronised to the DPS24 can follow time signature and/or tempo changes. -
Page 103: User Bank
SETUP USER BANK Pressing U-BANK in the main SETUP page will show this screen: Here you can assign any channel to the 12 ‘user channels’. This is useful as it allows you to have important channels conveniently available in one bank so that you have access to those channels quickly without having to switch banks all the time. -
Page 104: Preferences
The footswitch can be used for playing, stopping and drop- ping in and out of record (as on the DR8/16). Pressing the footswitch once will cause the DPS24 to play, pressing it again will cause it to drop into record on the selected track(s). -
Page 105: Set Clock
EXIT Returns you to the main SETUP page. SET CLOCK Takes you to a page where you can set the DPS24’s internal clock (described below). SET CLOCK Pressing SET CLOCK in the PREFERENCES page shows this screen: Using Q1-Q6, you can set the time and date. The new settings become active when you press SET CLOCK (F5/6). -
Page 106: Cd-Recorder
CD-R CD-RECORDER The SETUP key’s SHIFT function is CD-R and shows you this screen: The large window on the left shows general information. None of the parameters are editable but are: SOURCE PROJECT Shows the currently selected project. To select another to record to CD, load the appro- priate project in the PROJECT mode. -
Page 107: Mixing Down
MIXING DOWN It is not possible to mixdown directly to CD-R so first, you should make a stereo mix to the DPS24’s ‘virtual 2-track’. This is done in the MIXDOWN page: The graphic in the window represents what is happening - you are mixing down up to 24 channels of disk tracks through the stereo L/R bus to a 2-track machine (albeit a ‘virtual’... -
Page 108: Cd Player
During playback, F6 becomes a pause control. NOTE : It is not possible to play the CD through the DPS24’s monitoring system. You can listen to it on the CD-RW’s headphone socket (if the model installed has one, of course) but, ideally, to hear the CD you have created, you should take it to a compatible CD player. -
Page 109: Ext Sync Key
SYNC OFFSET The DPS24 will now only play upon reception of external timecode. The timecode rate is set using Q3 in the SETUP page: Also, the T/C SOURCE should be set as appropriately (although, unless the optional SMPTE board is fitted, MIDI... - Page 110 EXT. SYNC SETTING EXT SYNC OFFSETS Pressing SHIFT+EXT SYNC allows you to set a timecode offset. This prompt appears on the LCD: The first digit is highlighted and you should enter a value from the numeric keypad as appropriate. To set the ‘sign’ (i.e.
-
Page 111: Appendix
APPENDIX MIDI Implementation Chart Date: 12/01 Model DPS24 Version: 1.0 Function Transmitted Recognized Remarks Basic channel Default Changed Mode Default Messages Altered ************** Note Number: True Voice ************** Velocity Note On Note Off After Touch Channel Pitch Bend Control Change... -
Page 112: Block Diagrams
APPENDIX Block Diagrams GROUPS SOLO SEND 1 SEND 2 ADC 1-12 SEND 3 ADAT 1-8 SPDIF IN SEND 4 AUX IN INV ATT FADER GRP 1/2 2-TRACK IN FX 1-4 GRP 3/4 To Disk METRONOME GRP 5/6 GRP 7/8 SOLO INPUTS SEND 1 SEND 2... - Page 113 APPENDIX SEND 1 SEND 2 INPUTS 1-12 GROUPS 1-8 SEND 3 ADC 1-12 SEND 4 ADAT 1-8 SPDIF IN INV ATT FADER AUX IN GRP 1/2 2-TRACK IN GRP 3/4 FX 1-4 GRP 5/6 STEREO L/R BUS METRONOME GRP 7/8 SOLO RECORD SOURCES RECORD SOURCES...
- Page 114 APPENDIX Aux Send 1 Aux Send 2 AUX bus Aux Send 3 Aux Send 4 TB Switch Studio L Studio R Talkback 2 Track input MAIN L MAIN R MONITOR MONO LEVEL NEAR L SOLO bus NEAR R 2 TRACK NEAR switch STEREO switch...
-
Page 115: Installation Of Options - To Service Technicians
APPENDIX Installation of Options - To Service Technicians IB-24LTC/IB-24ADT 1. Remove the screws for the cover of expansion slot and remove the cover. Save the screws. 2. Slide the Option Board in along the guide groove and press it firmly to ensure secure connection. 3. -
Page 116: Hard Disk Drive
APPENDIX Hard Disk Drive 1. From the bottom of the unit, remove the screws for the bottom cover and open the bottom. 2. Referring to the illustration, slide the Hard Disk Drive in the disk holder and mount it with the screws inside the Internal Disk Mounting Kit. -
Page 117: Cd-R/Cd-Rw Drive
APPENDIX CD-R/CD-RW Drive 1. From the bottom of the unit, remove the screws for the bottom cover and open the bottom. 2. Remove the cover for the CD-R/RW Drive on the Front Panel. Blue 3. Referring to the illustration, slide the CD-R/RW Drive from the front and mount it on the bottom chassis with the screws inside the Internal Disk Mounting Kit. -
Page 118: Specifications
SPECIFICATIONS Specifications Power Supply AC 120V 60Hz (US, Canada), 220-240V 50Hz (Europe) 110W Operating Temperature 10 - 35° C Operating Humidity 10% - 60% (without condensation) Dimensions (mm) 726 (W) x 190 (H) x 579 (D) max. (with LCD tilted down) Weight 17.8kg (without drive) Display... - Page 119 SPECIFICATIONS Output Level Stereo Out +4dBu (+22dBu balanced max., 20k ohms load) Main (monitor) +4dBu (+22dBu balanced max., 20k ohms load) Nearfield (monitor) +4dBu (+22dBu balanced max., 20k ohms load) Studio Out +4dBu (+22dBu balanced max., 20k ohms load) Direct Out +4dBu (+22dBu balanced max., 20k ohms load) AUX Sends 1 - 4 +4dBu (+22dBu balanced max., 20k ohms load)
-
Page 120: Index
DISK 92 INPUT CHANNEL GROUP ASSIGN 71 DISK RECORD GROUP ASSIGN 72 INPUT CHANNEL SOURCE 69 DISK RECORD SOURCES 69 INPUT SOURCE 59 DPS24 Modes 40 Inputs 4, 36 DROPOUT MODE 75 INSERT 48 Dropping out of record 23 DSP 51... - Page 121 INDEX Progress Display 31 L/R Bus Assign 72 PROJECT 17, 40, 86 L/R Bus Assignment 6 Project Backup 87 LCD 16 Project LOAD 86 LCD layout 29 Project Restore 88 Linking Channels 63 PROJECT TOOLS 86 LOAD Project 86 Prompts 31 Locating to Timecode 27 PS2 Keyboard 37 Lock Lever 16...
- Page 122 INDEX S (continued) Studio Outputs 37 Sub-groups 6 T/C DISPLAY 41 T/C RATE 91 TALKBACK 13, 68 Talkback Level 16 TB Level 16 TEMPO 54 Tempo Maps 94 THRESHOLD 62, 63 TIME SYNC 91 Timecode Display 16 TO 24 Transport Keys 23 TRIM FADERS 78 U-BANK 91, 95 UNDO/REDO 18...
- Page 123 Printed in China...
Need help?
Do you have a question about the DPS24 and is the answer not in the manual?
Questions and answers