Advertisement
Table of Contents
- 1 Table of Contents
- 2 Important Safeguards
- 3 Grounding Instructions
- 4 Technical Specifications
- 5 Product Diagram
- 6 Installation
- 7 Preparing the Water Dispenser for Use
- 8 Initial Setup
- 9 Adjusting the Siphon Tube for Smaller Bottles
- 10 Operation
- 11 Cleaning and Maintenance
- 12 Troubleshooting
- Download this manual
Advertisement
Table of Contents

Subscribe to Our Youtube Channel
Related Manuals for Oasis BAEB1SHSK


Summary of Contents for Oasis BAEB1SHSK
- Page 1 User Guide Please read this instruction manual before using your water dispenser. BOTTOM LOAD BOTTLED WATER DISPENSER MODEL BAEB1SHSK 506335C...
-
Page 2: Table Of Contents
TABLE OF CONTENTS IMPORTANT SAFEGUARDS pg 3 GROUNDING INSTRUCTIONS pg 3 TECHNICAL SPECIFICATIONS pg 4 PRODUCT DIAGRAM pg 4 INSTALLATION pg 5 PREPARING THE WATER DISPENSER FOR USE pg 5 INITIAL SETUP pg 5 ADJUSTING THE SIPHON TUBE FOR SMALLER BOTTLES pg 6 OPERATION pg 6... -
Page 3: Important Safeguards
• Do not use an extension cord as it may overheat, increasing the risk of fi re. • If the supply cord is damaged, contact Oasis or a qualifi ed electrician to replace it before plugging it in. • Never turn the dispenser upside down. If the dispenser has been resting on its side for a long period of time, place the it in the upright position for approximately 12 hours before using. -
Page 4: Technical Specifications
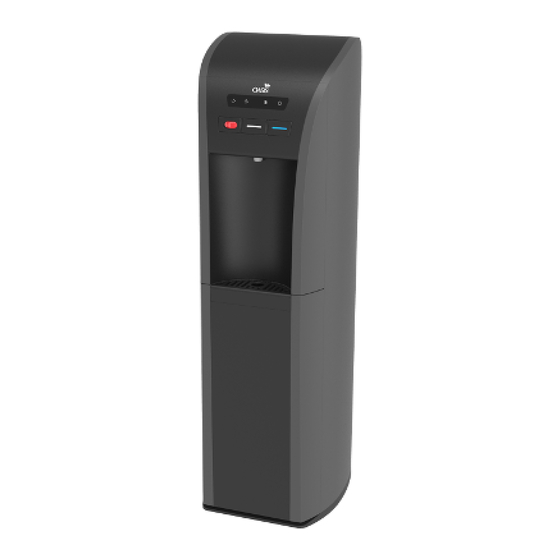
TECHNICAL SPECIFICATIONS MODEL 506335C HOT WATER/HR 0.9 GAL (3.5 L) RATED VOLTAGE 115V - 60Hz COLD WATER/HR 0.7 GAL (2.5 L) HEATING POWER 420W HOT WATER TEMP. RANGE 165°F - 194°F (73.9°C - 90°C) COOLING POWER/CURRENT 90W/1.5A COOLANT R134a 36g PRODUCT DIAGRAM FRONT BACK... -
Page 5: Installation
INSTALLATION 1. After unpacking, wipe dispenser with soft cloth. 2. Place the dispenser on a hard, fl at surface, making certain it is level. The dispenser should not be placed near direct sunlight or any other source of heat. 3. It is best to place the dispenser in an area with good air circulation. Make sure there is at least 6 in (15cm) of clearance in back and on both sides of the dispenser for proper ventilation. -
Page 6: Adjusting The Siphon Tube For Smaller Bottles
ADJUSTING THE SIPHON TUBE FOR SMALLER BOTTLES Your new water dispenser features a water bottle cap with siphon tube that can accommodate either a 3 or 5 gallon (12 or 19 liter) water bottle. The water bottle cap and siphon tube assembly is shipped in it’s default confi guration for use with a standard 5 gallon (19 liter) bottle. -
Page 7: Cleaning And Maintenance
CLEANING AND MAINTENANCE For maximum effi ciency and performance, your water dispenser requires cleaning on a regular basis (ie. every 6 months). Regular cleaning will prevent potential growth of bacteria and will maintain a hygienic environment. Never use harsh chemicals or abrasive cleaners. Cleaning the Outside of the Water Dispenser The outside of the dispenser may be wiped clean with a cleaning solution product or a mild soap and water mixture and a soft cloth. - Page 8 CLEANING AND MAINTENANCE Draining the Reservoirs IMPORTANT: UNPLUG THE DISPENSER BEFORE PERFORMING THIS PROCEDURE. 1. Dispense hot water from the water dispense point until the temperature drops to a safe level to avoid the risk of scalding. 2. Remove the water bottle. 3.
-
Page 9: Troubleshooting
Move dispenser away from other objects. The buttons are stuck down. Check for foreign objects in the button area. Water leaks from the The water dispense point Contact Oasis Customer Service. water dispense point. has been damaged. 1-800-646-2747 Tighten the drain cap. - Page 10 ® Water Friendly Solutions Oasis International 222 East Campus View Blvd. | Columbus, Ohio 43235 U.S.A. 1-800-646-2747 | info@oasiscoolers.com | www.oasiscoolers.com OASIS and Aquarius are registered trademarks of LVD Acquisition, LLC dba Oasis International ©2017 LVD Acquisition, LLC 030099-561...
Need help?
Do you have a question about the BAEB1SHSK and is the answer not in the manual?
Questions and answers