Moneris PAYD PRO Using Manual
For android
Hide thumbs
Also See for PAYD PRO:
- Setup manual (14 pages) ,
- User manual (43 pages) ,
- Reference manual (86 pages)
Table of Contents
Advertisement
Advertisement
Table of Contents

Related Manuals for Moneris PAYD PRO


Summary of Contents for Moneris PAYD PRO
- Page 1 For Android™ (11/17)
- Page 2 For more information and assistance: Web: getpayd.com/paydpro/support Email: info@getpayd.com Toll-free: 1-855-423-PAYD (7293) Record your Moneris® merchant ID here: __________________________________________...
-
Page 3: Table Of Contents
Contents Introduction ....................6 Before you get started ................7 Activating your PAYD Pro store .............. 8 Setting up the PAYD App on your mobile device ......9 Downloading and installing the PAYD App from Google Play™ Setting up the PAYD PIN Pad ..............11... - Page 4 Signing into/Signing out of the PAYD App ........40 Signing in with full credentials Signing out Signing in with a quick PIN The PAYD App main menu Need to reset your sign-in password? Can't remember your quick PIN? Configuring your security question/answer USING PAYD PRO® FOR ANDROID™...
- Page 5 The PAYD PIN Pad ..................47 Bluetooth connectivity indicator Battery charge indicator Maintaining battery charge Powering on the PAYD PIN Pad Sleep mode Using the PAYD PIN Pad while it is in Sleep mode Exiting Sleep mode Powering off the PAYD PIN Pad Card entry options ...................
- Page 6 Emailing a transaction receipt Sending an SMS text message transaction notification Reporting....................76 Transactions report "Details" screen (transactions) Totals (batches) report Re-initializing the PAYD PIN Pad ............82 Troubleshooting ..................83 Error messages in the PAYD App USING PAYD PRO® FOR ANDROID™...
- Page 7 Other issues (PAYD App) Error messages on the PAYD PIN Pad Other issues (PAYD PIN Pad) Using the PAYD card reader Manual card entry on your mobile device Sources of electromagnetic interference Merchant support ................. 100...
-
Page 8: Introduction
Introduction PAYD Pro allows you to accept Interac® Debit and credit payments right on your mobile device, just about anywhere your business takes you. This guide provides instructions on how to pair a Moneris PAYD® PAYD PIN Pad with an Android mobile device (referred to as "mobile device" or "device");... -
Page 9: Before You Get Started
PAYD PIN Pad (you will be asked to refer to this ID during the setup steps): 2. Ensure that you have the required credentials for your PAYD Pro store: If are activating your store, ensure that you have your merchant ID and store ID (refer to your "Useful Information"... -
Page 10: Activating Your Payd Pro Store
Activating your PAYD Pro store 1. Visit getpayd.com/activate. 2. In the Merchant ID and Store ID fields, enter your merchant ID and store ID (refer to your "Useful Information" Email for these IDs).* 3. Tap Next. 4. In the First name and Last name fields, enter your first name and last name.*... -
Page 11: Setting Up The Payd App On Your Mobile Device
Setting up the PAYD App on your mobile device The PAYD App must be downloaded and installed on your mobile device before you can start to perform PAYD Pro transactions. 1. Do one of the following: If you need to download/install the PAYD App to your mobile device, proceed to Downloading and installing the PAYD App from Google Play (page 10). -
Page 12: Downloading And Installing The Payd App From Google Play
4. Once the PAYD App is downloaded and installed on your mobile device, do not open/launch the PAYD App at this time. 5. Return to your mobile device's home screen. 6. Proceed to Setting up the PAYD PIN Pad (page 11). USING PAYD PRO® FOR ANDROID™... -
Page 13: Setting Up The Payd Pin Pad
If you want to move an initialized PAYD PIN Pad to an Apple® iPad®, iPhone®, or iPod touch®, refer to the Using PAYD Pro for Apple iPad, iPhone, and iPod touch Guide (follow Pairing option 3 on page 11 of... -
Page 14: Pairing A New Payd Pin Pad With Your Mobile Device
PAYD PIN Pad setup procedures. Wait while the PAYD PIN Pad beeps and powers on. d. When the LANGUAGE/LANGUE screen displays, LANGUAGE/LANGUE proceed to step 2 (Configure the PAYD PIN Pad's default language) on page 13. ENGL ENGL FRAN USING PAYD PRO® FOR ANDROID™... - Page 15 2. Configure the PAYD PIN Pad's default language a. On the LANGUAGE/LANGUE screen, press F1 LANGUAGE/LANGUE (ENGL). ENGL ENGL FRAN Note: If the WELCOME/BONJOUR screen displays instead, press F1 and F4 in sequence, and go directly to step 2c of this procedure. b.
- Page 16 If the passkey/code is the same on both the PAYD PIN Pad and the mobile device, tap Pair on the mobile device's Bluetooth pairing request. h. On the PAYD PIN Pad (COMPARE KEY: screen), press F1 (YES). COMPARE KEY: 000000 USING PAYD PRO® FOR ANDROID™...
- Page 17 When the TERMINAL WILL BE REBOOTED... screen displays (shown here), go to step 4j of this TERMINAL WILL BE REBOOTED... procedure. If you cannot complete the pairing, clear any error message displayed on the mobile device (e.g., "Pairing Unsuccessful" may be displayed), then press F4 (NO) on the PAYD PIN Pad (COMPARE KEY: screen), and then repeat steps 4b to 4h of this procedure.
- Page 18 6. Initialize the PAYD PIN Pad The PAYD PIN Pad must be successfully initialized from your mobile device before you can use it to perform PAYD Pro transactions. Follow the steps below to initialize the PAYD PIN Pad. Note: If the PAYD PIN Pad is already initialized, go to step 6k of this procedure.
- Page 19 g. When PLEASE WAIT displays on the PAYD PIN Pad, wait while it initializes. PLEASE WAIT Note: During this process, the PAYD App displays the message "Initializing Pinpad. This may take a few minutes". h. When the PAYD App displays the message "Initialization was successful.
-
Page 20: Pairing An Initialized Payd Pin Pad With A Different Mobile Device
Unpair the PAYD PIN Pad so that the mobile device forgets the PAYD PIN Pad's terminal ID. d. Power off the mobile device, and set it aside. Proceed to step 2 (Reset the initialized PAYD PIN Pad to its factory defaults) on page 19. USING PAYD PRO® FOR ANDROID™... - Page 21 2. Reset the initialized PAYD PIN Pad to its factory defaults a. If the initialized PAYD PIN Pad is not already powered on, press its power button (see page 49), and wait until the PAYD PIN Pad powers b. When the WELCOME/BONJOUR screen displays, press F1 and F4 in sequence.
- Page 22 When this BLUETOOTH PAIRING screen displays, BLUETOOTH PAIRING proceed to step 3 (Ready your mobile device for Bluetooth pairing) on page 13. PAIR PAIR ADMIN USING PAYD PRO® FOR ANDROID™...
-
Page 23: Pairing A Replacement Payd Pin Pad With Your Mobile Device
Pairing a replacement PAYD PIN Pad with your mobile device 1. Remove the older PAYD PIN Pad's terminal ID from your mobile device's Bluetooth memory a. Open the Bluetooth settings screen on the mobile device with which the older (initialized) PAYD PIN Pad is currently paired. b. - Page 24 Pair the new/replacement PAYD PIN Pad with your mobile device (proceed to Pairing a new PAYD PIN Pad with your mobile device on page 12). USING PAYD PRO® FOR ANDROID™...
-
Page 25: Other Payd Pin Pad Settings
Other PAYD PIN Pad settings Changing an initialized PAYD PIN Pad's default language 1. Access the initialized PAYD PIN Pad's LANGUAGE/LANGUE screen Note: If the USB charging cable is connected to the PAYD PIN Pad, disconnect the cable before you continue. a. - Page 26 The PAYD PIN Pad is now configured to display the new default language (you do not have to re-initialize the PAYD PIN Pad). If you also want to change the language of the PAYD App, see page 39. USING PAYD PRO® FOR ANDROID™...
-
Page 27: Bluetooth Pairing In Legacy Mode
Bluetooth pairing in Legacy mode If you are following the PAYD PIN Pad setup steps and have been unable to pair a PAYD PIN Pad with your mobile device, follow the steps below to pair the PAYD PIN Pad using Legacy mode. 1. - Page 28 SERIAL NUMBER I6012345 When this BLUETOOTH PAIRING screen displays, BLUETOOTH PAIRING proceed to step 2 (Pair the PAYD PIN Pad with your mobile device using legacy mode) on page PAIR PAIR ADMIN USING PAYD PRO® FOR ANDROID™...
- Page 29 2. Pair the PAYD PIN Pad with your mobile device using legacy mode a. On this BLUETOOTH PAIRING screen, press F1 BLUETOOTH PAIRING (PAIR). PAIR PAIR ADMIN b. When this next BLUETOOTH PAIRING screen BLUETOOTH PAIRING displays, press F2 to scroll to PAIR ANDROID, and PAIR IOS PAIR ANDROID PAIR ANDROID...
- Page 30 5 (Confirm that your WELCOME/BONJOUR mobile device is successfully paired with the PAYD PIN Pad) on page 15. Note: The battery icon in the upper right corner on the screen may appear fuller than is shown here. USING PAYD PRO® FOR ANDROID™...
-
Page 31: Ready To Use The Payd App
Ready to use the PAYD App? To learn about the PAYD App and some of its features, read the sections listed here: Configuring optional PAYD App settings, see pages 30 to 39. Signing in/signing out of the PAYD App, see pages 40 to 41. ... -
Page 32: Optional Features
Minimal: Includes only the customer ID. Full: Includes the customer ID and order ID. 4. Tap to return to the main menu. Note: To change this setting on a different mobile device, repeat these steps on the other device. USING PAYD PRO® FOR ANDROID™... -
Page 33: Setting A Default Payment Device
Setting a default payment device Sets a default payment device for transactions. 1. In the PAYD App, start on the "Settings" screen. Note: If another screen is displayed, tap to return to the main menu, and then tap Settings. 2. Tap Interface. 3. -
Page 34: Enabling Tip Prompting
Go directly to the next step. 5. Tap to return to the main menu. Note: To enable/disable this feature or change this setting on a different mobile device, repeat these steps on the other device. USING PAYD PRO® FOR ANDROID™... -
Page 35: Setting A Tax Rate
Setting a tax rate Sets a tax name and a percentage by which the tax will be auto-calculated during any Sale, Pre-Authorization, Refund, or Capture. Note: The tax will be calculated based on the original transaction amount excluding any tip (for information about tip prompting, see page 32). 1. -
Page 36: Location-Mapping Transactions
Viewing a location map To view the mapped location of a PAYD transaction, you must access the transaction's "Details" screen (see page 78) from any mobile device. USING PAYD PRO® FOR ANDROID™... -
Page 37: Setting A Quick Pin For Sign-In
Setting a quick PIN for sign-in Sign into the PAYD App with a 4-digit PIN. 1. In the PAYD App, start on the "Settings" screen. Note: If another screen is displayed, tap to return to the main menu, and then tap Settings. 2. -
Page 38: Pre-Filling The Employee Id/Store Id At Sign-In
5. When the "Success" message displays, tap OK. 6. Tap to return to the main menu. Note: To enable/disable this feature or change this setting on a different mobile device, repeat these steps on the other device. USING PAYD PRO® FOR ANDROID™... -
Page 39: Setting An Email Address To Receive Exported Reports
Setting an email address to receive exported reports Sets an email address to which transaction reports will be sent when you export report results to a comma-separated values (CSV) file (see page 76). Note: Results include the following transaction data (CSV fields appear in quotations): store ID ("store id"), terminal (PAYD PIN Pad) ID ("terminal"), batch number ("batch"), date and time ("date time"), transaction type ("type"), order ID ("order no"), customer ID ("cust id"), amount ("amount"), card type ("card... -
Page 40: Auto-Sending Transaction Receipts To A Set Merchant Address
5. When the "Success" message displays, tap OK. 6. Tap to return to the main menu. Note: To enable/disable this feature or change this setting on a different mobile device, repeat these steps on the other device. USING PAYD PRO® FOR ANDROID™... -
Page 41: Setting A Default Payd App Screen
Setting a default PAYD App screen Sets a default screen ("Sale", "Reports", "Totals", or "Settings") to open whenever you sign into the PAYD App. Note: "Sale" is pre-set as the default screen. 1. In the PAYD App, start on the main menu. Note: If another screen is displayed, tap to return to the main menu. -
Page 42: Signing Into/Signing Out Of The Payd App
2. Wait for the PAYD full sign-in screen to display: 3. Enter your credentials in the sign-in fields (PAYD Employee ID, PAYD Store ID, and PAYD Password). Note: Some fields may be pre-filled (see page 36). 4. Tap Sign In. USING PAYD PRO® FOR ANDROID™... -
Page 43: Signing Out
If at any time the PAYD App requests permission to access data from your mobile device (e.g., location, microphone, or contacts data), allow the PAYD App to access the data. If the PAYD App prompts you to change your password, enter a new password, and tap Save Password. -
Page 44: Signing In With A Quick Pin
You will automatically be signed in once you enter the last digit; otherwise, tap Sign In. 4. Your default PAYD App screen displays once you are signed in. Note: To change the default screen, see page 39. USING PAYD PRO® FOR ANDROID™... -
Page 45: The Payd App Main Menu
The PAYD App main menu From this menu, you can access any transaction, report, or setting in the PAYD App. To return to this menu from any other screen, simply tap at the top of the screen. -
Page 46: Need To Reset Your Sign-In Password
4 passwords). 10. When the "Password reset successfully" message displays on PAYD Administration's sign-in screen, it means your password has been reset. Note: You must enter the new password when signing into the PAYD App/PAYD Administration. USING PAYD PRO® FOR ANDROID™... -
Page 47: Can't Remember Your Quick Pin
Can't remember your quick PIN? 1. From your device's home screen, tap the PAYD icon ( ) to launch the PAYD App. 2. When the PAYD "Enter PIN" sign-in screen displays, tap Forgot PIN?. 3. When the PAYD full sign-in screen displays, enter your full sign-in credentials (see page 40). -
Page 48: Configuring Your Security Question/Answer
6 (page 16); begin at step c. If the PAYD PIN Pad with which you have paired your mobile device is already initialized, proceed to Ready to use the PAYD App? (page 29). USING PAYD PRO® FOR ANDROID™... -
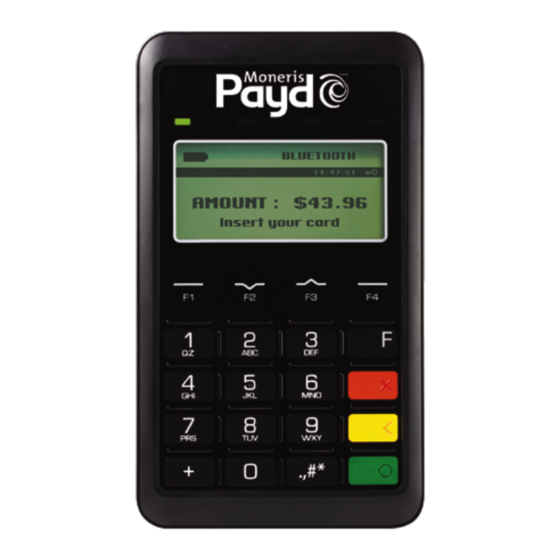
Page 49: The Payd Pin Pad
The PAYD PIN Pad The customer uses the PAYD PIN Pad to input data when prompted to do so during a transaction. For names and descriptions of labelled areas on the PAYD PIN Pad (shown below), see pages 48 to 49. - Page 50 WELCOME/BONJOUR screen displays when PAYD PIN Pad idle. Magnetic Stripe Reader (slot along the top of PAYD PIN Pad) See page 54. Micro-USB port (located on right side) Plug USB charging cable here. USING PAYD PRO® FOR ANDROID™...
-
Page 51: Bluetooth Connectivity Indicator
To see the location of the labelled areas on the PAYD PIN Pad, see page 47. Label Description Power button (located on right side) For power functions, see pages 51 to 52. For reset function, press and hold down until the rebooting starts. -
Page 52: Battery Charge Indicator
USB charging cable provided with the PAYD PIN Pad. Power off the PAYD PIN Pad when it is not in use or being charged (see page 52). USING PAYD PRO® FOR ANDROID™... -
Page 53: Powering On The Payd Pin Pad
Powering on the PAYD PIN Pad The WELCOME/BONJOUR screen displays when the PAYD PIN Pad is fully powered on (see also Sleep mode on page 52). 1. To power on the PAYD PIN Pad, do one of the following: With the USB charging cable: a. -
Page 54: Sleep Mode
3. Simultaneously press and hold down both the yellow key and the key until the PAYD PIN Pad starts to power off, and then wait while it powers off completely (the screen is blank when the PAYD PIN Pad is powered off). USING PAYD PRO® FOR ANDROID™... -
Page 55: Card Entry Options
Card entry options Insert: chip cards 1. The PAYD PIN Pad displays SWIPE OR INSERT CARD or SWIPE, TAP OR INSERT CARD. 2. The customer inserts their card into the PAYD PIN Pad's chip reader. Note: Unless the PAYD PIN Pad prompts otherwise, the card should not be swiped even if it has a magnetic stripe. -
Page 56: Swipe: Magnetic Stripe Cards
Hold the PAYD PIN Pad with one hand, and swipe the card in the magnetic stripe reader with the other hand (this will prevent the PAYD PIN Pad's internal contactless reader from inadvertently reading the card data as a contactless transaction). USING PAYD PRO® FOR ANDROID™... -
Page 57: Wave/Tap: Contactless Cards
Wave/tap: contactless cards 1. The PAYD PIN Pad to displays SWIPE, TAP OR INSERT CARD. 2. The customer taps/waves their card over the PAYD PIN Pad's display screen: The PAYD PIN Pad's battery charge level should be at least 50% (see page 50) to ensure a successful tap. -
Page 58: Manual Card Entry On The Payd Pin Pad
3. On the "Sale" screen, tap (checkmark the box) Keyed entry on pinpad. Note: If you are unable to use the PAYD PIN Pad to capture the card data, try using the PAYD card reader (see page 95). USING PAYD PRO® FOR ANDROID™... -
Page 59: Transactions
Transactions General guidelines for transactions 1. Keep the PAYD PIN Pad and your mobile device in close proximity to each other. 2. Do not attempt to perform transactions near strong sources of electromagnetic interference (see page 97). 3. Before you perform a transaction, confirm the operational status of the PAYD PIN Pad: ... -
Page 60: Sale With Debit/Credit Card
61. 6. Tap Process Transaction. 7. When "Follow prompts on pinpad" displays, do one of the following: If tip prompting is disabled, see page 62. If tip prompting is enabled, see page 64. USING PAYD PRO® FOR ANDROID™... -
Page 61: Sale With Cash
Sale with cash Cash sale of goods and services. 1. In the PAYD App, start on the "Sale" screen. Note: If another screen is displayed, tap to return to the main menu, and then tap Sale. 2. Tap Cash. If the Customer ID and Order ID fields display and you want to track the transaction with your own identifier(s), enter the required data in one or both fields;... -
Page 62: Pre-Authorization With Credit Card
8. If you need to manually enter the card data on the PAYD PIN Pad, see page 61. 8. Tap Process Transaction. 9. When "Follow prompts on pinpad" displays, see page 62. USING PAYD PRO® FOR ANDROID™... -
Page 63: Manually Entering Card Data On The Payd Pin Pad
Manually entering card data on the PAYD PIN Pad In the PAYD App, ensure that you have entered the transaction amount, selected/added the sales tax if enabled, and entered any optional tracking identifiers (customer ID and/or order ID) before you follow the steps below. 1. -
Page 64: Customer Prompts On The Payd Pin Pad
I PRE-AUTHORIZE Presses the green key to confirm the UP TO displayed Pre-Authorization amount. $0.00-OK? <TRANSACTION Presses the green key to confirm the NAME> displayed amount. $0.00-OK? This table continues on the next page... USING PAYD PRO® FOR ANDROID™... - Page 65 Prompt Customer action For chequing account, presses F1 (CHQ). SELECT ACCOUNT For savings account, presses F4 (SAV). ENTER PIN & OK Keys in their Personal Identification Number (PIN) and presses the green key. PLEASE WAIT Waits while the transaction is processed. APPROVED Removes their card from chip reader.
-
Page 66: Customer Prompts On The Payd Pin Pad (Tip Prompting Enabled)
62; begin at step 2. If ENTER CARD # displays on the PAYD PIN Pad, the customer returns the PAYD PIN Pad to you (continue on page 61; begin at step 5). USING PAYD PRO® FOR ANDROID™... -
Page 67: Customer Prompts In The Payd App
Customer prompts in the PAYD App When the PAYD App displays "Please specify a tip amount" during a Sale transaction, do the following: 1. Hand your mobile device to the customer. 2. The customer does one of the following: To add a default tip percentage: a. - Page 68 PAYD App automatically emails a receipt to the address (the PAYD App will not notify you that the email has been sent). To send an SMS text message notification, see page 75. 6. Tap to return to the main menu. USING PAYD PRO® FOR ANDROID™...
-
Page 69: Voiding/Refunding A Transaction
Voiding/refunding a transaction Reverses a debit/credit or cash transaction. Note: If you want to reverse a debit/credit transaction on the same day it was originally processed, you must do a Void for the full amount. If you want to reverse a debit/credit transaction processed on a different day, you must do a Refund. - Page 70 Manually enter the card data on the PIN Pad yourself (continue on page 61, and begin at step 4). 8. When the PAYD App displays the "APPROVED" or "DECLINED" response, the transaction is complete: USING PAYD PRO® FOR ANDROID™...
- Page 71 To email a transaction receipt, see page 74. Note: If you enabled the PAYD App to auto-send receipts to a set merchant address, the PAYD App automatically emails a receipt to the address (the PAYD App will not notify you that the email has been sent).
-
Page 72: Capturing A Pre-Authorization
Tap Sort by, and select a sort-by option (amount, customer ID, date, order ID, card type, or transaction type) from the drop- down list. 4. Tap Search Transactions, and wait for a transaction list to display. USING PAYD PRO® FOR ANDROID™... - Page 73 To display the next 10 transactions if applicable, tap More (to maximum of 300). 5. Tap the "Preauth" transaction that you want to complete. 6. When the transaction "Details" screen displays, confirm this is the transaction that you want to complete (see page 78). Note: If this transaction is not the one that you want to complete, (repeat step 5).
-
Page 74: Receipts
Masking replaces a card’s numbers (except for the last 4) with "*"s (e.g., ************1234). Truncation displays only the last 4 digits of a card (e.g., 1234). The expiry date does not appear in any receipt. USING PAYD PRO® FOR ANDROID™... -
Page 75: Signature Capture For Receipts
If a signature is captured, it will not be included in emailed receipts; however, a receipt with signature will be stored on PAYD Administration and can be viewed or printed from there at any time (see the Using Moneris PAYD Administration Guide). A receipt with signature can also be viewed via the hyperlink included in any SMS text message notification sent for the transaction. -
Page 76: Emailing A Transaction Receipt
3. When the "Receipt successfully sent" message displays, tap OK. 4. If you want to email a receipt to additional addresses, repeat steps 1 to 3 as many times as you require. 5. When you are finished, tap to return to the main menu. USING PAYD PRO® FOR ANDROID™... -
Page 77: Sending An Sms Text Message Transaction Notification
Sending an SMS text message transaction notification When the PAYD App displays the "APPROVED" or "DECLINED" response, follow these steps to send an SMS (short message system) text message notification. Note: The text message includes a hyperlink to a transaction receipt. If a customer signature was captured for the transaction, the signature will appear on the displayed receipt's "SIGNATURE"... -
Page 78: Reporting
Tap Sort by, and select a sort-by option (amount, customer ID, date, order ID, card type, or transaction type) from the drop- down list. 3. Tap Search Transactions, and wait for a transaction list to display. USING PAYD PRO® FOR ANDROID™... - Page 79 4. You may do any of the following: To display the next 10 transactions if applicable, tap More (to maximum of 300). To export the report results in CSV format in a text file, tap Export Report (near the top of the screen). Note: The file will be sent to the email address that you specified in your Export to CSV setting (see page 37).
-
Page 80: Details" Screen (Transactions)
To email a transaction receipt, see page 74. To send an SMS text message notification, see page 75. to return to the transaction list, or tap to return to the main menu. USING PAYD PRO® FOR ANDROID™... - Page 81 Transaction performed by user signed in under this employee ID. Moneris Host identifier (e.g., if "I60123450010690030" is the number, then "I6012345" is the terminal ID (i.e., PAYD PIN Pad ID). This number may be requested by Moneris to help track a transaction. Transaction Response code: ...
-
Page 82: Totals (Batches) Report
If "No tip totals for today" displays, it means no tip amounts were accrued for the specified date range. Terminal Totals For the selected date range, displays transaction types and totals (excluding cash) grouped by batch number and terminal ID. USING PAYD PRO® FOR ANDROID™... - Page 83 a. To display this sub-report, tap Note: Totals grouped under a terminal ID starting with "I6" indicate those transactions were performed on a PAYD PIN Pad with the same ID. Totals grouped under the terminal ID starting with "66" indicate those transactions were performed entirely on the PAYD App (i.e., without the use of a PAYD PIN Pad).
-
Page 84: Re-Initializing The Payd Pin Pad
7. When the PAYD App displays the message "Initialization was successful. Pinpad is ready to use", tap OK. 8. When the PAYD PIN Pad displays the WELCOME/BONJOUR screen, the operation is complete. 9. Tap to return to the main menu. USING PAYD PRO® FOR ANDROID™... -
Page 85: Troubleshooting
Troubleshooting Error messages in the PAYD App If an error message is displayed in the PAYD App (i.e., on your mobile device) and is listed in the table below, tap OK and then follow the instructions in the table’s Solution column. If the problem is still not resolved, call us at 1-855-423-PAYD (7293). - Page 86 PAYD PIN Pad because the PAYD App/your mobile pinpad. Please device is unable to detect the PAYD PIN Pad with connect pinpad to which it is paired. update pinpad 2. See "Unable to connect to Pinpad" (page 85). settings. USING PAYD PRO® FOR ANDROID™...
- Page 87 Error message Solution Unable to connect The PAYD App/your mobile device cannot detect the to Pinpad. PAYD PIN Pad with which it is paired. 1. Confirm that the PAYD PIN Pad is powered on (see page 51). 2. Confirm that the PAYD PIN Pad is in range of your mobile device and operating in a suitable environment (see page 97).
-
Page 88: Other Issues (Payd App)
5. If the issue recurs, close the PAYD App, and reboot the PAYD PIN Pad again. 6. Re-launch the PAYD App, sign in (see page 40), and retry the transaction. USING PAYD PRO® FOR ANDROID™... - Page 89 Issue Solution "Initialize 1. Ensure that the PAYD PIN Pad is powered on. Pinpad" button 2. In the PAYD App, tap Connect Pinpad. does not display. 3. If the Initialize Pinpad button still does not display, simultaneously press and hold down both the yellow key and the key on the PAYD PIN...
- Page 90 1. Configure your device's privacy settings to allow the PAYD App to access to your device's contacts list, and then retry to access your contacts list from the PAYD App. USING PAYD PRO® FOR ANDROID™...
- Page 91 Issue Solution The "Swipe" Your mobile device was unable to detect the PAYD card option does not reader connection. display on the Note: The Swipe option will replace the Keyed option transaction only if a reader is properly connected to your mobile page when the device.
- Page 92 Issue Solution You want to 1. See Determining the PAYD App's version number determine the (page 39). version number of the PAYD App. USING PAYD PRO® FOR ANDROID™...
-
Page 93: Error Messages On The Payd Pin Pad
Error messages on the PAYD PIN Pad If an error message displays on the PAYD PIN Pad, first press the red once or twice to clear the message, then retry the transaction. If the error message reappears and is listed in the table below, follow the instructions in the table. - Page 94 REMOVE CARD 2. If prompted, swipe the card on the magnetic stripe reader. NOT ACCEPTED 3. Credit only: If swiping does not work, manually USE MAG STRIPE enter the card number (see page 56). REMOVE CARD USING PAYD PRO® FOR ANDROID™...
- Page 95 Error message Solution The customer took more than 30 seconds to respond to COMPLETED the prompts. Retry the transaction. PLEASE The PAYD PIN Pad's battery charge is low. CHARGE 1. Connect the PAYD PIN Pad to an external power THE TERMINAL source via the USB charging cable.
-
Page 96: Other Issues (Payd Pin Pad)
The contactless The PAYD PIN Pad battery charge level may be too low. reader does not See TAP NOT ACCEPTED (page 93). beep when a card is tapped/waved at the SWIPE, TAP OR INSERT CARD prompt. USING PAYD PRO® FOR ANDROID™... -
Page 97: Using The Payd Card Reader
Using the PAYD card reader If you are unable to perform a credit card transaction using the PAYD PIN Pad, follow the steps below to use the PAYD card reader as a backup device (to order a PAYD card reader, please contact us at 1-855-423-PAYD (7293)): 1. - Page 98 PAYD App automatically emails a receipt to the address (the PAYD App will not notify you that the email has been sent). To send an SMS text message notification, see page 75. 8. Tap to return to the main menu. USING PAYD PRO® FOR ANDROID™...
-
Page 99: Manual Card Entry On Your Mobile Device
Manual card entry on your mobile device If you are unable to perform a Sale or Pre-Authorization using the PAYD card reader (see page 95), follow the steps below to manually enter the transaction entirely on you mobile device (i.e., neither the PAYD PIN Pad nor the PAYD card reader will be used). - Page 100 PAYD App automatically emails a receipt to the address (the PAYD App will not notify you that the email has been sent). To send an SMS text message notification, see page 75. 9. Tap to return to the main menu. USING PAYD PRO® FOR ANDROID™...
-
Page 101: Sources Of Electromagnetic Interference
Sources of electromagnetic interference Listed below are some common sources of electromagnetic interference that may impair the operability of the PAYD PIN Pad: Motors and compressors Computer screens and televisions Radio transmitters and other wireless devices operating at 2.4GHz (e.g., Wi-Fi devices, wireless routers, cordless phone bases, etc.) - at least 2 m (6.5 feet) away ... -
Page 102: Merchant Support
24/7. We’re only one click away. Visit getpayd.com/paydpro/support Consult the FAQs on how to set up and use PAYD Pro. Download PAYD Pro guides to assist with getting started, configuration, and usage instructions. Visit shop.moneris.com to purchase point-of-sale supplies and accessories. - Page 103 Notes...
- Page 104 Neither Moneris or any of its affiliates nor any of our or their respective licensors, licensees, service providers or suppliers warrant or make any representation regarding the use or the results of the use of the information, content and materials contained in this guide in terms of their correctness, accuracy, reliability or otherwise.
Need help?
Do you have a question about the PAYD PRO and is the answer not in the manual?
Questions and answers