Moneris PAYD Pro Plus User Manual
For apple ipad
Hide thumbs
Also See for PAYD Pro Plus:
- Hardware install manual (23 pages) ,
- Quick reference manual (2 pages)
Table of Contents
Advertisement
Advertisement
Table of Contents

Related Manuals for Moneris PAYD Pro Plus


Summary of Contents for Moneris PAYD Pro Plus
- Page 1 Using PAYD Pro Plus™ for Apple® iPad® (05/16)
- Page 2 For more information and assistance: Web: getpayd.com/paydproplus/support Toll-free: 1-855-423-PAYD (7293) Record your Moneris® merchant ID here: ____________________________________...
- Page 3 Contents Introduction ....................6 Signing in and out ..................7 Signing into the PAYD Pro Plus App Navigating the interface Accessing the main menu The panes The on-screen keyboard and numberpad Signing out Cashing in Inventory management ................. 12 Adding new products...
- Page 4 Creating a new customer profile Adding a customer from the Favourites Group Adding products to a sale Scanning products Searching for products Adding products from the Favourites Group Adding non-inventory items to a sale USING PAYD PRO PLUS FOR APPLE IPAD...
- Page 5 Editing quantities and prices Adjusting item quantity Adjusting product price Removing products from the bill Applying discounts Suspending and resuming transactions Suspending a transaction Resuming suspended transactions Discarding suspended transactions Canceling transactions Processing payment ................55 Processing cash payment Processing cheque payment Card entry options Insert: chip cards Swipe: magnetic stripe cards...
- Page 6 Exiting sleep mode Powering off the PAYD PIN pad Pairing the PAYD PIN pad to the Apple iPad Connecting and initializing the PAYD PIN pad The Moneris PAYD card reader Bluetooth barcode scanner USING PAYD PRO PLUS FOR APPLE IPAD...
- Page 7 Customer prompts on the PAYD PIN pad End of day procedures ................. 102 Cashing out Troubleshooting ..................105 Error messages in the PAYD Pro Plus App Error messages on the PAYD PIN pad Other issues (PAYD PIN pad) Need help? ....................114...
-
Page 8: Introduction
Introduction PAYD Pro Plus™ lets you turn your Apple® iPad® into a mobile POS Payment Solution, with great features that let you run your business from just about anywhere. This guide provides you with instructions on how to use the PAYD Pro Plus App to manage inventory, gain insights into customer buying trends and process transactions. -
Page 9: Signing In And Out
Signing in and out Signing into the PAYD Pro Plus App Depending on how the PAYD Pro Plus App has been configured, you may be required to sign in with your Moneris PAYD™ credentials: Username, Password and Store ID, or you may need to enter a Quick PIN. -
Page 10: Navigating The Interface
Navigating the interface Note: The PAYD Pro Plus App will always appear in “landscape” orientation, even if the Apple iPad is tilted into a “portrait” orientation. Accessing the main menu To access the main menu from any screen, tap the Main Menu button ). -
Page 11: The Panes
(i.e., customer or product names). Use this on-screen keyboard in the PAYD Pro Plus App just like you would in any other Apple iPad app. The PAYD Pro Plus App can use its own numberpad, or use the Apple iPad on- screen keyboard for numeric data entry too. -
Page 12: Cashing In
Note: If you do not see the Cash-In popup when you start the PAYD Pro Plus App, it means that the cash out process was not completed for the previous business day. Refer to Cashing out on page 102 for more information. -
Page 14: Inventory Management
Add Non-Inventory Product popup (accessed via the Sale screen) to add products to the business’ inventory. This section explains how to add new products using the New Product screen. For instructions on adding products through the Add Non-Inventory Product popup, refer to the PAYD Pro Plus Online Help. Note:... - Page 15 Select the method by which you would like to add an image to the product profile: To use an image that is already stored on the Apple iPad’s internal memory: i. Tap Library. Note: If prompted to allow the PAYD Pro Plus App to access your Apple iPad’s photo library, tap...
- Page 16 To take a picture of the product: i. Tap Camera. Note: If prompted to allow the PAYD Pro Plus App to access your Apple iPad’s camera, tap ii. Take the photo. iii. Tap Use Photo to use the image. Proceed to step 5.
- Page 17 Note: The taxes that appear are based on your business location as provided by you to Moneris. Please note that it is your responsibility to determine all taxes required. 14. In the Options section, set the product options following the guidelines below: ...
-
Page 18: Searching Inventory
The search results appear in the left pane. Searching for all products 1. Tap the Main Menu button ( 2. On the main menu, tap Products. 3. At the top of the left pane, tap the Search button ( USING PAYD PRO PLUS FOR APPLE IPAD... -
Page 19: Editing Products
The search results (every item entered in inventory) appear in the left pane listed by name in alphabetical order. Editing products Once a product has been created and saved, you are able to edit its profile at any point. 1. Tap the Main Menu button ( 2. -
Page 20: Deleting Products
8. Tap the Main Menu button ( ) when finished. Note: Use the PAYD Pro Plus In-Store Solution to capture even more information about products (e.g., Pricing Groups, Categories and Attributes). Deleting products It is possible to delete products that you no longer sell, or products that were created in error. - Page 21 2. On the main menu, tap Products. 3. On the Products screen, in the left pane, search for the item you wish to delete. 4. Once you locate it, tap its name. The right pane populates with the product’s details. 5.
-
Page 22: The Favourites Group
You can see an example of a populated Favourites Group in the screenshot below. For more information on configuring the tabs on the Favourites Group, refer to the PAYD Pro Plus™ Mobile Solution - Configuration Guide, available for free download at getpayd.com/paydproplus/support. USING PAYD PRO PLUS FOR APPLE IPAD... -
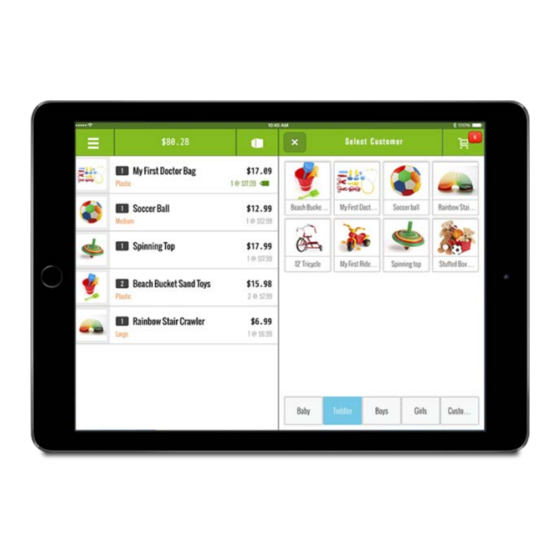
Page 23: Adding Products To The Favourites Group
Adding products to the Favourites Group The Favourites Group is split into 5 tabs. Each tab is capable of holding up to 16 products, so you can add a maximum of 80 products to the Favourites Group. To add products to the Favourites Group from the Sale screen: 1. - Page 24 Tap the item in the search results. Repeat steps a – d as necessary to add other items to this tab. Tap an area in the left pane to close the popup. Proceed to step 7. USING PAYD PRO PLUS FOR APPLE IPAD...
- Page 25 Scan: Tap inside the Search field at the top of the popup. Scan the product’s barcode with the Bluetooth scanner. The product appears in the search results below. Tap the item in the search results. Repeat steps a – c as necessary to add other items to this tab. Tap an area in the left pane to close the popup.
-
Page 26: Removing Products From The Favourites Group
The item disappears from the Favourites Group. 6. Repeat step 5 to remove additional items as necessary. 7. Tap the Save button. 8. Repeat steps 3 – 7 to remove other items from other tabs as necessary. USING PAYD PRO PLUS FOR APPLE IPAD... -
Page 27: Editing The Contents Of The Favourites Group
2. Add items to the group. Follow the instructions on Adding products to the Favourites Group on page 21. 3. If you want to edit the tab names, refer to the PAYD Pro Plus™ Mobile Solution - Configuration Guide, available for free download at getpayd.com/paydproplus/support. -
Page 28: Customer Management
Note: Based upon PAYD Pro Plus software bundle and/or your Merchant Agreement with Moneris, you may encounter a limit to the number of customer profiles that can be added to the customer database. For more information on how to increase this limit, please visit us at getpayd.com/paydproplus... - Page 29 4. In the New Customer popup, fill out the fields following the guidelines below: First/Last name – Enter the customer’s first and last name into these fields. Phone – Enter the customer’s primary contact phone number into this field. Note: Dashes or spaces are not necessary.
- Page 30 Band number in the appropriate fields. 5. When you are finished entering information about the customer, tap the checkmark button ( ) to save your work. 6. Repeat steps 3 – 5 to add other customers as necessary. USING PAYD PRO PLUS FOR APPLE IPAD...
-
Page 31: Searching Customers
Searching customers It is possible to search your database for customers that have been added. Searching for a customer 1. Tap the Main Menu button ( 2. On the main menu, tap Customers. 3. In the Customers screen, tap inside the search field at the top of the left pane and enter any of the following as your search criteria: ... -
Page 32: Editing A Customer Profile
The customer’s profile loads into the right pane. 5. Edit the customer’s profile as necessary. For an explanation of the various fields, refer to step 4 of the Adding new customers section on page 26. USING PAYD PRO PLUS FOR APPLE IPAD... -
Page 33: Deleting Customers
6. Once you have finished making changes, tap the Save button at the bottom to save your work. 7. Repeat steps 3 – 6 to edit other customer profiles as necessary. Deleting customers It is possible to delete customers who no longer patronize your business, or whose profiles were created in error. -
Page 34: Adding A Customer To The Favourites Group
They are added to the Favourites Group. 10. Repeat steps 6 - 9 as necessary to add other customers to the tab. 11. Tap outside of the popup. 12. Tap the Save button. USING PAYD PRO PLUS FOR APPLE IPAD... -
Page 35: Processing Transactions
Processing transactions This section explains how to perform the following tasks: Starting a sale Assigning a customer to a sale Adding products to a sale Manipulating quantities and prices Applying discounts Suspending and resuming transactions ... -
Page 36: Before You Begin
Receipts - The PAYD Pro Plus App has the ability to print paper receipts from a Bluetooth receipt printer, send a receipt via SMS text message, and the ability to email a receipt copy to a customer. For the purposes of this guide, the term “process receipts”... -
Page 37: Starting A Sale
Starting a sale To start a sale, follow the instructions below. 1. Tap the Main Menu button ( 2. On the main menu, tap Sale. The Sale screen appears. -
Page 38: Processing A Sale Without Assigning A Customer
The Search or Create a Customer popup appears. 3. Search for a specific customer. Search your entire list of customers. See Searching customers on page 29 for more information on how to search your customer database. USING PAYD PRO PLUS FOR APPLE IPAD... -
Page 39: Creating A New Customer Profile
Note: Based upon PAYD Pro Plus software bundle and/or your Merchant Agreement with Moneris, you may encounter a limit to the number of customer profiles that can be added to the customer database. For more information on how to increase this limit, please visit us at getpayd.com/paydproplus... -
Page 40: Adding A Customer From The Favourites Group
The customer’s name appears at the top of the right pane. 4. Continue the sale. Adding products to a sale There are 3 methods of adding products to a sale: Scan Search Tap to add from the Favourites Group USING PAYD PRO PLUS FOR APPLE IPAD... -
Page 41: Scanning Products
Scanning products 1. Start the sale. See Starting a sale on page 35 for more information. 2. Do one of the following: Tap the Products button ( ) in the top of the left pane. The Search or Create a Product popup appears. Proceed to step 3. ... -
Page 42: Searching For Products
7. Tap the product to add it to the transaction. 8. Repeat steps 2 – 5 as necessary to populate the bill with other items the customer wants to purchase. 9. Complete the transaction. USING PAYD PRO PLUS FOR APPLE IPAD... -
Page 43: Adding Products From The Favourites Group
Note: Based upon PAYD Pro Plus software bundle and/or your Merchant Agreement with Moneris, you may encounter a limit to the number of product profiles that can be added to the product database. For more information on how to increase this limit, please visit us at getpayd.com/paydproplus... -
Page 44: Editing Quantities And Prices
Using the quantity adjustment buttons 1. Tap the product’s name on the bill. A popup appears to the right. USING PAYD PRO PLUS FOR APPLE IPAD... - Page 45 2. Change the quantity: To increase the item quantity, tap the + button ( To decrease the item quantity, tap the – button ( 3. Tap outside of the popup to close it. The item’s quantity is adjusted. 4.
-
Page 46: Adjusting Product Price
If a product has been added to the bill by mistake, or if the customer changes their mind about something before paying, follow the instructions below to remove the product(s) from the bill. 1. Tap the product’s name on the bill. A popup appears to the right. USING PAYD PRO PLUS FOR APPLE IPAD... -
Page 47: Applying Discounts
2. Change the product quantity: To decrease the item’s quantity, tap the – button ( To remove the product from the bill, tap the Delete button ( 3. Repeat steps 1 and 2 as necessary to remove other products from the bill. 4. - Page 48 5 items, or only to 3 of 5? To apply the discount to a limited number of items, tap inside the Qty affected field and use the on-screen USING PAYD PRO PLUS FOR APPLE IPAD...
- Page 49 numberpad to key in the quantity to which the discount applies. Tap the OK or Return button when finished. To apply the discount to the total quantity of that one product, do not change the value in the Qty affected field. Proceed to step 4.
- Page 50 To apply a percent discount: Tap the % button (ensure it is coloured blue). Use the horizontal slider to select the discount amount. Sliding to the right increases the amount; sliding to the left decreases the amount. USING PAYD PRO PLUS FOR APPLE IPAD...
-
Page 51: Suspending And Resuming Transactions
Note: Promotion codes are defined and managed using the PAYD Pro Plus In-Store Solution. Click the icon in PAYD Pro Plus In- Store Solution for more help on creating promotion codes. Proceed to step 5. 5. Tap the left arrow button ( ) to return to the transaction. -
Page 52: Suspending A Transaction
Note: It is possible to suspend a transaction in the PAYD Pro Plus App and resume it in the POS view of the PAYD Pro Plus In-Store Solution, and vice-versa. Suspending a transaction A transaction can be suspended up to any point before payment is ready to be processed. -
Page 53: Resuming Suspended Transactions
6. The transaction is suspended and a blank Sale screen appears, ready to take the next transaction. Resuming suspended transactions Follow the instructions below to resume suspended transactions. 1. Tap the Main Menu button ( 2. On the main menu, tap Suspended Sales. A list of suspended transactions appears in the left pane. -
Page 54: Discarding Suspended Transactions
If a suspended transaction needs to be eliminated without needing to process payment, follow the instructions below. 1. Tap the Main Menu button ( 2. On the main menu, tap Suspended Sales. A list of suspended transactions appears in the left pane. USING PAYD PRO PLUS FOR APPLE IPAD... -
Page 55: Canceling Transactions
3. Scroll through the list to locate the transaction you wish to resume (the transactions appear with the date & time stamp of when the transaction was suspended, along with the customer’s name and the transaction’s projected expiry date). 4. Tap the transaction on the left pane. The transaction profile slides to the right revealing Resume and Discard buttons. - Page 56 USING PAYD PRO PLUS FOR APPLE IPAD...
-
Page 57: Processing Payment
Processing payment This section explains how to process payments to complete a transaction. Each of the instructions in this section assume that you have finalized the transaction (e.g., selected the customer, added the items and applied any discounts/price adjustments as necessary). Processing cash payment Follow the instructions below to process a cash payment for a transaction. -
Page 58: Processing Cheque Payment
) at the top of the right pane to checkout. The Payments screen appears with the payment types on the right pane. 2. Tap Cheque. The total amount due appears on the right pane. USING PAYD PRO PLUS FOR APPLE IPAD... -
Page 59: Card Entry Options
3. Tap the OK button. 4. Process the receipts. 5. Tap Done to complete the transaction. Card entry options Insert: chip cards 1. The PAYD PIN pad displays "SWIPE OR INSERT CARD" or "SWIPE, TAP OR INSERT CARD". 2. The customer inserts their card into the PAYD PIN pad's chip reader. -
Page 60: Swipe: Magnetic Stripe Cards
The customer will not be prompted for a PIN. The transaction amount must be equal to or less than the maximum Contactless Dollar Value set for the card (see Maximum Contactless Dollar Value on page 59). USING PAYD PRO PLUS FOR APPLE IPAD... -
Page 61: Maximum Contactless Dollar Value (Cdv)
Swipe: magnetic stripe cards on the PAYD card reader If something has prevented Bluetooth communication between the PAYD PIN pad and the Apple iPad, you can use the Moneris PAYD card reader as a backup method to process credit card transactions. -
Page 62: Manual Card Entry
If the PAYD PIN pad is enabled in Settings – Devices, you will be prompted to manually key in the card information on the PAYD PIN pad. If it is disabled, you will be prompted to enter the card data on the screen of the PAYD Pro Plus App. -
Page 63: Processing Interac Debit Payments
Tap the drop-down arrow for Expiration Date and use the calendar selector to select the month and year of the card’s expiry date. Tap the checkmark ( ) button when finished. Tap Process Transaction. Wait while the transaction processes. 4. Follow the prompts on the screen to complete the transaction. Processing Interac Debit payments Integrated merchants can use the PAYD PIN pad to accept and process Interac Debit cards. -
Page 64: Processing Credit Card Payments
PAYD PIN pad. Before proceeding, ensure the following conditions are met: Ensure the PAYD PIN pad is powered on and at the WELCOME/BONJOUR screen. See Powering on the PAYD PIN pad on page 77 for more information. USING PAYD PRO PLUS FOR APPLE IPAD... - Page 65 Ensure that the PAYD PIN pad is paired to the Apple iPad and is showing connected ( ) on the main menu. See Checking Bluetooth device status on page 88 for more information. If using the PAYD card reader, refer to Swipe: magnetic stripe cards on the PAYD card reader on page 59 for more information.
-
Page 66: Processing Store Credit Payments
If a customer has a store credit, but they have not been registered in the system, you can use the Store Credit ID, or search the list of outstanding credits, so that the customer can redeem it to pay for all or part of a subsequent purchase. USING PAYD PRO PLUS FOR APPLE IPAD... - Page 67 1. Tap the Shopping Cart button ( ) at the top of the right pane to checkout. The Payments screen appears with the payment types on the right pane. 2. Tap Store Credit. The total amount due appears on the right pane. 3.
-
Page 68: Processing Split-Tender Payments
8. Tap the second payment type in the right pane. 9. Process the second payment type following the appropriate instructions in this guide. 10. Process the receipts. 11. Tap Done to complete the transaction. USING PAYD PRO PLUS FOR APPLE IPAD... -
Page 69: Receipt Options
Receipt options There are 4 types of receipts that can be generated by the PAYD Pro Plus App: receipts printed from the Bluetooth receipt printer, emailed receipts, SMS text receipts, and gift receipts printed from the Bluetooth receipt printer. The receipts you are able to generate are dependent upon the type of hardware connected to your Apple iPad, as well as the output options you have enabled in the Receipt Settings screen. -
Page 70: Generating Email Receipts
). The Customer copy of the receipt will print. Generating email receipts The PAYD Pro Plus App can email a copy of the receipt to the customer. 1. Complete the transaction and process the payment(s). 2. Before tapping Done, tap the Email button ( The Email Receipt popup appears. -
Page 71: Generating Sms Text Receipts
4. The PAYD Pro Plus App sends the email to the customer. 5. Tap Done to complete the transaction. Generating SMS text receipts The PAYD Pro Plus App can send a link to the Customer copy of the receipt to the customer’s mobile phone as an SMS text message. Note:... -
Page 72: Generating Gift Receipts
+ until the quantity shows 2. 4. Repeat step 3 for other items on the bill. Hint: Select all To add everything on the bill to the gift receipt, tap USING PAYD PRO PLUS FOR APPLE IPAD... -
Page 73: Reprinting Transaction Receipts
5. Tap the checkmark button ( ) to continue. The gift receipt prints from the Bluetooth receipt printer. 6. Generate other receipts as necessary then tap Done. Reprinting transaction receipts It is possible to reprint receipts after the initial transaction has been completed. - Page 74 To email the customer a copy of their receipt: Tap Email customer copy. The Email Receipt popup appears. Refer to step 3 of the Generating email receipts section on page 68 for instructions. USING PAYD PRO PLUS FOR APPLE IPAD...
-
Page 75: Optional Devices
Optional devices The Moneris PAYD™ PIN pad The customer uses the PAYD® PIN pad to input payment data when prompted during a transaction. - Page 76 No lights flash: PAYD PIN pad is in Sleep mode (see page 78), or is powered off. • One light flashes: Reader is fully powered on. • Four lights flash: Reader is capturing card data (see page 58). USING PAYD PRO PLUS FOR APPLE IPAD...
-
Page 77: Power Management And The Payd Pin Pad
Display Screen/Contactless Reader • WELCOME/BONJOUR screen displays while the PAYD PIN pad is idle. • See Wave/tap: Contactless cards on page 58. Magnetic Stripe Reader (the slot along the top of PAYD PIN pad) • See Swipe: magnetic stripe cards on page 58. Micro-USB port (located on the right side) •... -
Page 78: Maintaining Battery Charge
The battery charge level also displays in the Settings – Devices screen in the PAYD Pro Plus App. Tap the Main Menu button ( ), then tap Settings. On the Settings screen, tap Devices. On the right pane, in the PIN Pad Terminal section, you can see the charge level. -
Page 79: Powering On The Payd Pin Pad
Powering on the PAYD PIN pad The WELCOME/BONJOUR screen displays when the PAYD PIN pad is fully powered on (see also Sleep mode on page 78). Power on WITH USB charging cable Plug the USB charging cable into the micro-USB port on the PAYD PIN pad (see page 75). -
Page 80: Power On Without Charging Usb Cable
The screen saver is active on the Apple iPad with which the PAYD PIN pad is paired. The PAYD Pro Plus App is not open (i.e., actively running) on the Apple iPad with which the PAYD PIN pad is paired. ... -
Page 81: Pairing The Payd Pin Pad To The Apple Ipad
The following instructions are to be used when pairing the PAYD PIN pad first time to an Apple iPad for the . Instructions for pairing under different circumstances are contained in the PAYD Pro Plus Online Help. Access the Main Menu Open Administration Online Help by tapping the... - Page 82 Wait while the PAYD PIN pad beeps and powers up. As soon as the version screen displays (shown here), press the red key, and then quickly press the green key. Note: The version screen displays for 10 seconds. USING PAYD PRO PLUS FOR APPLE IPAD...
- Page 83 Do one of the following: If you see the WELCOME/BONJOUR screen again, repeat steps 3a-f of this procedure. If you now see the TELIUM MENU screen (shown here), proceed to step 4. 4. Pair the PAYD PIN pad with your Apple iPad: Note: During the following steps, if you do not respond to the screen prompts quickly enough, the PAYD PIN pad may timeout and reboot back...
- Page 84 For other pairing options, visit the Knowledgebase at getpayd.com/support and search for “Bluetooth Pairing with Legacy Mode”. On the PAYD PIN pad, press the red key, and then wait while the PAYD PIN pad reboots back to the WELCOME/BONJOUR screen. USING PAYD PRO PLUS FOR APPLE IPAD...
-
Page 85: Connecting And Initializing The Payd Pin Pad
1. Launch the PAYD Pro Plus App: from the Apple iPad’s home screen, tap the app’s icon ( 2. Log into the PAYD Pro Plus App (see Signing into your PAYD Pro Plus App on page 7 for more information). - Page 86 The PAYD PIN pad display screen shows “PLEASE WAIT” while it is initializing. This might take a few minutes to complete. 13. Once the initialization has successfully completed, a popup appears informing you the PAYD PIN Pad has been initialized. Tap OK. USING PAYD PRO PLUS FOR APPLE IPAD...
-
Page 87: The Moneris Payd Card Reader
If you encounter any problems, refer to the Troubleshooting section on page 112. The Moneris PAYD card reader If you are unable to perform a credit card transaction using the PAYD PIN pad, follow the steps below to use the PAYD card reader as a backup device. -
Page 88: Bluetooth Barcode Scanner
It is possible to connect a cash drawer to the printer. The receipt printer and cash drawer are optional devices. To purchase a Bluetooth receipt printer and a cash drawer, please contact us at 1-855-423-PAYD (7293). USING PAYD PRO PLUS FOR APPLE IPAD... -
Page 89: Administrative Transactions
Administrative transactions Searching transactions Follow the steps below to search for completed transactions in the PAYD Pro Plus App. 1. Tap the Main Menu button ( 2. On the main menu, tap Transactions. 3. In the left pane, enter your search criterion into the search field at the top. -
Page 90: Checking Bluetooth Device Status
Ensuring they are connected before processing a transaction provides the client with a quick and seamless experience. The PAYD Pro Plus App provides two quick methods to determine whether the Bluetooth devices are connected and ready to be used from: ... -
Page 91: Apple Ipad Status Bar
2. On the main menu, scroll down to view the status of the devices. A connected icon ( ) appears beside devices that are paired and connected to the PAYD Pro Plus App. Connected devices are ready to use immediately. A disconnected icon ( ) appears beside items that are not paired, not powered on, or not configured in the PAYD Pro Plus App. -
Page 92: Using Diagnostics
If the iPad’s Bluetooth functionality is enabled (i.e., is it “discoverable” by other Bluetooth devices) If the iPad has an Internet connection to the PAYD Pro Plus server. Device Status including: If the PAYD PIN Pad is enabled and connected ... - Page 93 To access Diagnostics: 1. Tap the Main Menu button ( 2. On the main menu, scroll down and tap Help. 3. Tap the Run Now button under the Diagnostics section. The Diagnostics popup appears. 4. Use the following guidelines to view the service/device status: ...
-
Page 94: Generating Reports
A disconnected icon ( ) appears beside devices that are not paired, not powered on, or not configured in the PAYD Pro Plus App. Devices that are greyed out and do not have a status indicator have not been enabled. For more information on enabling devices, refer to the PAYD Pro Plus Mobile Solution –... -
Page 95: Using The Dashboard
) in the top right corner and select a date from the list. Using the Dashboard The PAYD Pro Plus App features a sales Dashboard, a user friendly summary of sales and business trends that allow you to view and manage your business with ease. -
Page 96: Viewing The Dashboard Data
The data that is displayed on the Dashboard is dependent upon the time frame selection that you make on the right pane. The Today, This week and Select Month buttons enable you to make a time frame selection, and the USING PAYD PRO PLUS FOR APPLE IPAD... -
Page 97: Processing A Return
graphs adjust accordingly. Follow the guidelines below to determine how time frame selection changes the displayed data. Today – This is the default selection when the Dashboard is first accessed. The values displayed are as of today’s calendar date from midnight to midnight. - Page 98 Process receipts. If connected to your Bluetooth receipt printer and configured, the cash drawer opens at this point. Remove cash from the till and give it to the customer. Proceed to step 11. USING PAYD PRO PLUS FOR APPLE IPAD...
- Page 99 To return a cheque: Tap Cheque. Tap the OK button. Process receipts. If connected to your Bluetooth receipt printer and configured, the cash drawer opens at this point. Remove the cheque from the till and give it to the customer. Proceed to step 11.
-
Page 100: Customer Prompts On The Payd Pin Pad
POS transaction on the PAYD PIN pad, along with the actions to take for each one. Note: Only some of the prompts listed below will appear for any one transaction. USING PAYD PRO PLUS FOR APPLE IPAD... - Page 101 Prompt Customer action(s) Enters the card on the PAYD PIN pad (see Card entry options on pages 57 - 61). • For English prompts, presses F1 (ENGL). • For French prompts, presses F4 (FRAN). • To select the displayed application, presses F1 (YES). •...
- Page 102 • For chequing, presses F1 (CHQ). • For savings, presses F4 (SAV). Keys in the Personal Identification Number (PIN) and presses the green key. Waits while the transaction is processed. Retrieves the card. USING PAYD PRO PLUS FOR APPLE IPAD...
- Page 103 Prompt Customer action(s) Removes the card from chip reader. Note: The PAYD PIN pad beeps until the card is removed. Returns the PAYD PIN pad to you.
-
Page 104: End Of Day Procedures
End of day procedures Moneris closes your batch for you automatically at the end of each day. As an integrated merchant, you have the ability to request that Moneris perform the batch close for you daily between 10pm and 11pm EST, or you can select a time slot in which the batch close will occur. - Page 105 4. Once all the fields have been filled out according to what is in your till, tap the right arrow button ( ) to proceed to the next step. 5. The next Cash-Out screen displays the totals for the cash counted (in the Actual Amount column) and expected (in the POS Amount column), as well as amounts for any other tender types used that day.
- Page 106 To sign out and end your session, tap Sign Out. The PAYD Pro Plus App returns to the Sign In screen. Refer to the Signing into your PAYD Pro Plus App section on page 7 for more information.
-
Page 107: Troubleshooting
Troubleshooting Error messages in the PAYD Pro Plus App If an error message is displayed in the PAYD Pro Plus App (i.e., on your Apple iPad) and is listed in the table below, tap OK and then follow the instructions in the table’s Solution column. - Page 108 Refine your search criteria and try again. transactions. If you are still unable to locate the transaction, it is possible that the transaction was cancelled before it was completed, or payment processing for that transaction was declined. USING PAYD PRO PLUS FOR APPLE IPAD...
- Page 109 “Connected” in to un-pair the PAYD PIN pad. the iPad’s Bluetooth a. Sign out of the PAYD Pro Plus App (see menu, but in the PAYD Signing out on page 9 for more information). Pro Plus App, it appears as “Not connected”.
- Page 110 Pairing the PAYD PIN pad to the Apple iPad section on page 79 beginning at step 4. Once the PAYD PIN pad is re-paired, it will be able to connect to the PAYD Pro Plus App. USING PAYD PRO PLUS FOR APPLE IPAD...
-
Page 111: Error Messages On The Payd Pin Pad
Error messages on the PAYD PIN pad If an error message appears on the PAYD PIN pad, first press the red once or twice to clear the message, then retry the transaction. If the error message reappears and is listed in the table below, follow the instructions in the table. - Page 112 Remove the card from the chip reader, REMOVE CARD and swipe it when prompted. • If card tapped: If it has a chip, insert it into the chip reader; otherwise, swipe the card. USING PAYD PRO PLUS FOR APPLE IPAD...
- Page 113 Error message Solution NOT ACCEPTED a. Remove the chip card from the chip reader. REMOVE CARD b. If prompted, swipe the card on the magnetic stripe reader. • Credit only: NOT ACCEPTED If this does not work, try swiping the USE MAG STRIPE card on the PAYD card reader (see page 59).
-
Page 114: Other Issues (Payd Pin Pad)
Close/shutdown the PAYD Pro Plus App. transaction. Power off the PAYD PIN pad, and then power it on again (see page 77). d. Re-launch the PAYD Pro Plus App, and sign in (see page 7). Retry the transaction. The screen displays the The PAYD PIN pad is in Sleep mode. - Page 115 Issue Solution The PAYD PIN pad powers off. The PAYD PIN pad may have gone into Sleep mode and then shut down to conserve power. a. To power on the PAYD PIN pad, press the PAYD PIN pad's Power button (see page 77).
-
Page 116: Need Help
Configuration Guide. Consult the Moneris PAYD™ PIN pad Setup Guide for instructions on setting up and pairing the Moneris PAYD PIN pad with your Apple iPad. Visit the Knowledgebase for a list of FAQs pertaining to setting up and operating both the In-Store Solution and the PAYD Pro Plus App. - Page 117 Notes...
- Page 118 Notes USING PAYD PRO PLUS FOR APPLE IPAD...
- Page 119 Notes...
- Page 120 Neither Moneris or any of its affiliates nor any of our or their respective licensors, licensees, service providers or suppliers warrant or make any representation regarding the use or the results of the use of the information, content and materials contained in this guide in terms of their correctness, accuracy, reliability or otherwise.
Need help?
Do you have a question about the PAYD Pro Plus and is the answer not in the manual?
Questions and answers