Cisco ATA 191 User Manual
Hide thumbs
Also See for ATA 191:
- Administration manual (142 pages) ,
- User manual (40 pages) ,
- Quick start manual (13 pages)
Table of Contents
Advertisement
Advertisement
Table of Contents

Related Manuals for Cisco ATA 191


Summary of Contents for Cisco ATA 191
- Page 1 Cisco ATA 191 User Guide for Cisco Unified Communications Manager First Published: 2017-11-22 Americas Headquarters Cisco Systems, Inc. 170 West Tasman Drive San Jose, CA 95134-1706 http://www.cisco.com Tel: 408 526-4000 800 553-NETS (6387) Fax: 408 527-0883...
- Page 2 Cisco and the Cisco logo are trademarks or registered trademarks of Cisco and/or its affiliates in the U.S. and other countries. To view a list of Cisco trademarks, go to this URL: www.cisco.com/go/trademarks . Third-party trademarks mentioned are the property of their respective owners. The use of the word partner does not imply a partnership relationship between Cisco and any other company.
-
Page 3: Table Of Contents
Make a Conference Call from Your Analog Phone Host a Meet Me Conference on Your Analog Phone Shared Lines on Your Analog Phone Call Features and Star Codes for Analog Phones Cisco ATA 191 User Guide for Cisco Unified Communications Manager... - Page 4 FCC Compliance Statements FCC Part 15.21 Statement FCC RF Radiation Exposure Statement FCC Receivers and Class B Digital Statement Compliance Information for Brazil Cisco Product Security Overview Important Online Information Cisco ATA 191 User Guide for Cisco Unified Communications Manager...
-
Page 5: Get Started With Your New Ata
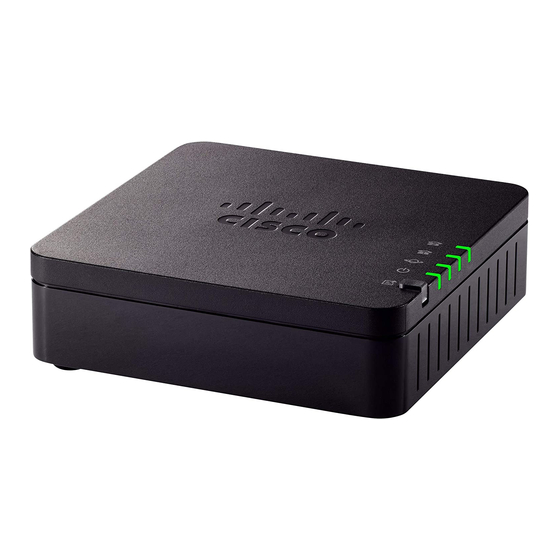
• Install your ATA with the components in the box. Cisco ATA 191 Hardware The ATA 191 is a compact, easy to install device. The following figures show the top and rear panels of the ATA 191. The unit provides these connectors: •... - Page 6 • The ATA 191 has one WAN network port—An RJ-45 10/100BASE-T data port to connect an Ethernet-capable device, such as a computer, to the network. You connect to the network switch or a computer running Cisco Unified Communications Manager using this port.
-
Page 7: Ata 191 Top Panel
Get Started with Your New ATA Cisco ATA 191 Hardware ATA 191 Top Panel Figure 1: ATA 191 Top Panel Cisco ATA 191 User Guide for Cisco Unified Communications Manager... - Page 8 Solid green for five seconds, then off: The PRT report was sent successfully. Flashing red: The PRT report failed. Press the PRT button to turn the LED off. Once it is off, another press triggers a new PRT report. Cisco ATA 191 User Guide for Cisco Unified Communications Manager...
-
Page 9: Ata 191 Back Panel
◦ The information that analog phones display depends on the model you have. ◦You use the phone’s flash button for hold, resume, transfer, and conference. • Analog telephony voice devices Cisco ATA 191 User Guide for Cisco Unified Communications Manager... -
Page 10: Install Your New Ata
• Phone cable to connect your phone • Uninterruptible power supply (UPS) to provide backup power Procedure Step 1 Connect the network cable to your network and to the NETWORK port on the ATA. Cisco ATA 191 User Guide for Cisco Unified Communications Manager... -
Page 11: Cisco Ata 191 User Guide For Cisco Unified Communications Manager
Step 4 Connect the ATA power cable to the DC 5V POWER port on the ATA, and plug the power cable into your power source. Cisco ATA 191 User Guide for Cisco Unified Communications Manager... -
Page 12: Mount Your Ata
The ATA has two wall-mounted slots on the bottom panel. To mount the ATA on a wall, you need mounting hardware (not included). Suggested hardware is illustrated (not true to scale). Recommended hardware (not included): Two #6 pan head, 5/8 in., self-tapping screws with anchors for sheet rock installation. Cisco ATA 191 User Guide for Cisco Unified Communications Manager... -
Page 13: Supported Ata Call Features
Get Started with Your New ATA Supported ATA Call Features Insecure mounting might damage the ATA or cause injury. Cisco is not responsible for damages incurred Note byinsecure wall-mounting. Procedure Step 1 Determine where you want to mount the unit. Verify that the surface is smooth, flat and dry. -
Page 14: Cisco Ata 191 User Guide For Cisco Unified Communications Manager
Some analog phones with a large LCD screen may display a voicemail icon. • Barge • Call forward • Redial Related Topics Calls, on page 15 Voice Mail on Your Analog Phone, on page 21 Cisco ATA 191 User Guide for Cisco Unified Communications Manager... -
Page 15: Manage The Ata Using The Ivr
To access the IVR, go off-hook on the phone connected to PHONE1 or PHONE2. Step 2 Press **** from the phone keypad. The IVR prompts for a password. The ATA 191 allows you to enter only numerical values for the password. Step 3 Follow the voice prompts on the IVR. -
Page 16: Ivr Configuration Menu Options
The following table describes the various options in the IVR Configuration Menu. Table 3: Navigating the IVR Configuration Menu Menu Option IVR Action Navigating Notes (IPv4) Check the Internet Addressing Answers with 0, the default option (DHCP). Method Cisco ATA 191 User Guide for Cisco Unified Communications Manager... -
Page 17: Cisco Ata 191 User Guide For Cisco Unified Communications Manager
DHCP: 0; Static IP: 1. Method Check IPv6 Auto Configuration. 0: Disabled 1: Enabled. (IPv6) Show the ATA IP address (IPv6) Configure the ATA's static IP Available in IPv6 static IP mode only. address Cisco ATA 191 User Guide for Cisco Unified Communications Manager... - Page 18 (IPv6) Check the gateway IP address (IPv6) Configure the gateway IP Available in IPv6 static IP mode only. address (IPv6) Check the primary DNS Server setting (IPv6) Set the primary DNS Server 73738 Factory Reset Cisco ATA 191 User Guide for Cisco Unified Communications Manager...
-
Page 19: Calls
Pick up the handset and check for a dial tone. Step 2 (Optional) Dial the digits for an outside line and wait for a dial tone. Step 3 Dial the phone number. Cisco ATA 191 User Guide for Cisco Unified Communications Manager... -
Page 20: Redial A Number From Your Analog Phone
Your call is put on hold. Step 2 To return to the call, either: • Perform another hook flash. • Go on hook (hang up) and pick up when your phone rings. Cisco ATA 191 User Guide for Cisco Unified Communications Manager... -
Page 21: Forward Your Analog Phone Calls To Another Number
Step 4 (Optional) If you wait until the other person answers the call, speak to them to introduce the caller. Step 5 Hang up your phone to complete the transfer. Cisco ATA 191 User Guide for Cisco Unified Communications Manager... -
Page 22: Make A Conference Call From Your Analog Phone
◦ If autobarge is disabled, the shared line dials **6 to trigger cBarge. • With the privacy feature, if you share a line with other people, you can prevent them from adding themselves to your call. Cisco ATA 191 User Guide for Cisco Unified Communications Manager... -
Page 23: Call Features And Star Codes For Analog Phones
Send and Receive Fax Calls You can send and receive fax calls when a fax machine is connected to a phone port on the ATA 191. Follow the instructions for your fax machine to send and receive fax transmissions. -
Page 24: Cisco Ata 191 User Guide For Cisco Unified Communications Manager
Calls Send and Receive Fax Calls Cisco ATA 191 User Guide for Cisco Unified Communications Manager... -
Page 25: Voice Mail On Your Analog Phone
When you pick up your handset and hear stutter dial tone, you have new voice messages. Follow these steps to access your voice-messaging system. Procedure Step 1 Press * then 0. Step 2 Follow the prompts from your voice-messaging system to listen to and manage your voice messages. Cisco ATA 191 User Guide for Cisco Unified Communications Manager... -
Page 26: Cisco Ata 191 User Guide For Cisco Unified Communications Manager
Voice Mail on Your Analog Phone Check Your Voicemail from Your Analog Phone Cisco ATA 191 User Guide for Cisco Unified Communications Manager... -
Page 27: Product Safety And Security
• Use shielded cables for the external device, or use cables with a better shield and connector. • Shorten the length of the external device cable. • Apply ferrites or other such devices on the cables for the external device. Cisco ATA 191 User Guide for Cisco Unified Communications Manager... -
Page 28: Phone Behavior During Times Of Network Congestion
Product Safety and Security Phone Behavior During Times of Network Congestion Cisco cannot guarantee the performance of external devices, cables, and connectors. Caution In European Union countries, use only external speakers, microphones, and headsets that are fully compliant with the EMC Directive [89/336/EC]. -
Page 29: Compliance Information For Brazil
This product contains cryptographic features and is subject to U.S. and local country laws that govern import, export, transfer, and use. Delivery of Cisco cryptographic products does not imply third-party authority to import, export, distribute, or use encryption. Importers, exporters, distributors, and users are responsible for compliance with U.S. - Page 30 Product Safety and Security Important Online Information Cisco ATA 191 User Guide for Cisco Unified Communications Manager...
Need help?
Do you have a question about the ATA 191 and is the answer not in the manual?
Questions and answers