
Related Manuals for ALLEN & HEATH dLive DX32


Summary of Contents for ALLEN & HEATH dLive DX32
- Page 1 DX Expander Getting Started Guide DX32 Before starting please check www.allen-heath.com for the latest dLive firmware and documentation. AP10242...
- Page 2 Limited One Year Manufacturer’s Warranty Allen & Heath warrants the Allen &Heath -branded hardware product and accessories contained in the original packaging ("Allen & Heath Product”) against defects in materials and workmanship when used in accordance with Allen & Heath's user manuals, technical specifications and other Allen & Heath product published guidelines for a period of ONE (1) YEAR from the date of original purchase by the end-user purchaser ("Warranty Period").
-
Page 3: Important - Read Before Starting
IMPORTANT - Read before starting Safety instructions Before starting, read the Important Safety Instructions printed on the sheet supplied with the equipment. For your own safety and that of the operator, technical crew and performers, follow all instructions and heed all warnings printed on the sheet and on the equipment panels. -
Page 4: Table Of Contents
Packed items Check you have received the following: DX32 expander Getting Started Guide AP10242 Safety Sheet IEC mains lead 4x M6 screws and washers for rack mounting Contents IMPORTANT - Read before starting ......................3 Introduction............................ -
Page 5: Introduction
1. Introduction dLive is a distributed digital mixing system providing a uniquely flexible solution for any live sound application. It separates the mix engine from the control surface, putting the audio and processing where it is needed, and offering a host of control and audio networking possibilities. Refer to the Allen & Heath website to find out more about dLive. -
Page 6: Installing The Expander
2. Installing the Expander 2.1 Free standing The Expander can be operated as a freestanding unit for shelf or floor use. It can be operated horizontally with the connectors facing upward or sideward. Check that its plastic feet are fitted in the intended position. Feet fitted for Feet fitted for shelf use... -
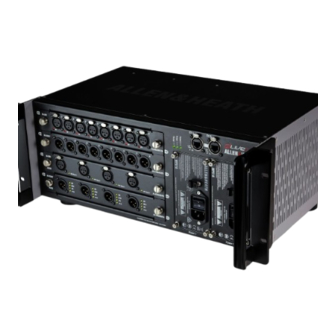
Page 7: Front Panel
3. Front Panel I/O modules – 4x slots for fitting 8ch analogue or digital I/O modules. To fit a module, switch the expander off, remove the blank panel by loosening the 2 thumb screws, slide the module into the slot and press it firmly into the mating connector, then secure it by tightening the thumb screws. -
Page 8: Rear Panel
4. Rear Panel Plastic feet – Removable plastic feet. Use a flat-head screwdriver to remove or reposition the plastic feet. Kensington Lock - A slot for fitting standard Kensington anti-theft security devices. – Ultra-quiet fan. Make sure the ventilation opening is not obstructed. DX32 Getting Started Guide AP10242 Issue 3... -
Page 9: I/O Modules
5. I/O Modules M-AIN - Recallable preamps for balanced or unbalanced microphone and line level signals. Gain, Pad and 48V are digitally controlled within the preamp. The PP indicator lights up when phantom power voltage is detected at the socket, whether internally or externally sourced. M-AOUT –... -
Page 10: Connect And Power Up
6. Connect and power up 6.1 MixRack connection Plug a touring grade CAT5e (or higher specification) cable up to 100m long between the DX Expander and MixRack DX ports. Use two cables for redundancy if required. Use ports DX1-2 on the MixRack for the first Expander, ports DX3-4 for a second Expander. -
Page 11: Dimensions
7. Dimensions 24.30 433.00 465.10 481.60 289.00 311.00 DX32 Getting Started Guide AP10242 Issue 3... -
Page 12: Technical Specs
8. Technical specs Inputs System Mic/Line XLR Inputs Balanced XLR, +48V phantom power Sampling Rate 96kHz +/- 20 PPM Mic/Line Preamp Fully recallable 24-bit Delta-Sigma Input Sensitivity -60 to +15dBu 24-bit Delta-Sigma Analogue Gain +5 to +60dB, 1dB steps -20dB Active PAD Latency + 8 samples, DX32 to Mixrack or DX32 to Surface (DX hop)
Need help?
Do you have a question about the dLive DX32 and is the answer not in the manual?
Questions and answers