Table of Contents
Advertisement
Advertisement
Table of Contents

Subscribe to Our Youtube Channel
Related Manuals for Technika TGSO618TSHL


Summary of Contents for Technika TGSO618TSHL
- Page 1 Instructions for Use and Installation Multifunction Double Oven TGSO618TSHL...
- Page 2 Data Label...
- Page 3 Contents For Your Safety ........3 Use and Care Description of the appliance .
-
Page 4: For Your Safety
To maintain the efficiency and safety of this appliance, we recommend that you do the following: · Always call the Technika service department if there are any faults with your appliance. · Always use original spare parts available from Technika. - Page 5 Only use the temperature sensing probe recommended for this oven. Technika Service Department must be contacted... · If in doubt about the operation of the appliance. · If in doubt about the soundness of the appliance after removing it from its packaging.
- Page 6 · Always grip the oven door handle in the centre. · Make sure the appliance is OFF when not in use. · Technika will not accept any liability as a result of any damage due to incorrect installation or improper use.
-
Page 7: Description Of The Appliance
Use and Care Description of the appliance Attention: The oven comes with a soft close door feature which will only operate correctly when sufficient initial force is applied when closing. Should insufficient force be applied, the door may need to be closed manually. -
Page 8: Control Panel
Use and Care Control Panel A - Divider Selector Knob B - Function Button C - Temperature Button D - Window Display E - Time Button F - Upper and Lower Exchange Button G - Time/Temp/Function Control Knob There are five positions for Divider Selector knob. ‘Off’ is the start position and you have four function choices by turning this knob. -
Page 9: Oven & Accessories
Use and Care Oven & Accessories The oven comes equipped with the following special features. Divider modes: When the divider is inserted, the oven allows independent cooking in two separated partitions, enhancing energy efficiency and convenience for use. Meat Probe (optional/where supplied): This function can only be used in single mode. - Page 10 Use and Care Oven & Accessories The following accessories are provided with your oven. 1) Wire grill - For dishes, cake 2) Wire roast - For roasting. tins, roasting and grilling trays. 3) Baking Tray - For cakes and 4) Deep pan - For roasting or biscuits.
- Page 11 Use and Care Oven & Accessories 5) Rotisserie spit - (can only be used in these two modes: comprises a spit, 2 prongs, a removable handle and a cradle which fits into the 3rd shelf from the bottom. To use the rotisserie, fit the spit into the hole in the rear wall of the oven's interior.
- Page 12 Use and Care Oven & Accessories The baking tray, deep pan and wire grill should be inserted correctly into the side runners. When taking out the cooked foods from the oven, be careful of hot utensils and surfaces. Example - Level 1: Deep pan Level 4: Baking tray When using the deep pan or the baking tray to collect drippings from cooking foods, ensure that the pan or tray is properly placed...
-
Page 13: How To Use Your Oven
Use and Care How to use your oven This multi-function oven combines the advantages of traditional convection ovens with modern fan assisted ovens in a single appliance. It is an extremely versatile appliance that allows you to choose easily and safely between different cooking modes. The various cooking modes are selected by means of a function knob, located on the control panel. -
Page 14: Positioning The Oven Trays & Shelves
Use and Care Positioning the oven trays & shelves The Grill Tray or Oven Shelf can be located in any of the five height positions in the oven. Refer to the ‘Cooking Guide Table’ for the recommended shelf position. When fitting the trays or shelves, ensure they are fitted between the two wires that are closest together as shown below. -
Page 15: Cooking Modes
Use and Care COOKING MODES Conventional mode Suggested temperature: 200°C The conventional function is ideal for baking and roasting foods arranged on one rack. Both the top and bottom heating elements operate to maintain the oven temperature. Before starting to cook you should preheat the oven. You can preheat the oven in the current mode, ‘Conventional’... - Page 16 Use and Care COOKING MODES Grill Suggested temperature: 240 °C The large grill function grills large quantities of flat foods, such as steaks, schnitzels and fish. It is also suitable for toasting. Both the top outside element and the top inside element are on in this mode.
- Page 17 Use and Care Twin Convection In models that feature the Twin Convection function, you can cook 2 dishes with 2 different modes at the same time, using the divider. For example, you can cook apple pie putting it in lower part of the oven with meat steak putting it in the upper part of the oven.
-
Page 18: Using The Controls
Use and Care USING THE CONTROLS Setting the Clock When power is first supplied to the oven, the display on the control panel will light briefly and 0:00 will begin blinking on the display. The oven cannot be operated until the clock is set. 1. - Page 19 Use and Care USING THE CONTROLS How to set the oven for roasting when using the probe · Insert the probe into the meat. · Plug the probe into the outlet in the oven. Make sure it is pushed all the way in. If the Probe is inserted correctly, will shows on the display.
- Page 20 Use and Care USING THE CONTROLS Top Heat Grill Fan Assisted Grill Upper mode The divider should be inserted. Convection Top Heat + Convection Top Heat...
- Page 21 Use and Care USING THE CONTROLS Lower mode The divider should be inserted. Convection Bottom Heat + Convection Twin mode The upper and lower modes operate at the same time. It is possible to set which mode activates first. When one of the dishes has finished cooking in twin mode and you would like to change the cooking time or temperature of the other partition, turn the Divider Select Knob to select the mode (upper or lower) that you would like...
- Page 22 Use and Care USING THE CONTROLS Single mode Convection Top Heat + Convection Grill Conventional Fan Assisted Grill Bottom Heat + Convection Defrosting...
- Page 23 Use and Care USING THE CONTROLS Setting the oven temperature in single, upper and lower modes 1. Press the Temperature Button and hold for about 2 seconds, the temperature will flash. 2. Turn the Time / Temp / Function Control Knob to adjust the temperature in increments of 5 °C.
- Page 24 Use and Care USING THE CONTROLS End time in single, upper and lower modes You can set the end time during cooking. 1. Press the Time Button several times until the end time icon and the three digits on the display begin to flash. 2.
- Page 25 Use and Care USING THE CONTROLS Cook time in single, upper and lower modes You can set the end time during cooking. 1. Press the Time Button several times until the end time icon and the three digits on the display begin to flash. 2.
- Page 26 Use and Care OVEN USE The oven comes with a soft close door feature which will only operate correctly when sufficient initial force is applied when closing. Should insufficient force be applied, the door may need to be closed manually. Delayed start If the end time is entered after the cook time has already been set, the cook time and the end time are calculated and if necessary the...
- Page 27 Use and Care OVEN USE Child safety function 1. Press the Time Button and Upper and Lower Exchange Button at the same time and hold for 1 seconds icon will appear in the display. 2. Press the Time Button and Upper and Lower Exchange Button at the same time and hold for 3 seconds again to unlock.
- Page 28 Use and Care The oven light The oven lights come on when the door is opened. The light/s will remain lit during operation depending on the divider setting you have chosen. Either the top light or bottom light in upper or lower mode, or both lights in twin or single mode.
-
Page 29: Practical Cooking Advice
Use and Care PRACTICAL COOKING ADVICE The oven offers a wide range of settings which allow you to cook any type of food in the best possible way. With time you will learn to make the best use of this versatile cooking appliance and the following directions are only a guideline which may be varied according to your own personal experience. - Page 30 Use and Care Using the grill This multi-function oven has 3 different grilling modes. Use the ‘Fan Assisted Grill / Grill’ modes with the oven door closed, place the food on the centre of the grill pan, insert and fit the grill pan on either the 3rd or 4th shelf from the bottom.
- Page 31 Use and Care Baking cakes When baking cakes ,always place them in a preheated oven. Make sure you wait until the oven has been preheated thoroughly (the indicator light will turn off). To prevent heat loss and the cake from dropping, do not open the oven door during baking.
- Page 32 Use and Care Cooking pizza For best results when cooking pizza, use the ‘Conventional’ mode or ‘Fan Forced/Convection’ mode · Preheat the oven for at least 10 minutes. · Use a light aluminum pizza pan, placing it on the shelf supplied with the oven.
-
Page 33: Cooking Guide
Use and Care COOKING GUIDE - some functions are not available on all models Conventional... - Page 34 Use and Care COOKING GUIDE - some functions are not available on all models Top Heat + Convection...
- Page 35 Use and Care COOKING GUIDE - some functions are not available on all models Convection...
- Page 36 Use and Care COOKING GUIDE - some functions are not available on all models Grill...
- Page 37 Use and Care COOKING GUIDE - some functions are not available on all models Bottom Heat + Convection...
- Page 38 Use and Care COOKING GUIDE - some functions are not available on all models Twin Convection...
- Page 39 Use and Care COOKING GUIDE - some functions are not available on all models Probe...
-
Page 40: Cleaning And Maintenance
If necessary, clean it but avoid using abrasive products or objects to do so. Should it become damaged, please contact Technika Service Department. We recommend you avoid using the oven until it has been repaired. -
Page 41: How To Remove The Oven Door
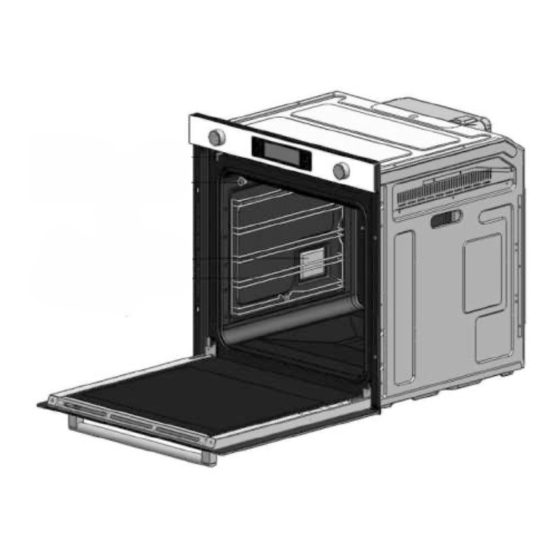
Use and Care How to remove the oven door You can remove the oven door for better access to the oven when cleaning. Proceed as follows to remove the door: · Open the door fully (1). · Lift up and turn the latch situated on each of the two hinges (2). ·... -
Page 42: How To Dismantle The Oven Door For Cleaning
Use and Care How to dismantle the oven door for cleaning Method 1 1. Open the door or remove the door (can be done either way) and push the round pins on either side of the door. 2. While holding them pressed in, pull the end panel (A) out. 3. - Page 43 Use and Care How to dismantle the oven door for cleaning Method 2 1. Flip the glass pane retainers outwards to open them. 2. Gently lift up the inner pane and remove it. 3. Gently lift up the middle pane/s and remove it. 4.
-
Page 44: Replacing The Oven Lamp
- Voltage: 220-240V - Wattage: 25W - Type: E 14 Replacement lamps are available from Technika. Replace the glass cover and reconnect the oven to the mains power supply. Disposal By ensuring this product is disposed of correctly, you will help... -
Page 45: Cabinet Details
* Ventilation: provide cut out at Technika recommends that our rear for wall oven installation only 600mm electric ovens be installed 90mm x 400mm... -
Page 46: Electrical Connection
Installation The panels of the adjacent cabinets must be made of heat- resistant material. In particular, cabinets with a veneer exterior must be assembled with glues which can withstand temperatures of up to 100°C. In compliance with current safety standards, contact with the electrical parts of the oven must not be possible once it has been installed. - Page 47 Installation Replacing the power supply lead If the supply cord or plug is damaged, it must be replaced by the manufacturer or its service agent or a similarly qualified person in order to avoid hazard. Opening the terminal board · Open the back cover of the oven at the bottom (using a flat- bladed screwdriver) and completely unscrew the connection screw and the cable clamp before fitting conducting wires into the appropriate terminals.
-
Page 48: Technical Data
Installation Technical data Inner dimensions of the oven: Width: 43cm Depth: 41cm Height: 40cm Gross Oven Volume: 83 litres. Net Oven Volume: 70 litres. Voltage and Frequency of Power Supply: 220-240V ~50/60Hz or 50Hz Error and Safety Codes Error and safety codes General Functions Solution Er 3 or Er 4... - Page 49 TECHNIKA PTY LTD ACN 069 686 326 77 FILLO DRIVE SOMERTON VIC 3062 General : 1800 649 969 - Service : 1800 333 244 T echnika After Sales Service - P .O. Box 543 SOMERTON VIC 3061 Version 2 Revision 20160616...
Need help?
Do you have a question about the TGSO618TSHL and is the answer not in the manual?
Questions and answers