
Related Manuals for Jensen JDM118BT


Summary of Contents for Jensen JDM118BT
- Page 1 INSTALLATION MANUAL / USER’S MANUAL AM/FM Receiver with Bluetooth and Detachable front panel...
- Page 2 CONTENTS Precautions........................1 Precautions & Warnings....................1 Lithium Battery Cell Warnings..................1 Drivers and Connections.....................1 Other Warnings......................1 Installation........................2 Installation Procedures....................2 To Install the Car Radio....................2-3 Wiring Connections....................3 Removal of the Main Unit ....................3 Control Panel Button Locations..................4 General Operation......................5 Turn Unit On/Off......................5 Adjust Volume (VOL)..
-
Page 5: Wiring Connections
INSTALLATION(CONT.) Wiring Connections WIRING DIAGRAM Radio Antenna Socket FUSE 10A Front Left CH RCA Output (white) Front Right CH RCA Output (red) Rear Right CH RCA Output (red) Purple Rear Right Speaker Rear Left CH RCA Output (white) Purple/Black GND/ground (Black) Gray Front Right CAUTION... -
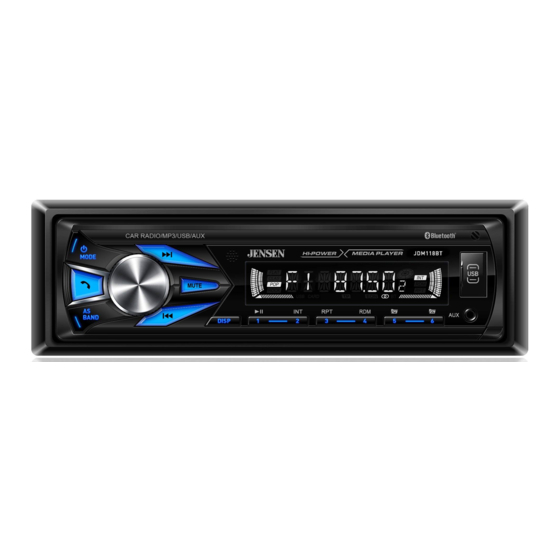
Page 6: Control Panel Button Locations
CONTROL PANEL BUTTON LOCATIONS RESET (power)/MODE (source) button 2. SEL (select/menu) button and VOL (volume) knob 3. BAND(band) button, AS (automatic store / preset station scan ) button button (pause/play), Preset station1 button 6. INT (intro) , Preset station 2 button 7. -
Page 7: General Operation
GENERAL OPERATION Turn Unit On/Off Press the power ( ) /MODE button on the front panel to turn on the unit, and long press it again to turn off the unit. ress the power ( ) button on the remote control to turn the unit on or off. Adjust Volume (VOL) Rotate the VOL knob on the front panel or press the VOL /VOL... -
Page 8: Change The Source (Mode)
GENERAL OPERATION (CONT.) Change the Source (MODE) Press the MODE button to switch between RADIO, BT(Bluetooth), USB(with USB device inserted) and AUX-IN(auxiliary input) modes. Mute on/off In power on mode, briefly press the MUTE button to toggle mute on or off. The muted state will be also released when the volume knob is used. -
Page 9: Radio Operation
RADIO OPERATION Switch Between USA area and Europe area Frequency In radio mode, press the VOL button to enter switch state of the US(USA) and EU(europe) frequency, then rotate it to switch between US(USA) and EU(europe) frequency. The system will change the frequency setting in about 3 seconds. Change Bands (BAND) Press the B A N D button to switch between the FM1, FM2, FM3, AM1 and AM2. -
Page 10: Usb Operation
USB OPERATION To insert USB evice nser h orag evice laybac u oma ically. Eject USB evice layback he emov evice. Play/Pause lay/ ause esum layback. Next/Previous Track ex rack bu on. reviou rack u on. Fast Forward/Backward as or ar u on. -
Page 11: Select The Track Or File For Playback In Mp3 Format
USB OPERATION Select the track or file for playback in MP3 format a) Press the AS button on the front panel or press the AS/PS button on the remote control to enter the tr ack search mode. The “TRK0000” will appear on the display. b)Turn the volume control to select the “... -
Page 12: Bluetooth Operation
2. When the phone finds the car audio system,the “JENSEN JDM118BT " will be displayed. 3. Choose the “JENSEN JDM118BT ” from the device list and input the bluetooth PIN code “1234” to p air and connect with the car audio system. Upon confirming, the character “BT” on the LCD will stop flashing. -
Page 13: Remote Control
REMOTE CONTROL Remove Insulating Sheet The remote control comes with an insulating sheet attached to the underside of the remote control, as illustrated on the right. The remote control will not work until the insulating sheet is removed. Replace Lithium Battery Cell 1. -
Page 14: Specifications
SPECIFICATIONS General Chassis Dimensions...............178(W) x 108(D) x 50(H) mm Power Supply Requirement ..................DC 12V Current Consumption ..................10A (max.) Maximum Power Output ..................75W x 4CH Radio USA/ Europe Frequency Range..........87.5 - 107.9 MHz (200KHz/Step) 87.5 - 108.0 MHz(50KHz/Step) Usable Sensitivity ....................30 dBu I.F. - Page 16 Warning Statement This equipment has been tested and found to comply with the limits for a Class B digital device, pursuant to part 15 of the FCC Rules. These limits are designed to provide reasonable protection against harmful interference in a residential installation.
Need help?
Do you have a question about the JDM118BT and is the answer not in the manual?
Questions and answers