Skytech TS/R-2A Installation And Operating Instructions Manual
Fireplace remote control wireless wall thermostat
Hide thumbs
Also See for TS/R-2A:
- Installation and operating instructions manual (9 pages) ,
- Installation and operating instructions manual (10 pages) ,
- Manual (8 pages)
Table of Contents
Advertisement
Quick Links
IF YOU CANNOT READ OR UNDERSTAND THESE INSTALLATION INSTRUCTIONS DO NOT
INTRODUCTION
This SKYTECH remote control system was developed to provide a safe, reliable, and user-friendly remote control system for gas
heating appliances. The system can be operated thermostatically or manually from the transmitter. The system operates on radio
frequencies (RF) within a 20-foot range using non-directional signals. The system operates one of 1,048,576 security codes that are
programmed into the transmitter at the factory; the remote receiver's code must be matched to that of the transmitter prior to initial use.
Review COMMUNICATION SAFETY SECTION under TRANSMITTER section and THERMO SAFETY SECTION under REMOTE
RECEIVER section. These signal/temperature safety features shut down the fireplace system when a potentially unsafe condition exists.
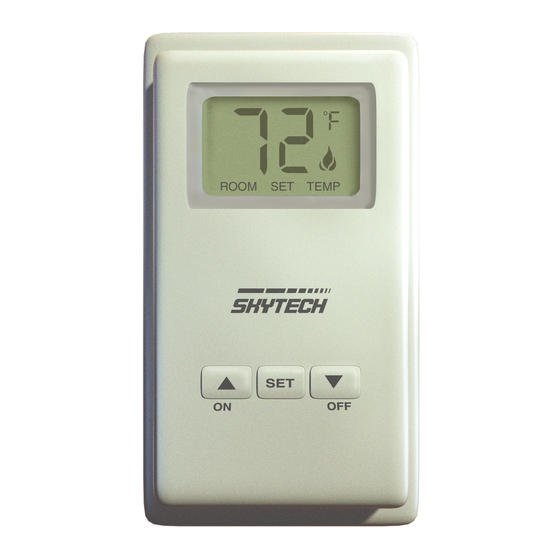
WALL MOUNT THERMOSTAT
LCD
DISPLAY
TEMP
ROOM
"SET"
THERMO
MODE
SET
BUTTON
ON/UP
SET
BUTTON
OFF
ON
OFF/DOWN
BUTTON
TO INSTALL BATTERIES IN THE WIRELESS THERMOSTAT
1.
Remove face from backing plate this is done by sliding the face up about 1/2" then pull the face off the base plate. As shown in
Figure #1
2.
Locate the (2) holders for the 3V button cell batteries.
3.
Slide the button cell batteries into the battery holders. (Make sure that the batteries are installed with the (+) plus side facing
you or up.
TO REMOVE THE BATTERIES IN THE WIRELESS THERMOSTAT
1.
Remove face from backing plate this is done by sliding the face up about 1/2" then pull the face off the base plate. As shown in
Figure #1
2.
Locate the (2) holders for the 3V button cell batteries.
3.
Insert a small screwdriver into the slot above the button cell battery and push the battery out. AS shown in Figure #2
R O
O M
T E
M P
S E
O N
T
O F
F
___________________________________________________________________________________________________________
Skytech TS/R-2A
Model: TS/R-2A
INSTALLATION AND OPERATING INSTRUCTIONS
ATTEMPT TO INSTALL OR OPERATE
The wall/transmitter operates on (2) 3V Button Cell (Included) which powers the LCD screen and
powers the RF signal. These batteries are made specifically for remote controls and electronic
lighters. Before using the transmitter the 3V batteries must be installed into the battery
compartments.
It is recommended that CR2032 lithium batteries always be used for longer battery life and
maximum operational performance.
Upon initial use, there may be a delay of five seconds before the remote receiver will respond to
the transmitter. This is part of the system's design. If the LCD screen will not come on, check the
3V Button Cell battery.
Figure #1
Figure #2
BACK OF UNIT
+
+
Plus
Plus
Side
Side
(2) 3 Volt Button
Cell Batteries
REV 12/26/13 Page 1 of 7
Battery Removal
Slots
Advertisement
Table of Contents

Related Manuals for Skytech TS/R-2A


Summary of Contents for Skytech TS/R-2A
- Page 1 ATTEMPT TO INSTALL OR OPERATE INTRODUCTION This SKYTECH remote control system was developed to provide a safe, reliable, and user-friendly remote control system for gas heating appliances. The system can be operated thermostatically or manually from the transmitter. The system operates on radio frequencies (RF) within a 20-foot range using non-directional signals.
- Page 2 C), you must press and hold both the ON and OFF buttons on the transmitter at the same time until the LCD displays the change. If you want to convert back, repeat the above procedure. ___________________________________________________________________________________________________________ Skytech TS/R-2A REV 12/26/13 Page 2 of 7...
- Page 3 COMMUNICATION – SAFETY – TRANSMITTER – (C/S – TX) This SKYTECH remote control has a COMMUNICATION –SAFETY function built into its software. It provides an extra margin of safety when the TRANSMITTER is out of the normal 20 foot operating range of the receiver.
-
Page 4: Installation Instructions
This remote control system must be installed exactly as outlined in these instructions. Read all instructions completely before attempting installation. Follow instructions carefully during installation. Any modifications of the SKYTECH remote control or any of its components will void the warranty and may be pose a fire hazard. -
Page 5: Wiring Instructions
Light your gas appliance following the lighting instructions that came with the appliance. Confirm that the pilot flame is on; it must be in operation for the main gas valve to operate. ___________________________________________________________________________________________________________ Skytech TS/R-2A REV 12/26/13 Page 5 of 7... - Page 6 BATTERY LIFE Life expectancy of alkaline batteries in the SKYTECH A-TS/R-2A should be at least 12 months. Check and replace all batteries annually. When the Wall Transmitter no longer operates or the remote receiver does not function at all, the batteries should be checked.
-
Page 7: Fcc Requirements
Should you encounter problems with your fireplace system, the problem may be with the fireplace itself or it could be with the SKYTECH remote control. Review the fireplace manufacturer’s operation manual to make sure all connections are properly made. Then check the operation of the SKYTECH remote in the following manner: Make sure receiver batteries are installed properly. -
Page 8: Limited Lifetime Warranty
Replacement parts will be available at no charge for the first (5) five years of this warranty, and will be available at market cost for the Lifetime of the product to that original owner. If SKYTECH does not have the parts for an individual model, then a replacement SYSTEM will be provided. - Page 9 Exclusive offer to Skytech Remote Control Owners This special offer is only provided to customers of Skytech that have purchased a remote control for their Hearth Product. This remote control system can be used for any 120VAC appliance, but perfect your Christmas Tree Lights or any other appliance that is difficult to reach or plug in.
Need help?
Do you have a question about the TS/R-2A and is the answer not in the manual?
Questions and answers