Table of Contents
Advertisement
Advertisement
Table of Contents

Related Manuals for Thermogroup 5265


Summary of Contents for Thermogroup 5265
- Page 1 5265 7 Day Programmable Thermostat Installation & User Guide...
-
Page 2: Table Of Contents
Contents What’s in the box? ..………………………………………… 3 Before you start ..…………………………………………... Installing the Thermostat ..………………………………… Wiring Diagram ..…………………………………………… 6 Configuration ..……………………………………………… User Interface ..…………………………………………….. Set the time and date ..……………………………………. Heating modes ..…………………………………………… Heating schedule ..………………………………………… Error Messages ..…………………………………………… Technical Information ..……………………………………. -
Page 3: What's In The Box
What’s in the box? Check you’ve got everything 5265 Programmable Thermostat Floor Sensor Probe Floor Sensor Conduit (2m) Fixing Screws Installation & Programming Guide... -
Page 4: Before You Start
Before you start 5265 Thermostat should be installed: approximately 1.5m from the floor on an interior wall in an area outside any wet zones (IP21) on an RCD protected circuit away from drafts or heat influences so that the floor sensor probe can be laid in a clear,... -
Page 5: Installing The Thermostat
Installing the Thermostat Switching off mains power You will be installing the 5265 Thermostat as part of a high voltage mains electrical circuit. To ensure your safety and to protect the thermostat, switch off the mains power before you start the installation. -
Page 6: Wiring Diagram
Installing the Thermostat... - Page 7 Installing the Thermostat Insert the floor sensor cable through one of the two openings on the base and connect the sensor wires to terminals 3 and 4. The sensor probe should be installed inside the conduit in the wall and position the sensor probe so that it does not come in contact with the underfloor heating cable.
- Page 8 Installing the Thermostat Push the excess length of high-voltage wires back inside the electrical box. Secure the power base to the electrical box using the provided screws. Insert the tabs at the top of the control module in the slots at the top of the power base.
-
Page 9: Configuration
Configuration Some thermostat configurations can be modified via switches on the back of the faceplate (control module). Default (factory) settings are inside the grey cells. Configurations DOWN Display format °F / 12 h °C / 24 h Early Start Enable Disable Temperature control mode a. -
Page 10: User Interface
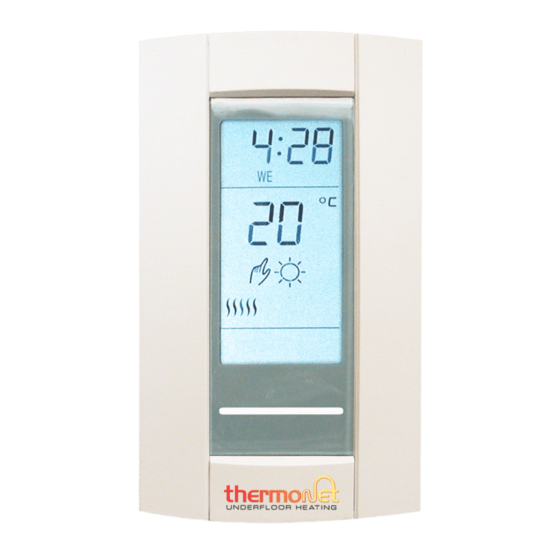
User Interface On/Stand by Switch 10. Mode Display Appears when the set point is 11. Present Temperature Indicator displayed 12. Ground Fault Indicator Day and Time Settings 13. Temperature Control Mode Heating On/Status Indicator Indicator Program Button 14. Temperature Present Buttons Program Clear Button 15. -
Page 11: Set The Time And Date
Set the time and date Set the time and date 1. Press the button to set the hour 2. Press the button to set the minutes 3. Press the button to set the day 4. Press to exit and save the changes Daylight Savings Time (DLS) 1. -
Page 12: Heating Modes
Heating modes Comfort Maintains a higher temperature that will keep you warm on a cold day! To set the comfort temperature press the button and use the buttons to set the desired temperature then press and hold the button till the is displayed to save the settings. - Page 13 Heating modes Vacation Maintain a low frost protection temperature while you are away. Your heating system is off, but will switch on automatically if the temperature gets too cold. Set the temperature using the buttons. Schedule/Automatic The thermostat will adjust your UFH according to your pre-set heating schedule.
-
Page 14: Heating Schedule
Heating schedule Setting up a schedule ensures energy efficiency and convenience by automatically changing the temperature of your underfloor heating system. There are 4 heating events for every day. Most people treat them as 2 on/off cycles. This thermostat allows all days (Mon-Sun) on the same schedule or each day programmed separately to creates your own customised schedule. - Page 15 Heating schedule 1. Press program to display Monday (Mo) Period 1 (Wake). This will automatically program the temperature to your comfort temperature setting 2. Set desired ‘On’ time using the buttons. 3. Press program to move on to Period 2 (out). This will automatically program the temperature to your Economy Setting temperature 4.
-
Page 16: Error Messages
Error Messages LO – The measured temperature is below the thermostat’s display range HI – The measured temperature is above the thermostat’s display range. Heating is deactivated. Er – Verify the thermostat and sensor connections. Setpoint Temperature The thermostat normally displays the actual (measured) temperature. -
Page 17: Technical Information
Technical Information Supply voltage 240VAC 50/60Hz Maximum Load IP Rating IP21 Warranty 3 Years Width 70mm Height 124mm Depth 50mm (20mm to wall) Data Backup In the event of a power failure most settings are saved. Only the time must be re-adjusted if the power failure lasts more than 6 hours. - Page 18 Notes...
- Page 19 Notes...
- Page 20 Service and support Thermogroup AU PO Box 822 Leeton NSW 2705 1300 368 631 sales@thermogroup.com.au www.thermogroup.com.au...
Need help?
Do you have a question about the 5265 and is the answer not in the manual?
Questions and answers