Table of Contents
Advertisement
Ambient Weather WS-8482 8-Channel Wireless Internet
Remote Monitoring Weather Station with Indoor / Outdoor
Temperature & Humidity User Manual
Table of Contents
1.
Introduction ..................................................................................................................................... 2
2.
Warnings ......................................................................................................................................... 2
3.
Getting Started ................................................................................................................................ 3
3.1
Parts List ................................................................................................................................. 3
3.2
Product Features ..................................................................................................................... 3
3.1.1
Display ............................................................................................................................... 3
3.1.2
Wireless Indoor/Outdoor Thermo-Hygrometer Transmitter............................................... 4
3.3
Powering Up ........................................................................................................................... 5
3.3.1
Power Up Sequence ........................................................................................................... 5
3.3.2
Initial Sensor Synchronization ........................................................................................... 5
3.4
Mount the Sensor ................................................................................................................... 5
4.
Console Display .............................................................................................................................. 6
5.
Console LED Status Light .............................................................................................................. 6
6.
Battery and Memory Backup .......................................................................................................... 6
7.
Settings ............................................................................................................................................ 7
7.1
Time Settings .......................................................................................................................... 7
7.1.1
Time Zone Settings ............................................................................................................ 9
7.2
Sensor Pairing with the Display Console ............................................................................. 10
7.3
WiFi Connection Status ........................................................................................................ 10
7.4
Time Server Sync Status ...................................................................................................... 10
7.5
Daylight Savings Time Adjustment ...................................................................................... 10
7.6
Alarm Settings ...................................................................................................................... 11
7.6.1
Setting the Alarm Time .................................................................................................... 11
7.6.2
Turning On and Off the Alarm Feature ............................................................................ 11
7.6.3
Using the Alarm and Snooze Functions ........................................................................... 11
7.7
Temperature and Humidity Display and Settings ................................................................. 11
7.7.1
Temperature Units of Measure ......................................................................................... 11
7.7.2
Temperature and Humidity Trend .................................................................................... 12
7.7.3
Temperature and Humidity Measurements Limits ........................................................... 12
7.8
Max / Min Temperature and Humidity Record .................................................................... 12
7.9
Calibration ............................................................................................................................ 13
7.9.1
Calibration Discussion ..................................................................................................... 15
8.
Additional Console Features ......................................................................................................... 15
8.1
Wireless Signal Strength and Signal Loss ............................................................................ 15
8.2
Low Battery Indication ......................................................................................................... 16
8.3
Low Temperature Icon ......................................................................................................... 17
8.4
Remove Sensor from Console .............................................................................................. 17
9
WiFi Connection and Weather Servers ......................................................................................... 17
9.1
Register at Wunderground.com (Weather Underground) ..................................................... 17
9.2
WiFi Setup ............................................................................................................................ 18
9.3
Register with AmbientWeather.net ....................................................................................... 22
9.4
Viewing your Data on Weather Underground ...................................................................... 25
Version 1.0
©Copyright 2017, Ambient LLC. All Rights Reserved.
Page 1
Advertisement
Table of Contents

Subscribe to Our Youtube Channel
Related Manuals for Ambient Weather WS-8482


Summary of Contents for Ambient Weather WS-8482
-
Page 1: Table Of Contents
Ambient Weather WS-8482 8-Channel Wireless Internet Remote Monitoring Weather Station with Indoor / Outdoor Temperature & Humidity User Manual Table of Contents Introduction ............................. 2 Warnings ............................2 Getting Started ..........................3 Parts List ..........................3 Product Features ........................3 3.1.1... -
Page 2: Introduction
FCC Statement.......................... 32 Warranty Information ....................... 33 1. Introduction Thank you for your purchase of the Ambient Weather WS-8478 FALCON Solar Powered Wireless WiFi Remote Monitoring Weather Station. The following user guide provides step by step instructions for installation, operation and troubleshooting. -
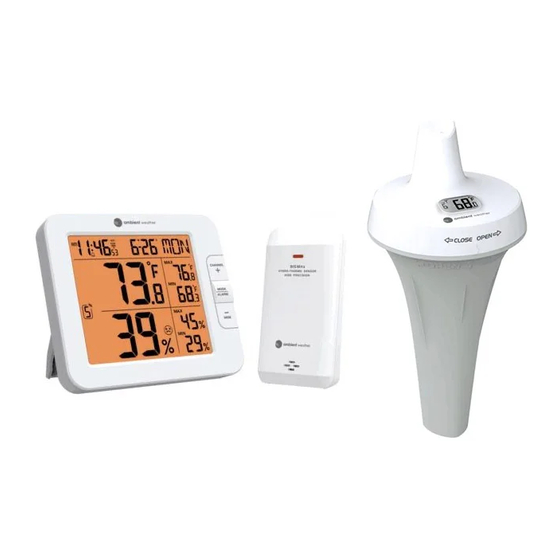
Page 3: Getting Started
3. Getting Started Note: Remove the plastic film from the console face before getting started. Parts List Item Display Console Frame Dimensions (L x W x H): 130 x 112 x 27.5mm (5.1 x 4.4 x 1.1 in) Wireless Indoor/Outdoor Thermo-Hygrometer (L x W x H): 4.5 x 2.5 x 1.5” UL Rated Class 5 AC Adapter User Manual Product Features... -
Page 4: Wireless Indoor/Outdoor Thermo-Hygrometer Transmitter
1, 2 ,3 ,4, 5, 6, or 7 default = 1) Note: The WS-8482 supports seven wireless channels. If you have one sensor, leave the transmitter channel at Channel 1. If you have more than one sensor, set the appropriate channel, then power down and up the sensor (by removing and reinserting batteries). -
Page 5: Powering Up
Powering Up 3.3.1 Power Up Sequence Note: The power up sequence must be performed in the order shown in this section (remote transmitters FIRST, Display Console SECOND) to avoid sensor synchronization time out. The Indoor/Outdoor Wireless Transmitter(s): 1. Remove the battery door on the sensor(s) 2. -
Page 6: Console Display
Figure 3 4. Console Display Figure 4 references the individual sections of the console display. Figure 4 5. Console LED Status Light The console LED status light is on the back of the console. Reference Figure 5 for explanation of the colored LED. -
Page 7: Settings
Date and Time Max and Min Records Alarms The following parameters are stored in memory when AC and battery power is disconnected: Router settings Weather server settings Time server settings Time zone offset ... - Page 8 Command Mode Settings Image Enter Time Zone Press [+] to increase, [-] to [TIME SET] + 2 seconds Settings decrease. Reference Figure [TIME SET] Enter Daylight Press [+] or [-] to turn ON Savings Time or OFF. OFF (AZ and HI) or ON (everywhere else).
-
Page 9: Time Zone Settings
[TIME SET] Month Press [+] to increase, [-] to decrease. Press [+] to increase, [-] to [TIME SET] decrease. [TIME SET] Enable or disable Press [+] or [-] to turn ON or the internet time sync [TIME SET] Language Press [+] or [-] to change between EN (English), DE (German), FR (French), ES (Spanish) IT (Italian), NL... -
Page 10: Sensor Pairing With The Display Console
Hours from Time Zone Cities -2 AT: Azores Azores, Cape Verde Islands -1 WAT: West Africa 0 GMT: Greenwich Mean London, England WET: Western European 1 CET: Central European Paris, France 2 EET: Eastern European Athens, Greece 3 BT: Baghdad Moscow, Russia 4 --- Abu Dhabi, UAE... -
Page 11: Alarm Settings
Alarm Settings 7.6.1 Setting the Alarm Time While in normal time mode, perform the following operations to set the alarm time. Command Mode Settings [MODE/ALARM] Enter Alarm Settings Press [+] to increase, [-] to decrease. Alarm Hour + 2 seconds [MODE/ALARM] Alarm Minute Press [+] to increase, [-] to decrease. -
Page 12: Temperature And Humidity Trend
automatic scrolling, press the CHANNEL + button again. Figure 9 7.7.1.2 Indoor Comfort Icon The comfort indication is a pictorial indication calculated from the indoor air temperature and humidity. Each indoor channel displays a comfort icon. The comfort indication can vary at the same temperature, depending on the humidity. There is no comfort Indication when the temperature is below 0°C (32°F) or over 60°C (140°F). -
Page 13: Calibration
LCD display, as shown in Figure 12. 2. When the MAX/MIN records are shown, the display will return to normal mode after 5 seconds. Figure 12 3. Press and hold the MEM/- button for two seconds to clear the all-time Max/Min records. The display will update as shown in Figure 13. - Page 14 Figure 14 3. Press the MODE / ALARM key to switch between temperature and humidity. The parameter will flash when selected. 4. In the temperature calibration mode, press the CHANNEL /+ or MEM/- key to increase or decrease the calibrated temperature offset in 0.1º increments. Press and hold the CHANNEL /+ or MEM/- key to change rapidly, where: Calibrated Temperature = Measured Temperature + Temperature Offset 5.
-
Page 15: Calibration Discussion
7.9.1 Calibration Discussion The purpose of calibration is to fine tune or correct for any sensor error associated with the devices margin of error. Errors can occur due to electronic variation (example, the temperature sensor is a resistive thermal device or RTD, the humidity sensor is a capacitance device), or degradation (contamination of sensors). -
Page 16: Low Battery Indication
Strong wireless signal Fair wireless signal Weak wireless signal Figure 17 2. If the signal for a specific channel has discontinued and does not recover within 15 minutes, the temperature and humidity will display “Er” for the corresponding channel, as shown in Figure 18. -
Page 17: Low Temperature Icon
Low Temperature Icon When the temperature is less than 3 ºC (37.4 ºF), the LO temperature icon will be displayed. The purpose of this icon is ice can begin forming at this temperature. Figure 20 Remove Sensor from Console To de-link a sensor from the console unit, press the CHANNEL / + key or MEM / - key to the desired channel, then press and hold the ºC/ºF key for 2 seconds. -
Page 18: Wifi Setup
Figure 21 Note: Your station ID will have the form: KSSCCCC###, where K is for USA station (I for international), SS is your state, CCCC is your city and ### is the station number in that city. In the example above, KAZPHOEN424 is in the USA (K), State of Arizona (AZ), City of Phoenix (PHOEN) and #424. - Page 19 Figure 23 c) Example 3. Connect to the console WiFi server with an iPhone or iPad. Choose the Settings icon and Wi-Fi (Figure 24). Connect to the PWS- WiFi network, as shown in Figure 25 (your WiFi network name may be slightly different, but will always begin with PWS-).
- Page 20 Figure 26 Figure 27 3. Once connected, enter the following IP address into any browser’s address bar: http://192.168.1.1 to access the console’s web interface: Note: Some browsers will treat 192.168.1.1 as a search, so make sure you include the header http://, http://192.168.1.1 not 192.168.1.1 4.
- Page 21 Figure 28 Notes: Make a note of your Mac address. You will need this to register at AmbientWeather.net. Hidden SSIDs. If you have a hidden SSID, enter the SSID manually. 5. If all of the information you entered, and is correct, the console LED will change from flashing blue to solid blue.
-
Page 22: Register With Ambientweather.net
Figure 29 6. Once the setup is completed, the Wi-Fi console will disconnect from your computer or smart phone’s Wi-Fi connection, and search for the assigned router. If the connection is successful, the Wi-Fi console’s status LED will change to blue and the Wi-Fi icon will stop flashing and remain on. - Page 23 Figure 30 Next, enter the MAC address found on your Weather Station Web Interface (Figure 28). Note that this is an example only and your MAC address will be different. Figure 31 Register an account on AmbientWeather.net (email address and password). Once registered, select the dashboard to view your data, as shown in Figure 32.
- Page 24 AmbientWeather.net is a responsive design and mobile friendly, so there is no need for a mobile app. Simply open your mobile devices web browser, browse to AmbientWeather.net, and bookmark your dashboard. If you save the bookmark to your desktop, it will automatically save the Ambient Weather icon, as shown in Figure 33.
-
Page 25: Viewing Your Data On Weather Underground
9.4 Viewing your Data on Weather Underground There are several ways to view your data on Wunderground: 9.4.1 Web Browser Visit: http://www.wunderground.com/personal-weather-station/dashboard?ID=STATIONID where STATIONID is your personal station ID (example, KAZPHOEN210). Figure 34 9.4.2 WunderStation iPad Application Visit: http://www.WunderStation.com to download the WunderStation iPad app. Version 1.0 ©Copyright 2017, Ambient LLC. -
Page 26: Mobile Apps
Figure 35 9.4.3 Mobile Apps Visit: http://www.wunderground.com/download/index.asp for a complete list of Mobile apps for iOS and Android. Alternately, you can find your data on your mobile device’s web browser. Version 1.0 ©Copyright 2017, Ambient LLC. All Rights Reserved. Page 26... -
Page 27: Additional Ambientweather.net Features
AmbientWeather.net. Enable the skill and get started: say "Alexa, ask Ambient Weather for a weather report.". This will provide you with your outdoor weather report, but you can ask for your indoor weather report as well by saying, "Alexa, ask Ambient Weather about the indoor conditions."... -
Page 28: Works With Google Assistant
AmbientWeather.net Link your account to get started: say 'hey google, Ambient Weather... weather report.' This will provide you with your outdoor weather report. You can ask for your indoor weather report as well by saying, ' indoor conditions'. -
Page 29: Specifications
The AmbientWeather.net dashboard allows you to rename the sensor description, as shown in Figure Figure 37 11 Specifications 11.1 Wireless Specifications Indoor/Outdoor Thermo-Hygrometer: 300 feet line of sight, 100 feet under most conditions. Frequency: 915 MHz Version 1.0 ©Copyright 2017, Ambient LLC. -
Page 30: Measurement Specifications
11.2 Measurement Specifications The following table provides specifications for the measured parameters. Measurement Range Accuracy Resolution Indoor and Outdoor -4 to 140 °F alkaline 131 to 140°F: ± 0.9°F 0.1 °F/°C Temperature batteries (55 to 60°C: ± 0.5°C) -40 to 140 °F Lithium 50 to 131°F: ±... - Page 31 Problem Solution The wireless sensor communication has Make sure the transmitter is powered up and the been lost or is intermittent or will not sync LED is flashing about once per minute. For cold weather environments, install lithium batteries. If the transmitter is not flashing, replace the batteries.
-
Page 32: Liability Disclaimer
Liability Disclaimer Please help in the preservation of the environment and return used batteries to an authorized depot. The electrical and electronic wastes contain hazardous substances. Disposal of electronic waste in wild country and/or in unauthorized grounds strongly damages the environment. Reading the “User manual”... -
Page 33: Warranty Information
Phone : 1-(480)346-3380 Warranty Information Ambient, LLC provides a 1-year limited warranty on this product against manufacturing defects in materials and workmanship. This limited warranty begins on the original date of purchase, is valid only on products purchased and only to the original purchaser of this product. To receive warranty service, the purchaser must contact Ambient, LLC for problem determination and service procedures.
Need help?
Do you have a question about the WS-8482 and is the answer not in the manual?
Questions and answers