Table of Contents
Advertisement
Quick Links
Ambient Weather WS-8478A FALCON Solar Powered
Wireless WiFi Remote Monitoring Weather Station User
Table of Contents
1.
Introduction ..................................................................................................................................... 3
1.1
Model History and Changes ................................................................................................... 3
2.
Warnings ......................................................................................................................................... 4
3.
Getting Started ................................................................................................................................ 4
3.1
Parts List ................................................................................................................................. 4
3.2
Quick Start Guide ................................................................................................................... 4
3.3
Product Features ..................................................................................................................... 5
3.3.1
Display ............................................................................................................................... 5
3.3.2
Wireless Indoor Thermo-Hygrometer Transmitter ............................................................. 6
3.3.3
Sensor Array ....................................................................................................................... 7
3.4
Powering Up ........................................................................................................................... 8
3.4.1
Power Up Sequence ........................................................................................................... 8
3.4.2
Initial Sensor Synchronization ........................................................................................... 9
3.5
Mount the Indoor Sensor ........................................................................................................ 9
3.6
Mount the Outdoor Sensor Array ........................................................................................... 9
3.6.1
Site Survey ......................................................................................................................... 9
3.6.2
Pole Mounting the Sensor Array ...................................................................................... 10
4.
Console Display ............................................................................................................................ 11
5.
Settings .......................................................................................................................................... 11
5.1
Time Settings ........................................................................................................................ 11
5.1.1
Time Zone Settings .......................................................................................................... 13
5.2
Month Day vs. Year Display ................................................................................................ 14
5.3
Moon Phase .......................................................................................................................... 14
5.4
Sunrise and Sunset ............................................................................................................... 15
5.5
WiFi Connection Status ........................................................................................................ 15
5.6
Time Server Sync Status....................................................................................................... 15
5.7
Alarm Settings ...................................................................................................................... 16
5.7.1
Turning On and Off the Alarm Feature ............................................................................ 16
5.7.2
Setting the Alarm Time .................................................................................................... 16
5.7.3
Using the Alarm and Snooze Functions ........................................................................... 16
5.8
Temperature and Humidity Display and Settings ................................................................. 17
5.8.1
Temperature Units of Measure ......................................................................................... 17
5.8.2
Outdoor Sensor Array Signal Strength ............................................................................. 17
5.8.3
Indoor Sensor ................................................................................................................... 17
5.8.4
Temperature and Humidity Trend .................................................................................... 18
5.8.5
Temperature and Humidity Measurements Limits ........................................................... 18
5.9
Wind ..................................................................................................................................... 18
5.9.1
Average Wind Speed vs. Wind Gust ................................................................................ 19
5.9.2
Wind Units of Measure and Wind Direction Format ....................................................... 19
5.9.3
Wind Speed Level ............................................................................................................ 19
5.9.4
Calibrating the Wind Direction for the Southern Hemisphere ......................................... 19
Version 1.3
©Copyright 2018, Ambient LLC. All Rights Reserved.
Manual
Page 1
Advertisement
Table of Contents

Subscribe to Our Youtube Channel
Related Manuals for Ambient Weather FALCON WS-8478A


Summary of Contents for Ambient Weather FALCON WS-8478A
-
Page 1: Table Of Contents
Ambient Weather WS-8478A FALCON Solar Powered Wireless WiFi Remote Monitoring Weather Station User Manual Table of Contents Introduction ............................. 3 Model History and Changes ....................3 Warnings ............................4 Getting Started ..........................4 Parts List ..........................4 Quick Start Guide ........................4 Product Features ........................ - Page 2 5.10 Barometric Pressure Display and Settings ................20 5.10.1 Barometric Pressure Units of Measure ................ 20 5.10.2 Absolute Pressure vs. Relative Pressure ..............20 5.10.3 Relative Pressure Calibration ..................20 5.11 The Forecast ......................... 21 5.12 Weather Index ........................21 5.12.1 UV Index ........................
-
Page 3: Introduction
FCC Statement .......................... 50 Warranty Information ....................... 51 1. Introduction Thank you for your purchase of the Ambient Weather WS-8478A FALCON Solar Powered Wireless WiFi Remote Monitoring Weather Station. The following user guide provides step by step instructions for installation, operation and troubleshooting. -
Page 4: Warnings
2. Warnings Warning. Only use the included approved AC adapter. Warning: Any metal object may attract a lightning strike, including your weather station mounting pole. Never install the weather station in a storm. Warning: Installing your weather station in a high location may result in injury or death. Perform as much of the initial check out and operation on the ground and inside a building or home. -
Page 5: Product Features
Product Features 3.3.1 Display BARO Button WIND Button ALARM/SNOOZE button INDEX button RAINFALL button LCD Display GRAPH / button °F / °C / button HISTORY button MAX / MIN button CHANNEL button Status LED Wall suspension eye for hanging WI-FI / SENSOR button REFRESH button CONSOLE SET button ALARM button... -
Page 6: Wireless Indoor Thermo-Hygrometer Transmitter
3.3.2 Wireless Indoor Thermo-Hygrometer Transmitter Figure 3 Description Description Transmitter LED (flashes when the remote [RESET] button is transmitting) Suspension eye for hanging 2 x AA battery compartment Transmitter channel (assign the transmitter to 1, 2 ,3 ,4, 5, 6, or 7 default = 1) Note: The WS-8478A supports seven wireless channels. -
Page 7: Sensor Array
3.3.3 Sensor Array Wind Vane Wind Cups Antenna Thermo-Hygrometer Radiation Shield Pole Mount Transmission status LED RESET button Battery door Level indicator Rain collector UV sensor Solar panel Version 1.3 ©Copyright 2018, Ambient LLC. All Rights Reserved. Page 7... -
Page 8: Powering Up
Thermo-Hygro Sensor (radiation shield removed) Figure 4 Powering Up 3.4.1 Power Up Sequence Note: The power up sequence must be performed in the order shown in this section (remote transmitters FIRST, Display Console SECOND) to avoid sensor synchronization time out. The Indoor Wireless Transmitter(s): 1. -
Page 9: Initial Sensor Synchronization
3. Replace the battery door 4. Plug the AC adaptor into the DC jack of the console. 5. After power up, all of LCD segments will be displayed. The console will enter access point (AP) mode, and the status LED will flash green. 6. -
Page 10: Pole Mounting The Sensor Array
Please take this into consideration when choosing console or mounting locations. Make sure your display console is at least five feet away from any electronic device to avoid interference. 6. Visit Ambient Weather Mounting Solutions for assistance and ideas for mounting your weather station: http://www.ambientweather.com/amwemoso.html 3.6.2 Pole Mounting the Sensor Array... -
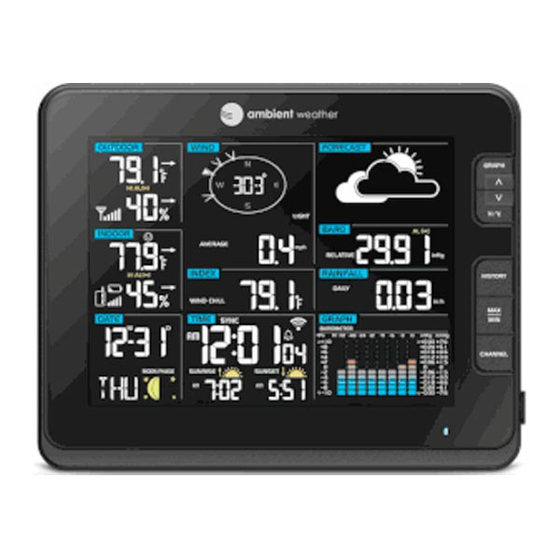
Page 11: Console Display
4. Console Display No Description No Description Outdoor temperature & humidity Time, sunrise/sunset & system status Indoor temperature & humidity Weather forecast Calendar & moon phase Barometer Wind direction & speed Rainfall Heat Index & Wind Chill Multi-Function Graph Figure 8 Settings 5.1 Time Settings While in normal time mode, perform the following operations to set the time. - Page 12 Command Mode Settings Image Enter Time Zone Press [ ] to increase, [ ] to [CLOCK SET] + 2 Settings decrease. Reference Figure seconds [CLOCKSET] Enter Daylight Press [ ] or [ ] to turn ON Savings Time or OFF. OFF (AZ and HI) or ON (everywhere...
-
Page 13: Time Zone Settings
[CLOCKSET] Day Press [ ] to increase, [ ] to decrease. [CLOCKSET] Month Day Press [ ] or [ ] to toggle Format between M-D (month-day) and D-M (day-month) [CLOCKSET] Enable or disable Press [ ] or [ ] to turn ON the internet time or OFF sync... -
Page 14: Month Day Vs. Year Display
Hours from Time Zone Cities -6 CST: Central Standard Chicago, IL, USA -5 EST: Eastern Standard New York, NY, USA -4 AST: Atlantic Standard Caracas -3 --- São Paulo, Brazil -2 AT: Azores Azores, Cape Verde Islands -1 WAT: West Africa 0 GMT: Greenwich Mean London, England WET: Western European... -
Page 15: Sunrise And Sunset
Figure 11 Sunrise and Sunset The console calculates your location’s sunrise and sunset time based on your time zone, latitude and longitude you entered. Figure 12 WiFi Connection Status When the console successfully connects to your Wi-Fi router, the Wi-Fi signal icon will appear on the LCD display. -
Page 16: Alarm Settings
REFRESH button to force the time synchronization process, and the status LED will flash purple. Alarm Settings 5.7.1 Turning On and Off the Alarm Feature In normal mode, press the ALARM button to show the alarm time. Press the alarm button again, and the alarm icon will appear. -
Page 17: Temperature And Humidity Display And Settings
Temperature and Humidity Display and Settings 5.8.1 Temperature Units of Measure Press the °F / °C button on the front of the display to change the temperature units of measure. 5.8.2 Outdoor Sensor Array Signal Strength The outdoor sensor array signal strength is displayed in the outdoor section of the display: Figure 15 5.8.3 Indoor Sensor... -
Page 18: Temperature And Humidity Trend
Figure 16 5.8.3.2 Changing Indoor Channel Numbers The console supports up to seven wireless indoor/outdoor sensors. If you have two or more sensors, press the CHANNEL button to switch to different channels. Press and hold the CHANNEL button for two seconds to automatically scroll between the indoor channels every four seconds. -
Page 19: Average Wind Speed Vs. Wind Gust
Wind speed reading Figure 19 5.9.1 Average Wind Speed vs. Wind Gust To change the display between average wind speed and wind gust, press the WIND button on the top of the display. The wind speed is the average calculated by the sensor array in the 12 second update period. The wind gust is the maximum calculated by the sensor array in the 12 seconds update period, and then passed to the console. -
Page 20: Barometric Pressure Display And Settings
press the INDEX button again until the “N” icon appears on the weekday location. 3. Press the [ ] button to change to the Southern Hemisphere. The “S” icon will appear. 4. Press the INDEX button to confirm and exit. Note: Changing the hemisphere setting will automatically switch the direction of the moon phase on the display. -
Page 21: The Forecast
around the world. Relative pressure measurements greater than 29.92 inHg (1013 mb) are considered high pressure and relative pressure measurements less than 29.92 inHg are considered low pressure. To determine the relative pressure for your location, locate an official reporting station near you (the internet is the best source for real time barometer conditions, such as Weather.com or Wunderground.com), and set your weather station to match the official reporting station. -
Page 22: Uv Index
UV INDEX → BEAUFORT → WIND CHILL → HEAT INDEX → DEWPOINT 5.12.1 UV Index The UV index (UVI) is based on a range of 0 – 16. Figure 22 The US EPA defines the UVI as follows: Rating Comments A UV Index reading of 0 to 2 means low danger from the sun's UV rays for the average person. - Page 23 Calm < 1 km/h Calm. Smoke rises vertically. < 1 mph < 1 knot < 0.3 m/s Light air 1.1 - 5.5 km/h Smoke drift indicates wind direction. 1 - 3 mph Leaves and wind vanes 1 - 3 knot are stationary.
-
Page 24: Wind Chill
24.5 - 28.4 m/s Violent storm 103 - 117 km/h Widespread vegetation and structural damage 64 - 73 mph likely. 56 - 63 knot 28.5 - 32.6 m/s ≥ 118 km/h Hurricane force Severe widespread ≥ 74 mph damage to vegetation ≥... -
Page 25: Dew Point
Level Heat Index Notes Range (°F) Caution 80-90 Fatigue is possible with prolonged exposure and activity. Continuing activity could result in heat cramps. Extreme Caution 90-105 Heat cramps and heat exhaustion are possible. Continuing activity could result in heat stroke. Danger 105-130 Heat cramps and heat exhaustion are likely;... -
Page 26: Rainfall
Figure 30 5.13 Rainfall The rainfall displays total rain (since the last reset), hourly, daily, weekly, or monthly rain. Figure 31 5.13.1 Rain Units of Measure Command Mode Settings Press [ ] to change between mm → inch [RAINFALL] Enter Rain Settings Rain Units of Measure + 2 seconds Exit Rain Settings... -
Page 27: Resetting Rain To Zero
3. WEEKLY - the total rainfall of the current week 4. MONTHLY - the total rainfall of the current calendar month 5. TOTAL – the total rainfall since the last reset. 5.13.3 Resetting Rain to Zero In normal mode, press and hold the HISTORY button with 2 sec to reset the rainfall record. 5.14 Graph The history graph (GRAPH), at the bottom right of the LCD displays different weather parameters in bar graph format. -
Page 28: Min / Max
Outdoor °F, °C Past 72 hours temperature Indoor humidity Past 72 hours (according to the current channel 1-7) Outdoor Humidity Past 72 hours Rainfall mm, in Past 7 days Figure 33 5.15 Min / Max Press (do not hold) the MAX / MIN button on the front of the display to review the following: Command Parameter Daily Outdoor MAX temperature &... -
Page 29: History Data (Past 24 Hours)
[MAX/MIN] Daily Maximum Dew Point Daily Minimum Dew Point [MAX/MIN] [MAX/MIN] Daily Maximum Wind Chill [MAX/MIN] Daily Minimum Wind Chill Daily Maximum Heat Index [MAX/MIN] [MAX/MIN] Daily Minimum Heat Index [MAX/MIN] Daily Maximum UV Index Daily Maximum Beaufort Scale [MAX/MIN] Daily Maximum Relative Pressure [MAX/MIN] [MAX/MIN]... -
Page 30: Activating An Alert
to 0.2 hPa) (BARO) Rainfall 1 mm to 1000 Rainfall section 100 mm (3.93 [ALERT] mm (0.04 in to (RAINFALL) 39.37 in) [ALERT] Exit Alert setting mode [ALERT] means press the ALERT button Figure 34 8. After selecting the alert parameter, press and hold the ALERT buttons for 2 seconds to adjust, and the alert value will flash. -
Page 31: Wifi Setup
5. Once registered, you receive a station ID and password. Make a note of this. You will need to enter it into your weather station web interface shown in Figure 43 (Figure 36 is an example and your station ID and password will be different. Figure 36 Note: Your station ID will have the form: KSSCCCC###, where K is for USA station (I for international), SS is your state, CCCC is your city and ### is the station number in that city. - Page 32 b) Example 2. Connect to the console WiFi server with a Mac. Choose the Settings icon and Network . Connect to the PWS- WiFi network, as shown in Figure 38 (your WiFi network name may be slightly different, but will always begin with PWS-). Figure 38 c) Example 3.
- Page 33 icon, choose the Settings icon and Wi-Fi (Figure 41). Connect to the PWS- WiFi network, as shown in Figure 42 (your WiFi network name may be slightly different, but will always begin with PWS-). Figure 41 Figure 42 3. Once connected, enter the following IP address into any browser’s address bar: http://192.168.1.1 to access the console’s web interface: Note: Some browsers will treat 192.168.1.1 as a search, so make sure you include the header http://,...
- Page 34 Model number Select web interface language Select your WiFi Router (SSID) from the list Manually enter your SSID if not on the list Select your router’s security (usually WAP2) Router’s password (leave blank if unsecured) Check to confirm upload to Weather underground server Enter Station ID Enter station key / password Check to confirm upload to AmbientWeather.net...
- Page 35 Figure 44 5. If all of the information you entered, and is correct, the console LED will change from green to blue. If it does not change to blue or keeps flashing, check your web interface information again. The blue flashing light will time out after 30 minutes (if you do not plan on connecting the console to the Internet).
-
Page 36: Register With Ambientweather.net
Figure 45 6. Once the setup is completed, the Wi-Fi console will disconnect from your computer or smart phone’s Wi-Fi connection, and search for the assigned router. If the connection is successful, the Wi-Fi console’s status LED will change to blue and the Wi-Fi icon will stop flashing and remain on. -
Page 37: Viewing Your Data On Weather Underground
AmbientWeather.net is a responsive design and mobile friendly, so there is no need for a mobile app. Simply open your mobile devices web browser, browse to AmbientWeather.net, and bookmark your dashboard. If you save the bookmark to your desktop, it will automatically save the Ambient Weather icon, as shown in Figure 49. -
Page 38: Web Browser
6.4.1 Web Browser Visit: http://www.wunderground.com/personal-weather-station/dashboard?ID=STATIONID where STATIONID is your personal station ID (example, KAZSEDON12). Figure 50 6.4.2 WunderStation iPad Application Visit: http://www.WunderStation.com to download the WunderStation iPad app. Version 1.3 ©Copyright 2018, Ambient LLC. All Rights Reserved. Page 38... -
Page 39: Mobile Apps
Figure 51 6.4.3 Mobile Apps Visit: http://www.wunderground.com/download/index.asp for a complete list of Mobile apps for iOS and Android. Alternately, you can find your data on your mobile device’s web browser. Version 1.3 ©Copyright 2018, Ambient LLC. All Rights Reserved. Page 39... -
Page 40: Additional Ambientweather.net Features
AmbientWeather.net. Enable the skill and get started: say "Alexa, ask Ambient Weather for a weather report.". This will provide you with your outdoor weather report, but you can ask for your indoor weather report as well by saying, "Alexa, ask Ambient Weather about the indoor conditions."... -
Page 41: Works With Google Assistant
AmbientWeather.net Link your account to get started: say 'hey google, Ambient Weather... weather report.' This will provide you with your outdoor weather report. You can ask for your indoor weather report as well by saying, ' indoor conditions'. -
Page 42: Cleaning The Outdoor Thermo-Hygrometer Sensor
Figure 53 7.3 Cleaning the Outdoor Thermo-Hygrometer Sensor 1. Remove the 2 screws at the bottom of the radiation shield. 2. Gently pull off the shield. 3. Carefully remove any dirt or insects on the sensor casing (Do not let the sensors inside get wet). 4. -
Page 43: Uv Sensor Calibration And Cleaning
Figure 54 7.4 UV Sensor Calibration and Cleaning The UV sensor lens must be periodically cleaned with a damp cloth. 1 In normal mode, press and hold [ INDEX ] key for 8 seconds to enter UV index calibration mode 2 Use [ GRAPH / Ʌ... -
Page 44: Uv Sensor Degradation
7.4.2 UV Sensor Degradation Over time, the UV sensor will naturally degrade. The UV sensor can be calibrated with a utility grade UV meter. 7.5 Console Firmware Updates To find the latest firmware updates, visit: https://ambientweather.net/help/ws-8478-firmware/ 1. Extract or unzip the update zip file. 2. -
Page 45: Adding Or Subtracting Multiple Sensors
Figure 58 4. Reconnect the console’s AC power to start the update process (In the meantime, do not remove the USB stick) 5. During the update process the LCD will show the update status as shown in Figure 59. Figure 59 6. -
Page 46: Multiple Sensor Features
Section 3.3.1 for details. 4. Do not touch any buttons until synchronization is complete. 8.2 Multiple Sensor Features The console will scroll through the multiple channels, so there is no need to press the Channel button. Reference Section 5.8.3.2 for details. Wunderground.com does not support multiple sensor channels. -
Page 47: Measurement Specifications
9.2 Measurement Specifications The following table provides specifications for the measured parameters. Measurement Range Accuracy Resolution Indoor and Outdoor -4 to 140 °F alkaline 131 to 140°F: ± 0.9°F 0.1 °F/°C Temperature batteries (55 to 60°C: ± 0.5°C) -40 to 140 °F Lithium 50 to 131°F: ±... -
Page 48: Other Specifications
9.5 Other Specifications Time synchronize method: Synchronized through internet UTC time server Console Temperature Limits of Operation: 23 ˚F to 122 ˚F (-5˚C to 50˚C) 9.6 Weight Specifications Console: 1.3 lbs (590 grams) with batteries Sensor Array: 2.4 lbs (1096 grams) with batteries ... - Page 49 Problem Solution The wireless sensor communication has Make sure the transmitter is powered up and the been lost or is intermittent or will not sync LED is flashing about once per 12 seconds. For cold weather environments, install lithium batteries.
- Page 50 Problem Solution Console Time is off by increments of Make sure your time zone and Daylight Savings hours. Time are set properly (Reference Section 5.1.1). 11 Liability Disclaimer Please help in the preservation of the environment and return used batteries to an authorized depot. The electrical and electronic wastes contain hazardous substances.
- Page 51 • Consult the dealer or an experienced radio/TV technician for help. The Responsible party: Company Name: Ambient, LLC Address : 6845 W. Frye Road Chandler, AZ 85226 Phone : 1-(480)346-3380 13 Warranty Information Ambient, LLC provides a 1-year limited warranty on this product against manufacturing defects in materials and workmanship.
Need help?
Do you have a question about the FALCON WS-8478A and is the answer not in the manual?
Questions and answers