Table of Contents
Advertisement
Quick Links
Advertisement
Table of Contents

Related Manuals for Sitec Delta

Summary of Contents for Sitec Delta
- Page 1 ...keeping you secure Operator’s Manual...
-
Page 3: Table Of Contents
...keeping you secure Contents General Safety Instructions ......................4 1. Appropriate Use ......................... 4 2. Operator’s Duty of Care..................... 4 3. Safety Instructions......................5 4. Conditions of Guarantee..................... 6 Product Description........................7 1. Assembly and Product Functions..................7 2. Environmental Conditions....................8 3. -
Page 4: General Safety Instructions
General Safety Instructions 1. Appropriate Use The DELTA intercom system has been specially developed for use in banks, at cash desks, company reception areas or gatehouses, stations, night desks, ticket offices, border crossing points, customs offices, tollbooths, currency exchanges, government offices and authorities, and transfer locks. -
Page 5: Safety Instructions
...keeping you secure 3. Safety Instructions The DELTA intercom is modular. The electrical connections between the individual components are pre-assembled, colour-coded and pluggable. The connectors have differing contact configurations, so that the individual leads cannot be incorrectly connected, provided force is not used to plug them into the wrong sockets. -
Page 6: Conditions Of Guarantee
Our guarantee is limited to our own products and we accept no liability for consequential damages. Please send guarantee claims in writing directly to our customer services, together with all DELTA intercom components. SITEC GmbH - Customer Service Security Products and Equipment Johann-Georg-Herzogstraße 19 D-96369 Weißenbrunn - Hummendorf Germany Tel.:... -
Page 7: Product Description
Product Description 1. Assembly and Product Functions The DELTA intercom system consists as a minimum of a central control with mains adaptor, a main control and an extension. The central control is the central point of the system. The electricity supply, the main control and the extension are connected to it. -
Page 8: Environmental Conditions
...keeping you secure 2. Environmental Conditions The operator must ensure that the DELTA intercom is only operated when functioning properly, and in good condition. The room temperature for the intercom can be anywhere between –10°C und +60°C. A wider temperature range requires a special product: please contact our customer service for further information. -
Page 9: Assembly And Set Up
...keeping you secure 3. Assembly and Set Up The individual components have pluggable connecting leads. The plugs are colour coded and should be plugged into the corresponding sockets. The connectors have a variety of contact configurations, thus preventing the individual leads from being mixed up, provided they are not pushed forcefully into the wrong sockets. - Page 10 See page 28 for further information. The DELTA intercom has optional additional loudspeakers, wired headsets or wireless radio headsets. Please contact our customer service or sales department for further information. Note: Only our own original accessories should be connected to the sockets. If components from another manufacturer are connected and operated, we cannot guarantee the electrical safety and the operational safety of the system.
-
Page 11: Commissioning
...keeping you secure 4. Commissioning Once all the electrical connections have been put in place, the DELTA intercom can be switched on. The mains adaptor should now be installed and connected. The connecting plug on the mains adaptor should be plugged into the appropriate socket in the Main Control (see sketch on previous page). -
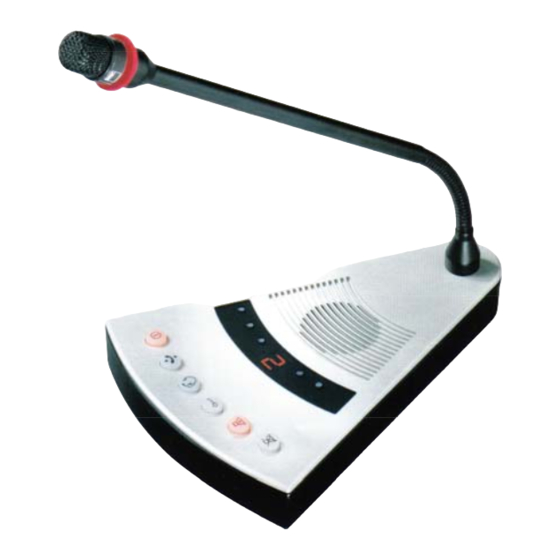
Page 12: Using The Intercom
...keeping you secure Using the Intercom 1. Description of the Controls External Internal Attenuation or Feedback Volume Volume Suppression + / - Buttons Display On/Off-Standby Headset Announcement Button On/Off (Paging) Call Acceptance Door Opener or Switch Contact Mute Version 1.2... -
Page 13: Operating The Intercom
...keeping you secure 2. Operating the Intercom The following details refer first of all to an intercom with one main control and one extension whose condition is as delivered. Any operating functions which differ are explained in detail from page 18. 2.1 Switching the Intercom On Briefly press the on/off button. -
Page 14: Cancelling Standby Mode
...keeping you secure 2.3 Cancelling Standby Mode Briefly press the on/off button. The button changes from a flashing light to a fixed press light, indicating that the intercom is ready to operate. The swan-neck microphone ring also lights up to show that it is functioning. -
Page 15: Setting Volume And Attenuation
...keeping you secure 3. Setting Volume and Attenuation The volume and attenuation levels can be increased or reduced by 16 levels each. AS the LED only displays one digit, the 16 levels are shown in hexadecimal code. 0 - 1 - 2 - 3 - 4 - 5 - 6 - 7 - 8 - 9 - A - b - C - d - E - F “0”... -
Page 16: Set Internal Volume
3.3 Set Attenuation The Delta intercom uses an automatic speech equaliser. Its intelligent electronics automatically reduce the volume of the direction of speech which is not in use. This suppresses feedback as far as possible. - Page 17 ...keeping you secure Increasing Attenuation Hold down the “Attenuation” button. The display hold press shows the current attenuation level (preset at “8”). Press the “+” button. Each time it is pressed, the attenuation is increased by one level up to the maximum.
-
Page 18: Special Functions
...keeping you secure 4. Special Functions Depending on the DELTA intercom’s configuration (number of extensions, accessories connected), the following functions can be carried out, using the function buttons on the main control. 4.1 Receiving Calls If several extensions are connected to the intercom, use the “call receive” button to connect to a specific extension. - Page 19 ...keeping you secure Note: If the system is in standby mode, select the extension using the + and – buttons, and by pressing the on/off button to switch on the intercom, the connection to the required extension can be made simultaneously. If the employee only wants to connect briefly to another extension, e.g.
-
Page 20: Headset On/Off
7 in the set up menu, and for further information see page 28. 4.3 Door Opener or Switch Contact A switch contact is available on both the main control of the Delta intercom and the extension signal amplifiers (See p.31ff for description of connection). This switch contact allows you to e.g. -
Page 21: Announcements/Paging
...keeping you secure 4.4 Announcements/Paging For as long as this button is pressed, either the volume to the extension which is connected at that time is increased, or you are switched to a separate paging loudspeaker, which may e.g. be in a waiting room. This depends on the configuration of menu point 6 in the set up menu;... -
Page 22: Intercom Set Up
...keeping you secure Intercom Set Up 1. Accessing the Set Up Menu The Delta intercom has a set up menu in order to be best suited to the local operating conditions. The set up menu is divided into 10 menu functions (0-9). -
Page 23: Overview Of Menu Functions
...keeping you secure The value can now be modified using the + and – select buttons (in this case from “0” to “2”). Press the “external volume” button to leave the confirm menu function. The value selected will thereby be adopted and stored. -
Page 24: Explanation Of The Menu Functions
...keeping you secure 3. Explanation of the Menu Functions The following explains the individual menu functions in detail. The value in bold is the status at delivery. 3.1 Menu function 0 - Mute This menu function adjusts the settings for the “mute” button. This function can be set separately for each extension. - Page 25 ...keeping you secure In systems with several extensions which are connected through signal amplifiers, this menu function is a little more complex. As each signal amplifier only has one switch output and one switch input, the way these connections function must be set using this menu function. The switch output can e.g.
-
Page 26: Menu Function 2 - External Gong Volume
...keeping you secure 3.3 Menu Function 2 - External Gong Volume This menu function allows the external gong function to be set. This function can be set up separately for each extension. When the “Announcements/Paging” button is pressed, there is no gong sound in the announcement or extension loudspeaker. -
Page 27: Menu Function 4 - Standby
...keeping you secure 3.5 Menu function 4 - Standby This menu function can be used to cancel the standby function. This function applies to all the connections to the individual extensions. No standby function The standby function can only be cancelled using the on/off button. The standby function can either be cancelled using the on/off button or if someone is speaking externally. -
Page 28: Menu Function 6 - Loudspeaker During Announcements
...keeping you secure 3.7 Menu function 6 - Loudspeaker during Announcements This menu function is used for setting whether the extension volume is increased when the “Announcements/Paging” button is pressed, or whether the announcement should be channelled through a separate announcement loudspeaker. If the function has been activated, announcements always go through a separate announcement loudspeaker, regardless of the extension to which you are currently connected. -
Page 29: Menu Function 9 - Number Of Extensions
The factory setting is “1” for one extension. 3.11 Reset to Factory Settings The DELTA intercom can be reset to the original factory settings at any time. To reset to factory settings, the following procedure should be carried out. Press... -
Page 30: Technical Data And Connection Diagrams
16-stage feedback suppression Connection of Accessories: The central control of the DELTA intercom has connections for accessories. Warning: Only our own original accessories should be connected to connection points 3 and If accessories or equipment from another manufacturer are connected to the intercom or any of its components, it may in the worst case destroy the intercom or its components. - Page 31 Point 3 - Connecting a Door Opener and “Please Speak” Message Display. A door opener and a message display can be connected to the central control of the DELTA intercom. If the “Door Opener” button on the main control is pressed, the door opener is controlled for about 3 seconds.
- Page 32 A call button, an infrared movement detector and the feedback contact of the door opener can be connected to the central control of the DELTA intercom. When the call button is pressed, a gong tone sounds in the loudspeaker of the main control (depending on the set up of menu function 3 in the set up menu –...
- Page 33 ...keeping you secure The signal amplifiers also have connectors for accessories. Microphone connection Loudspeaker connection Message display connection Call button connection Microphone Loudspeaker Power supply plug plug Extension Connection for plug connecting lead to central control Complete extensions can be connected at the signal amplifier using the available plugs. In addition, it is possible to connect the loudspeaker and microphone via the plugs or directly via the screw terminals.
-
Page 34: Overview Of Components And Accessories
...keeping you secure Overview of Components and Accessories The following components and accessories are available: Version 1.2... -
Page 35: Declaration Of Conformity
...keeping you secure Declaration of Conformity Version 1.2... - Page 36 ...keeping you secure Notes: Version 1.2...
- Page 37 ...keeping you secure Notes: Version 1.2...
- Page 38 ...keeping you secure Notes: Version 1.2...
- Page 39 ...keeping you secure Notes: Version 1.2...
- Page 40 Status: October 2007 Author: SITEC Sales/Tech. dept. Translation: Hilary Swanston E&OE © Sitec GmbH This document, or its constituent parts, may not be reproduced without our express permission.
Need help?
Do you have a question about the Delta and is the answer not in the manual?
Questions and answers