
Related Manuals for Stryker 1188HD


Summary of Contents for Stryker 1188HD
- Page 1 1188HD Video Camera User Guide 1188-010-000 1188-210-105 1188-410-105 1188-710-105...
-
Page 3: Table Of Contents
1188HD Video Camera User Guide Contents Warnings and Cautions ......... 3 Symbol Definitions ................5 Product Description and Intended Use ....7 Indications/Contraindications ............7 Camera Console ................8 Camera Head .................. 10 C-Mount Coupler ................11 Setup and Interconnection ......... 12 Setting Up the Console .............. - Page 4 Technical Specifications ........37 Electromagnetic Compatibility ............39 Warranty ............43 Service and Claims ..........44 EN-2...
-
Page 5: Warnings And Cautions
Warnings and Cautions Please read this manual and follow its instructions carefully. The words warning, caution, and note carry special meanings and should be carefully reviewed: Warning The personal safety of the patient or physician may be involved. Disregarding this information could result in injury to the patient or user. - Page 6 14. Never autoclave a camera head unless it is marked AUTOCLAVABLE Autoclaving regular camera heads will result in permanent device damage for which Stryker will not be responsible. 15. Disconnect the control unit from the electrical outlet when inspecting the fuses.
-
Page 7: Symbol Definitions
In addition to the cautionary symbols already listed, other symbols found on the 1188HD Camera and in this manual have specific meanings that clarify the proper use and storage of the 1188HD Camera. The following list defines the symbols associated with this product. - Page 8 Device meets requirements for safety and effectiveness set forth in MDD 93/42/EEC Federal law (USA) restricts this device to use by, or on order of, a physician Denotes compliance to CAN/CSA C22.2 No 601.1 and UL 60601-1 Power on/off (alternates when button is pushed) 1188 camera head Alternating current connection...
-
Page 9: Product Description And Intended Use
1188-710-105 0° cable) • C-mount coupler (P/N 1188-020-122; 1188-410-110 autoclavable) The 1188HD also comes with various connection cables which, like the other components, can be purchased together or separately. Part numbers 1188-210-105 and 1188-710-105 are not intended for sale in the European Union and do not bear a CE mark. -
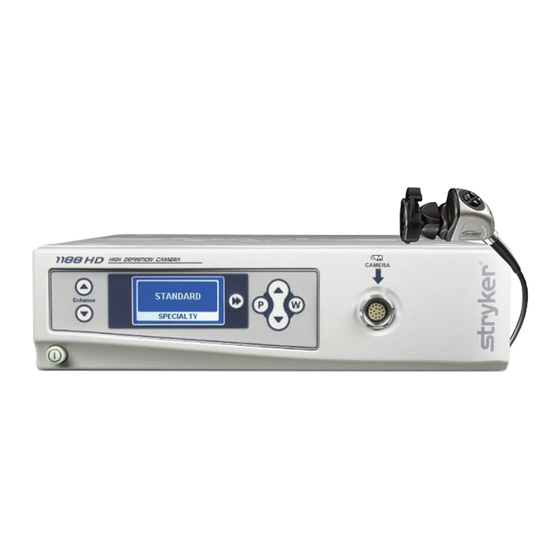
Page 10: Camera Console
The front panel also allows activation of remote outputs. The rear panel provides ports for connecting the 1188HD Camera to viewing and recording equipment, such as video monitors, the SDC Ultra, or photo printers. - Page 11 Up and Down Arrow Buttons: Controls image light or zoom level W Button: Controls white balance and image light or zoom level Camera Connector: Connects to the 1188HD Camera Head DVI Out 1: Digital video output 10. DVI Out 2: Digital video output 11.
-
Page 12: Camera Head
(see the “Operation Instructions” section of this manual). Figure 2 below lists the features of the camera head. Figure 2: 1188HD Camera Head Camera Cable Camera Head: Captures photographic and video images, provides camera controls, and connects with a focusing coupler... -
Page 13: C-Mount Coupler
C-Mount Coupler The C-Mount coupler threads onto the face of the camera head, enabling a scope to be attached to the camera. It provides a focusing ring to adjust image sharpness. The features of the coupler are listed in Figure 3 below. Additional instructions are available in the “1188 C-Mount Coupler User Guide”... -
Page 14: Setup And Interconnection
Setup and Interconnection Note Stryker Endoscopy considers instructional training, or inservice, an integral part of the 1188HD Medical Video Camera. Your local Stryker Endoscopy sales representative will perform at least one inservice at your convenience to help set up your equipment and instruct you and your staff on its operation and maintenance. - Page 15 **On some monitors, S-VHS inputs may be labeled Y/C. **The DVI connectors can also output analog SXGA signals through a DVI-I to VGA adapter. • Use the cables and outputs described above to connect the 1188HD to other operating-room equipment. Wiring Diagrams 1-3 on the following pages describe typical set-ups.
- Page 16 Wiring Diagram 1: Camera and Flat-Panel Monitor EN-14...
- Page 17 Wiring Diagram 2: Camera, SDC, SIDNE ® , and Flat-Panel Monitor Stryker European Rep. - RA/QA Manager ZAC Satolas Green Pusignan Av. De Satolas Green 69881 MEYZIEU Cedex, France EN-15...
- Page 18 Wiring Diagram 3: Camera, Flat-Panel Monitor and CRT Monitor Note If you are using any device with unterminated analog video inputs, you must connect a cable from the VIDEO OUT of that device to the VIDEO IN on the monitor. Note An additional monitor may be connected using an open camera output.
-
Page 19: Setting Up The Camera Head
Setting Up the Camera Head Connect the camera head to the console. • Unscrew the soaking cap from the cable connector if necessary. • Align the blue arrow on the cable connector with the blue arrow on the camera-connector port on the front console panel (see Figure 4). •... - Page 20 Caution When attaching or removing the coupler, grip only the rear adapter, as twisting other parts of the coupler may result in mechanical damage. Caution Do not overtighten the coupler, as this may damage the front window of the camera. Note For direct-coupled C-mount scopes (scopes that require no coupler), thread the endoscope directly into the camera head...
-
Page 21: Operation Instructions
“Setup and Interconnection” section of this manual. Warning Before using the 1188HD Camera in a surgical procedure, test all components to ensure proper function. Ensure that a video image appears on all video monitors before beginning any procedure. - Page 22 W (White Balance) Button The W button activates the white-balance function or the light/zoom function. The white balance function is used to correct slight color differences that exist between different light sources or endoscopes. • Press the W button for more than one second to activate the white- balance function.
-
Page 23: Selecting The Display Language
• Hysteroscopy • Laparoscopy • Laser • Microscope • Standard The front panel LCD will display the current specialty. Selecting the Display Language The 1188HD has the capability of displaying text in the following languages: Danish German Polish Dutch Greek Portuguese... -
Page 24: Using The Configuration Menu
Press the P button again to exit the Configuration Menu. Controlling Remote Video Accessories The 1188HD Camera can remotely control up to two video accessories (such as the SDC Ultra, a VCR, or a photo printer), enabling the user to capture images or start and stop video recording by pressing the P button. -
Page 25: Using The Sfb Serial Interface
This system feature requires an additional device (that is, a computer) to connect to SMS. Using the DVI Fiber Outputs The 1188HD Camera contains four laser diodes to transmit a DVI output over fiberoptic cables. Connect four individual fibers (terminated in Lucent connectors) to the red (R), green (G), blue (B) and clock (C) laser diodes on the console rear panel. -
Page 26: Operating The Camera With A Light Source
Operating the Camera with a Light Source Warning IMPORTANT SAFETY NOTICE: Before operating this device, please read this operating manual thoroughly and carefully. When using this device with a light source, fire and/or severe injury may result to the patient, user or inanimate objects, if the instructions in this manual are not followed. -
Page 27: Troubleshooting
Troubleshooting Problem Possible Solution “System Error” • Camera head temporarily shut down due to message overcurrent. (Color bar • Turn off the console, wait 3 seconds, and turn it back background) • After sterilization, ensure the camera head has cooled down before connecting it to the console. - Page 28 Shutter On Noise or snow on • Plug the electrocautery generator into a separate picture when using electrical outlet and separate the 1188HD power cord electrocautery from the electrocautery power cord. probes • Separate the camera cable from the electrocautery cable.
- Page 29 • Ensure the specialty switch is not set to FLEXI-SCOPE unless you are using a flexible scope. Note If this troubleshooting guide does not resolve the problem, call Stryker Technical Support at 1-877-478-7953 (inside the U.S.) or refer to the “Service and Claims” section of this manual. EN-27...
-
Page 30: Cleaning And Sterilization
Cleaning and Sterilization The camera console is not intended to come into contact with the patient. It may be cleaned, but not sterilized. The camera head and coupler may contact the patient and must both be cleaned and sterilized prior to every use. Cleaning the Camera Console Warning Disconnect the console from the AC power source before... - Page 31 • Inspect the camera cable for cuts and breaks before soaking in any fluid. Return any damaged camera to Stryker for service. • Never soak the camera in the same tray with sharp instruments.
- Page 32 Instructions Point of Use • Wipe excess soil from the device using disposable paper towels. • If an automated reprocessing method will be used, rinse any channels in the device with 50mL of sterile distilled water immediately after use. Containment and Transportation •...
- Page 33 Cleaning: Manual 1. Brush • Thoroughly brush the exterior of the device with a soft-bristled brush, focusing on any mated or rough surfaces. • Inject any lumen or mated surface a minimum of five times with at least 50mL of the detergent. •...
- Page 34 Cleaning: Automated 1. Brush • Brush both ends of any lumens a minimum of five times, using an appropriate bottle brush. 2. Rinse • Rinse the device with treated water at ambient temperature until there is no visible detergent residue. Continue to rinse for a minimum of 30 seconds after all detergent residue has been removed.
- Page 35 • Inspect all components for cleanliness. If fluid or tissue buildup is present, repeat the above cleaning and disinfection procedures. • Inspect the camera cable for cuts and breaks. Return any damaged camera to Stryker for service. Packaging Sterilization After performing the cleaning instructions specified above, perform one of the following sterilization cycles.
- Page 36 Steam Note for United States users: For all autoclave-compatible devices, Stryker recommends using steam sterilization instead of liquid chemical sterilization. • Steam sterilization is intended only for camera heads and couplers marked AUTOCLAVE • Rapid cooling, or “quenching, ” the coupler after autoclaving will result in product damage.
- Page 37 Steris System 1 / System 1E Note: Steris® System 1™ is not intended for use in the United States. Do not sterilize the autoclavable camera head (1188-410-105) with Steris System 1E. Clean and prepare the camera head and cable as recommended in this user guide.
-
Page 38: User Maintenance
Note Refer calibration and operating difficulties not detailed in this manual to your Stryker Endoscopy sales representative. Disposing of the 1188HD The 1188HD must be disposed of according to local laws and hospital practices. EN-36... -
Page 39: Technical Specifications
This product is considered electronic equipment and must not be disposed of as unsorted municipal waste and must be collected separately. Please contact the manufacturer or other authorized disposal company to decommission your equipment. Technical Specifications 60Hz settings are displayed first. (50Hz settings follow in parentheses.) Imaging System 1/3"... - Page 40 This product complies with 21CFR, Subchapter J, Parts 1040.10 and 1040.11, except for deviations pursuant to Laser Notice No. 50, dated July 26, 2001. Please contact your local Stryker Endoscopy sales representative for information on changes and new products. EN-38...
-
Page 41: Electromagnetic Compatibility
1188HD Camera. Guidance and Manufacturer's Declaration: Electromagnetic Emissions 1188HD Camera is intended for use in the electromagnetic environment specified below. The customer or the user of 1188HD Camera should ensure that it is used in such an environment. Emissions test Compliance... - Page 42 Guidance and Manufacturer's Declaration: Electromagnetic Immunity 1188HD Camera is intended for use in the electromagnetic environment specified below. The customer or the user of 1188HD Camera should ensure that it is used in such an environment. Electromagnetic IEC 60601 Test...
- Page 43 Guidance and Manufacturer's Declaration: Electromagnetic Immunity 1188HD Camera is intended for use in the electromagnetic environment specified below. The customer or the user of 1188HD Camera should ensure that it is used in such an environment. Immunity IEC 60601 Test...
- Page 44 1188HD Camera is intended for use in the electromagnetic environment specified below. The customer or the user of 1188HD Camera should ensure that it is used in such an environment. (a) Field strengths from fixed transmitters, such as base stations for radio (cellular/cordless) telephones and land mobile radios, amateur radio, AM and FM radio broadcast, and TV broadcast, cannot be predicted theoretically with accuracy.
-
Page 45: Warranty
The customer is responsible for returning the defective equipment to the factory at his or her own expense. Stryker Endoscopy or its representative will service the unit, repair or replace any defective parts thereof, and return the unit. -
Page 46: Service And Claims
Package all the components carefully in the original shipping container if possible. Ship the camera, prepaid and insured to: Stryker Endoscopy Customer Service Attention: Repair Department 5900 Optical Court San Jose, CA 95138 © Stryker and Stryker Endoscopy are registered trademarks of Stryker Corporation. EN-44... - Page 48 U.S. Patents: www.stryker.com/patents Stryker Corporation or its divisions or other corporate affiliated entities own, use or have applied for the following trademarks or service marks: SIDNE and the Stryker logo. All other trademarks 2016/04 are trademarks of their respective owners or holders.
Need help?
Do you have a question about the 1188HD and is the answer not in the manual?
Questions and answers