Table of Contents
Advertisement
Quick Links
Advertisement
Table of Contents

Related Manuals for Millipore Direct Detect


Summary of Contents for Millipore Direct Detect
- Page 1 User Guide Direct Detect Spectrometer ®...
- Page 2 Corporation nor any of its affiliates assumes responsibility for any errors that may appear in this document. Made in Germany The M logo, Millipore, Direct Detect, and Amicon are registered trademarks of Merck KGaA, Darmstadt, Germany. All trademarks of third parties are the property of their respective owners.
-
Page 3: Table Of Contents
Direct Detect® Assay-free Card and Sample Preparation ........12 Direct Detect® Assay-free Card ......................12 Sample Preparation ........................... 13 10 How to Use the Direct Detect® Spectrometer ............14 10.1 Accessing Direct Detect® Software ....................... 14 10.2 Loading and Installing the Card ......................15 10.3 Measurement .............................. - Page 4 14.3 Operation Qualification Protocol (OQ) ....................42 14.4 Performance Qualification Protocol (PQ) .................... 42 14.5 Protein Measurement Verification ......................42 14.6 Direct Detect® System IQ/OQ/PQ Report Summary ................. 44 15 Specifications......................45 16 Ordering Information ....................46 17 Technical Assistance ....................47 18 EC Representative ....................
-
Page 5: Introduction
(PTFE) membrane that is transparent in most of the infrared spectral region. The Direct Detect® system measures amide bonds in protein chains, accurately quantifying an intrinsic component of every protein without relying on amino acid composition, dye binding properties, or redox potential. -
Page 6: Components Supplied
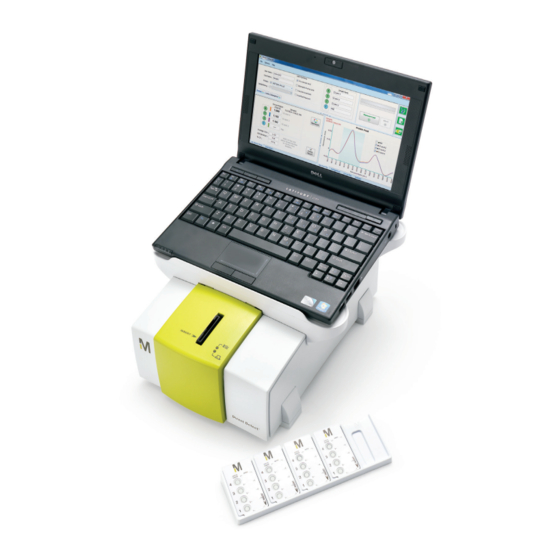
Components Supplied The Direct Detect® system includes the following components: Figure 1. Components supplied Direct Detect® spectrometer Instrument power adapter with 4 power cord/plug configurations (EU, UK, US, Japan) Data cable (crossover, 10Base-T Ethernet with RJ45 connectors) Dell® Netbook computer with Direct Detect® Software installed... -
Page 7: Symbols Used In This User Guide
For information on recycling electrical and electronic products in the European Union, please visit www.millipore.com/weee. Hot Surface Product Labeling Figure 2. Product label appears on both the back and the bottom of the instrument Direct Detect® Spectrometer User Guide... -
Page 8: Safety Precautions
● Always ensure that the power supply input voltage matches the voltage available in your location. ● Use only the power supplies that were supplied by EMD Millipore Corporation for use with the Direct Detect® system. Use of other power supplies may damage the system. -
Page 9: Site Requirements
NMRs, or high-powered lasers in close proximity to the Direct Detect® spectrometer. These devices can cause a spectrometer malfunction. Make sure that these types of devices are not connected to the same electrical circuit as the Direct Detect®... -
Page 10: Installation Configuration
6.3 Installation Configuration The Direct Detect® spectrometer is configured to operate as a stand-alone unit connected to the supplied Netbook computer (PC) using the factory-set standard IP address (10.10.0.1). 6.4 Unpacking and Setting up the Computer Unpack the Netbook computer, power adapter, and world-wide plug adapter from the shipping box. - Page 11 6.5.2 Initializing the Direct Detect® Spectrometer 1. Refer to the Direct Detect® Software User Guide for instructions on starting up the software and logging in (section 1.2). 2. During initialization, the laser, IR source, and detector are switched on. The IR source warms up, the scanner moves forward and backward several times, and tones once.
-
Page 12: Direct Detect® Spectrometer Parts And Functions
Direct Detect® Spectrometer Parts and Functions 7.1 General Technical Features 7.1.1 The Instrument The Direct Detect® spectrometer is a small compact FTIR spectrometer designed for measuring IR absorbance. Figure 5. Direct Detect® spectrometer Definition 5A Instrument module (with integrated electronics and optics) 5B Slot for Netbook stand tab 5C Direct Detect®... - Page 13 The connecting ports (e.g., power, Ethernet) and the system diagnostic LEDs are on the back of the instrument. 6B 6C 6E 6G 6H 6I 6J Figure 6. Direct Detect® Spectrometer rear side - Connecting ports and LEDs Type Definition 6A USB port Not available to user.
-
Page 14: Direct Detect® Computer And Software
7.2 Direct Detect® Computer and Software The Direct Detect® spectrometer is designed to operate with the Direct Detect® Software that is pre-installed on the Netbook computer. For computer specifications, refer to section 15. Direct Detect® Software may be updated periodically. For information on the most up-to- date software, go to www.millipore.com/directdetect. -
Page 15: General Guidelines
General Guidelines The Direct Detect® spectrometer is recommended for use with protein samples ranging from 0.25 to 5 mg/mL. Although the instrument can measure protein concentrations from 0.1 mg/mL to around 30 mg/mL, the most accurate results are achieved within the recommended concentration range. The instrument is also capable of detecting and analyzing lipids and detergents. -
Page 16: Direct Detect® Assay-Free Card And Sample Preparation
Including drying time, the total measurement time for a card loaded with 2 µL samples does not exceed 5 minutes. The Direct Detect® Assay-free card is intended for one-time protein and/or lipid/detergent spotting. However, already prepared cards can be stored and read again. -
Page 17: Sample Preparation
Analysis of detergents can be performed directly from buffer. Due to the excessive time required to achieve dryness, samples containing more than 5% of the analyzed detergent should be avoided. The limits of lipid and detergent detection and quantification should be established experimentally for each compound analyzed. Direct Detect® Spectrometer User Guide... -
Page 18: How To Use The Direct Detect® Spectrometer
How to Use the Direct Detect® Spectrometer The instrument is controlled and operated by Direct Detect® Software installed on the Netbook computer. Samples are introduced to the instrument module by inserting the Direct Detect® Assay-free card into the card holder (Figure 11). An alignment notch on one corner of the card ensures correct card insertion into the card holder. -
Page 19: Loading And Installing The Card
Figure 11. Inserting sample card The arrow on the bottom right side of the card should be aligned with the arrow on the Direct Detect® card holder module (5D in Figure 5). Gently release the card and the instrument will accept it for analysis. -
Page 20: Measurement
(refer to section 4.2 in the Direct Detect® Software User Guide). Lipids and detergents can be analyzed using a Relative Absorbance mode. - Page 21 Result tab (Figure 14) of the main Direct Detect® screen. Figure 14. Last sample results screen 3. For reporting options, refer to sections 2.4–2.7 of the Direct Detect® Software User Guide. NOTE: Periodically the software will initiate a reference measurement which must be performed without a sample card inserted in the card holder.
-
Page 22: Removing The Card
10.3 Measurement, continued Section 4.2 of the Direct Detect® Software User Guide details how to use the Calibration Method Wizard to create or modify a calibration method file. Figure 16. Calibration Method start page 10.4 Removing the Card After all 4 positions on the card have been read, the instrument will sound a tone. The card will rise to the initial insertion position and can be removed. -
Page 23: Switching From Direct Connection To Intranet Connection (Networking)
Switching from Direct Connection to Intranet Connection (Networking) During initial setup, the Direct Detect® instrument is connected directly to the computer running the Direct Detect® software using the crossover 10Base-T cable with RJ45 connectors provided with the instrument (direct connection). After verification of instrument and software functionality, the instrument can be configured to run directly from your company’s intranet (intranet connection), if... -
Page 24: Changing From Direct Connection To Intranet Connection
You can continue to the next step in the utility only if all requirements are valid. Figure 19. Status of requirements 11.2 Changing from Direct Connection to Intranet Connection IMPORTANT: This section assumes that the Direct Detect® instrument is currently connected directly to the computer using the supplied crossover 10Base-T cable with RJ45 connectors. - Page 25 11.2 Changing from Direct Connection to Intranet Connection, continued 5. The software will now make the necessary modifications to the Direct Detect® software and instrument, as well as the host computer. If the modifications are successful you will be informed that your instrument settings have been updated.
-
Page 26: Changing From Intranet Connection To Direct Connection
Figure 23. Selecting direct connection 3. Select the Next button to proceed. 4. The software will now make the necessary modifications to the Direct Detect® software and instrument, as well as the host computer. If the modifications are successful you will be informed that your instrument settings have been updated (Figure 24). - Page 27 IT department or contact Technical Service (section 17). 11. Select the Finish button to close the software. You should now be able to perform measurements using the Direct Detect® instrument connected directly to the computer. Direct Detect® Spectrometer User Guide...
-
Page 28: Changing Computer Network Settings Manually
2. Select your network connection, and then select option Change settings of this connection. 3. This opens the Local Area Connection Properties dialog. Select the connection Internet Protocol Version 4(TCP/IPv4) and then select the Properties button to view this connection’s properties. Figure 27. Accessing the connection’s properties Direct Detect® Spectrometer User Guide... - Page 29 11.4 Changing Computer Network Settings Manually, continued 4. Depending on the desired configuration, choose one of the following options: For a direct connection between the Direct Detect® instrument and the computer, enter the custom IP address 10.10.0.100 and subnet mask setting 255.255.255.0 (Figure 28).
-
Page 30: Troubleshooting
Troubleshooting 12.1 General Information The status of the Direct Detect® spectrometer is indicated by both the instrument status light (located on the top right side of the instrument under the Netbook tray (5E in Figure 5)) and the hardware diagnostics icon (located in the upper right corner of the Direct Detect®... -
Page 31: Problems Indicated By Hardware Diagnostics Icon
Click on the hardware diagnostics icon and the hardware diagnostics dialog opens. Figure 31. Hardware diagnostics dialog - Instrument Status More information on hardware diagnostics is available in section 5.1 of the Direct Detect® Software User Guide. If an issue cannot be resolved with the help of this diagnostics section and/or the following troubleshooting tables, refer to section 17 for information on... -
Page 32: Problems Indicated By Instrument Status Light (Top Of Instrument)
(Figure 31). If the laser, interferometer, electronics, automation, or detector is defective, contact Technical Service. If the IR source is defective, refer to section 13.1 for instructions on how to replace it. Direct Detect® Spectrometer User Guide... -
Page 33: Problems Indicated By Instrument Validation Icon
Refer to section 5.2 of the Direct Detect® Software User Guide for details on instrument validation. Instrument An instrument validation To find out which instrument validation test has failed, validation icon test has failed. -
Page 34: Maintenance
Maintenance The Direct Detect® spectrometer is a low-maintenance instrument and the operator can replace components with a limited service life. Replacing the IR source and desiccant are described in this section. WARNING Perform only the maintenance procedures described in this manual and observe the relevant safety precautions. - Page 35 Figure 33. Removing the IR source 4. Loosen the two mounting screws on the IR source (Figure 33) with the Torx® screw driver. 5. Disconnect the green source plug (Figure 33). 6. Pull the source out from the spectrometer housing. Direct Detect® Spectrometer User Guide...
- Page 36 9. Plug the green source plug into the SRC female connector. Figure 35. Replacing IR source Torx® screws 10. Attach the cover plate and fasten the 4 Torx® screws (Figure 32). Plug the power plug into the power outlet again. Direct Detect® Spectrometer User Guide...
-
Page 37: Replacing The Desiccant
13. After the test has finished, run the Operational Qualification test by clicking on the Operational Qualification Run Test button (2). 14. If the instrument passes the test, the hardware diagnostics icon turns green. If the instrument fails, refer to section 5.1 in the Direct Detect® Software User Guide. 13.2 Replacing the Desiccant Excessive humidity inside the spectrometer may cause H O bands in the spectrum. - Page 38 (Figure 32) with the Torx® screw driver supplied and take off the cover plate. Desiccant pack Figure 38. Replacing the desiccant 3. Pull out the used desiccant pack. A pair of tweezers may be helpful. Direct Detect® Spectrometer User Guide...
-
Page 39: Cleaning
The outer spectrometer surface can be cleaned with a damp or dry cloth. Do not use detergents with organic solvents, acids, or bases! CAUTION: Do not try to clean the interior of the spectrometer as this may lead to serious spectrometer damage. Direct Detect® Spectrometer User Guide... -
Page 40: Description Of Instrument Validation Tests
The average of ten measurements must not exceed the predefined limit. ● Wavenumber Accuracy Test: - This test ensures that the frequency calibration of the instrument is within the defined limits using an internal polystyrene standard sample. Direct Detect® Spectrometer User Guide... - Page 41 The OQ test protocol consists of the following four tests: ● Wavenumber Resolution Test: This test verifies the achievable spectrometer resolution by measuring a single-channel (single-beam) spectrum of the water vapor available inside the spectrometer, using the maximum available resolution. Direct Detect® Spectrometer User Guide...
- Page 42 1576.130 cm -1 Measured Band: 1576.129 cm -1 Maxim um Deviation: 0.050 cm -1 Measured Deviation: 0.001 cm -1 Overall Test Result = PASSED Figure 40. OQ test report Date and Signature Date and Signature Direct Detect® Spectrometer User Guide ...
-
Page 43: Running The Instrument Validation Oq And Pq Tests
Run Test button (2). The test takes about a minute to run. For information on interpreting test failures, refer to section 12.4. 13.6 Storage Store the Direct Detect® spectrometer and Assay-free cards in a clean, dry environment at 15–30 °C. Direct Detect® Spectrometer User Guide... -
Page 44: Installation, Operation, And Process Qualification Protocol (Optional)
PC software. 1. Set up the system as instructed in section 6.5.1. 2. Verify that the Direct Detect® system starts the initialization sequence and that successful completion is indicated by the status indicator light (5E in Figure 5) turning green. - Page 45 5, Diagnostics, in the Direct Detect® Software User Guide. Correct the problem, then click on the hardware diagnostics icon to verify that all of the check marks are green.
-
Page 46: Operation Qualification Protocol (Oq)
The majority of commercially available BSA standards use NaCl (with ) as a buffer; check manufacturer specifications. Pipette exactly 2 µL of the buffer solution to the default blank position on the card (position 1). Direct Detect® Spectrometer User Guide... - Page 47 4. Pipette exactly 2 µL of sample to sample positions 2 through 4. Card positions can be labeled if desired. 5. In the Direct Detect® Software main screen, complete the measurement setup as indicated in Figure 44. Choose NIST BSA AM1 from the protein drop down menu and check the Dry sample card box.
-
Page 48: Direct Detect® System Iq/Oq/Pq Report Summary
System PQ ● PQ test report indicates Overall Test Result = PASSED 14.5 Verification of Protein Measurement ● Direct Detect® measurement and UV reader measurement are within 10% of one another for a 2 mg/mL BSA standard. Testing completed by: Date:... -
Page 49: Specifications
Crossover, 10Base-T (10 or 10/100 MBit) with RJ45 connectors Processor Intel® Pentium® III, 800 MHz or greater Random Access Memory (RAM) 2 GB Graphics Card XVGA, 256 Mb RAM, 32-bit color depth, Open GL, GDI+ Direct Detect® Spectrometer User Guide... -
Page 50: Ordering Information
Ordering Information This section lists catalogue numbers for the Direct Detect® spectrometer and replacement parts. See Technical Assistance section for contact information. You can purchase these products on-line at www.millipore.com/products. Product Description Cat. No. Qty/Pk Direct Detect® Spectrometer Direct Detect® Spectrometer (includes instrument with power DDHW00010-WW adapter*, Dell®... -
Page 51: Technical Assistance
Technical Assistance For more information, contact the office nearest you. In the U.S., call 1-800-MILLIPORE (1-800-645-5476). Outside the U.S., go to our web site at www.millipore.com/offices for up-to-date worldwide contact information. You can also visit the tech service page on our web site at www.millipore.com/techservice.
Need help?
Do you have a question about the Direct Detect and is the answer not in the manual?
Questions and answers