Table of Contents
Advertisement
Quick Links
Advertisement
Table of Contents

Related Manuals for HITEC Eclipse 7 Pro


Summary of Contents for HITEC Eclipse 7 Pro
-
Page 1: User Manual
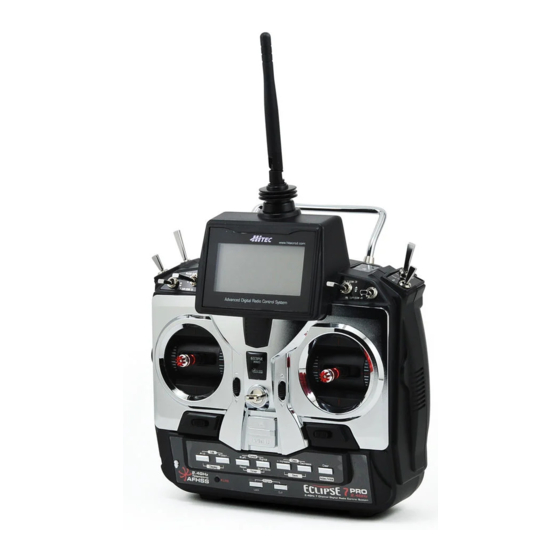
ECLIPSE 7 PRO 2.4G 2.4GHz Radio Control System USER MANUAL Hitec RCD KOREA INC. - Page 2 Congratulations and welcome to the R/C world! You now own a basic, but unusually versatile and powerful, 5-Channel beginner’s RC transmitter. The ECLIPSE 7 PRO 2.4G is all the radio you need to fly the most of 5-Channel fixed-wings aircraft models. Standard features include servo-reversing for all channels, trim adjustments on all control channels, ATV (Adjustable Travel Volume) on Aileron (CH.1) and Elevator (CH.2).
- Page 3 Collapse the student's antenna, and fully extend the instructor's antenna. If the student's transmitter has aremovable RF module, remove it from the transmitter. The Hitec cord is specifically marked at one end as the "master" Charge Jack Trainer Jack the other end as "student". Plug it accordingly into each transmitter, with power switched off.
- Page 4 If you are still having trouble, pack up your system in its original shipping materials and send it to the factory or the nearest authorized Hitec R/C Service Center. Be sure to include a note in your package that describes the trouble in as much detail as possible, including: Symptoms of the problem in as much detail as you can provide, including any unusual mounting conditions or equipment orientation A list of items you are sending, and what you want to be repaired.
- Page 5 Eclipse 7 Pro “Mode2” Control and Switch Assignments ECLIPSE 7 PRO MODE 2 TYPE SWITCH CONFIGURATION LIST FRONT...
- Page 6 You'll learn how to use these buttons in the setup sections that follow 6.the link button Can be used for link process between ECLIPSE 7 PRO to a Optima series receivers, entering the power down mode for range checks, and the Normal/Scan Mode set-up.
- Page 7 If any of your servos are located too far away to plug directly into the receiver (like the aileron servo), or you need to unplug the servo each time you disassemble the model, use a servo extension cord to extend the length of the servo lead. Additional Hitec extension cords of varying lengths are available from your hobby dealer.
- Page 8 Optic 6 Sport 2.4 transmitter. The instructor may override the beginner at any time to bring the model back under safe control. For training, the transmitter may be connected to another Hitec 2.4GHz system using the Hitec cord part (between 6 cell transmitter battery systems) or No.
- Page 9 If the instructor's transmitter is on a different frequency than the student's, use the student's transmitter as the master transmitter, and the other transmitter as the student's. 2) Turn on the instructor's transmitter and DO NOT turn on the student's transmitter power. Plug Trainer Cord (#58320 Stereo Jack) accordingly into each transmitter.
- Page 10 Note5 1) Do NOT turn on the power of the STUDENT transmitter having the STEREO Jack. Once you plug the trainer cable into the STUDENT Transmitter using the STEREO Jack, it will be powered on automatically. 2) All Transmitters in the trainer system use their own batteries. Both batteries in both the Instructor and Student Transmitters should be properly charged and installed when flying in the trainer mode.
- Page 11 5. Tighten up the tension spring hex screw on the new location, and try control the stick and feel it first if you like the tension of control stick. 6. Loosen up the tension spring hex screw on the original location. 7.
- Page 12 openings and cause erratic operation or loss of control. If you must fly in wet weather during a contest, be sure to protect your transmitter with a plastic bag or waterproof barrier.
-
Page 13: Fcc Information To User
FCC Information to User This equipment has been tested and found to comply with the limits for a Class B digital device, pursuant to Part 15 of the FCC Rules. These limits are designed to provide reasonable protection against harmful interference in a residential installation. This equipment generates, uses and can radiate radio frequency energy and, if not installed and used in accordance with the instructions, may cause harmful interference to radio communications. - Page 14 IMPORTANT Safety Instruction: 1) Read these instructions. 2) Keep these instructions. 3) Heed all warnings. 4) Follow all instructions. 5) Do not use this equipment near water. 6) Do not using near any heat sources such as radiators, heat resisters, stove, or other equipment that produce heat.
-
Page 15: Contact Information
CONTACT INFORMATION Manufacturer Address : 653, YangCheong-Ri, Ochang-Eup, CheongWon-Gun, Chung Buk Province, Korea To locate in-country Hitec RCD KOREA, INC. distributors of the ECLIPSE 7 PRO 2.4G please refer to the Hitec RCD KOREA, INC. Website http://www.hitecrcd.co.kr/ These distributor(s) represent local contacts for this product. -
Page 16: Declaration Of Conformity
653, YangCheong-Ri, Ochang-Eup, CheongWon-Gun, Chung Buk Province, Korea declare under our sole responsibility that the product(s) 2.4GHz Radio Control System – ECLIPSE 7 PRO 2.4G to which this declaration relate(s) is in conformance with the following standards: EN 301 489-1 V1.8.1:2008 EN 301 489-17 V2.1.1 :2009...
Need help?
Do you have a question about the Eclipse 7 Pro and is the answer not in the manual?
Questions and answers