Table of Contents
Advertisement
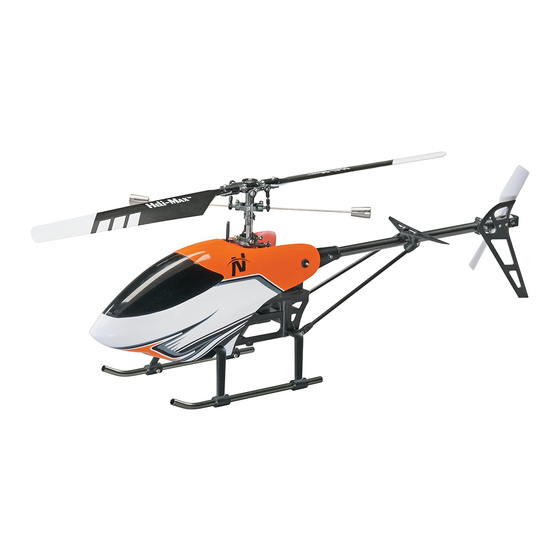
Novus FP Specifications
Length:
Width:
Height:
Rotor Span
Flying Weight:
Entire Contents © Copyright 2009
9.0 in [229mm]
1.6 in [41mm]
3.0 in [76mm]
7.9 in [200mm]
1.8 oz [51.3g]
(with supplied
flight battery)
Novus CX Specifications
Length:
Width:
Height:
Rotor Span
Flying Weight:
8.0 in [205mm]
1.6 in [40mm]
5.1 in [130mm]
6.9 in [175mm]
1.85 oz [52.6g]
(with supplied
flight battery)
HMXE0802/0803MNL01
™
™
™
™
Advertisement
Table of Contents

Related Manuals for Heli-Max Novus FP


Summary of Contents for Heli-Max Novus FP
- Page 1 ™ ™ ™ Novus FP Specifications Novus CX Specifications Length: Length: 9.0 in [229mm] 8.0 in [205mm] Width: Width: 1.6 in [41mm] 1.6 in [40mm] ™ Height: 3.0 in [76mm] Height: 5.1 in [130mm] Rotor Span Rotor Span 7.9 in [200mm] 6.9 in [175mm]...
-
Page 2: Important Precautions
important precautions • Only use the included charger with the included battery or replacement part (GPMP0408). • Do not attempt to use this charger with NiCd or NiMH battery packs. • Never charge in excess of 4.20V per cell. • If the battery should become damaged, discard the battery. Do not attempt to use a damaged battery. - Page 3 Further, Heli-Max reserves the right to change or modify this warranty without notice. In that Heli-Max has no control over the final assembly or material used for final assembly, no liability shall be assumed nor accepted for any damage resulting from the use by the user of the final user-assembled product.
-
Page 4: Table Of Contents
Open the “Helicopters” link, and then select the Novus CX or Novus FP link. If there is new technical information or changes to this model a “tech notice” box will appear in the upper left corner of the page. -
Page 5: Additional Items Required
• The spinning blades of a model helicopter can cause serious injury. When choosing a flying site for your Novus Helicopter, stay clear of buildings, trees and power lines. AVOID flying in or near crowded areas. DO NOT fly close to people, children or pets. Maintain a safe pilot-to-helicopter distance while flying. -
Page 6: Ordering Replacement Parts
(217) 398-8970. kit inspection Before starting assembly, take an inventory of the Novus FP/CX to make sure it is complete, and inspect the parts to make sure they are of acceptable quality. If any parts are missing or are not of acceptable quality, or if you need assistance with assembly, contact Product Support. -
Page 7: Kit Contents
™ kit contents ™ 1. Novus FP Helicopter 3. 4-Channel 2.4GHz Transmitter 2. 3.7V LiPo Battery 4. 110V Wall Charger ™ ™ 1. Novus CX Helicopter 3. 4-Channel 2.4GHz Transmitter 2. 3.7V LiPo Battery 4. 110V Wall Charger... -
Page 8: Assembly Instructions
assembly instructions Install Batteries in the Transmitter Remove the battery cover from the back of the transmitter and remove the battery box. Install eight (8) “AA” batteries into the battery box. Double-check the polarity of each battery before placing the battery box back into the transmitter and replacing the battery cover. -
Page 9: Get The Model Ready To Fly
Charging the Flight Battery WARNING! The charger supplied with the Heli-Max Novus Helicopter contains protective circuitry. If you experience any difficulties while charging the battery, please disconnect the battery from the charger and unplug the charger from the power source. -
Page 10: Lithium Battery Handling & Usage
WARNING! Do not leave the battery connected to the charger if the charge indicator is solid red. This may over-discharge the battery, possibly causing damage to the battery or the charger. Once the battery has been disconnected from the charger, contact technical support immediately for further assistance. Plug the battery into the charger. - Page 11 Land your model immediately when the battery begins to lose power. Recharge the battery before attempting another flight. A dangerous situation can occur when attempting to recharge an over-discharged battery! • ALWAYS charge the battery inside a fireproof container placed in a fireproof location clear of combustible materials.
-
Page 12: Preflight
preflight Turning the Model On The Novus Helicopter uses a 2.4GHz system that requires a binding process when the unit is powered up. This process involves connecting the flight battery to the ESC with the transmitter turned off. Ensure that the throttle stick is at its lowest position and turn the transmitter on. -
Page 13: Controls
controls Transmitter Controls All controls described as follows are with the tail pointing directly towards you. This is the best way to start out since it keeps the control inputs oriented the same. Once you start getting comfortable you can work on side hovering and nose-in. Moving the cyclic stick right will cause the helicopter to tilt right and start moving that direction. - Page 14 Moving the cyclic stick left will cause the helicopter to tilt left and start moving that direction. Moving the cyclic stick backwards (towards you) will cause the helicopter to tilt backwards and start moving that direction.
- Page 15 Moving the cyclic stick forward (away from you) will cause the helicopter to tilt forward and start moving that direction. Moving the collective stick up (away from you) will cause the helicopter to climb higher.
- Page 16 Moving the collective stick down (towards you) will cause the helicopter to descend. Moving the tail rotor stick towards the left will cause the helicopter nose to rotate left (counterclockwise).
-
Page 17: Flying
FP helicopter we highly recommend flying it in a large area of at least 35 feet [10.5m] square with no obstacles. Both the Novus CX and Novus FP are extremely lightweight and do not fly well in ground effect (air disturbance when the model is hovered below 1 foot [30cm]). - Page 18 Takeoff Slowly add power and observe the model. If you feel it needs trimming, do so before lift off. You will find that model helicopters never allow you to return the sticks to center. You just need to position the stick as needed to maintain a steady hover.
-
Page 19: Maintenance & Repair
Both the Novus CX and FP are very sturdy helicopters. On occasion it will be necessary to replace damaged parts after a crash. Please use this section as a guide to performing these steps. NOVUS FP – MAIN ROTOR BLADE REPLACEMENT Remove the blade bolt using a #00 phillips screwdriver. - Page 20 NOVUS FP – REPLACING THE MAIN GEAR Remove the lower retaining pin from the main gear using needle nose pliers. Remove the old main gear from the model and install the new main gear.
- Page 21 NOVUS FP – REPLACING THE TAIL SHAFT AND TAIL ROTOR Use a flat blade screw driver to carefully pry the tail rotor from the tail rotor shaft. Slide the tail drive gear off of the shaft. Slide the tail rotor shaft out the opposite side of the tail rotor case.
- Page 22 NOVUS FP – REPLACING A MOTOR Unplug the motor from the E-Board remove motor mounting screws. Remove the old motor and install the new motor. Reinstall the motor mounting screws and plug the motor connector back into the E-Board. NOVUS FP – E-BOARD CONNECTIONS...
- Page 23 The Heli-Max Novus CX and FP are very small helicopters. Working on these ™ small models will require very small tools. The DTXR0170 Duratrax Precision Phillips Screwdriver 00x75mm is recommended for both the Novus CX and FP. NOVUS CX – MAIN ROTOR BLADE REPLACEMENT Remove the blade bolt using a #00 phillips screwdriver.
- Page 24 NOVUS CX – REPLACING THE FLYBAR Remove the flybar linkage from the blade grip. Press outward on one side of the head block and simply rotate the flybar carrier from the head block. Once the flybar carrier has been removed, press the flybar weights inward and turn them 90 degrees.
- Page 25 NOVUS CX – REPLACING THE MAINSHAFT AND UPPER HEAD The Novus CX uses an inner solid main shaft and a hollow outer main shaft. Remove the lower main gear retaining screw. When performing the following step please be careful not to lose any small bearings or bearing blocks.
- Page 26 NOVUS CX – REPLACE THE TAILBOOM Loosen the tail boom screw and slide the tail boom out of the frame. Loosen the two screws used to attached the tail fin and tail assembly to the tail boom. Slide the tail assembly from the tail boom.
- Page 27 NOVUS CX – E-BOARD CONNECTIONS In addition to the connections there is an adjuster located on the other side of the E-Board. This adjuster is used to set the gyro gain. The factory setting is the optimum value. Due to different climates it may be necessary to make slight adjustments.
-
Page 28: Exploded View
View ™... -
Page 29: Parts List & Optional Parts
™ 1. HMXE8535 ..Main Rotor Blades Upper and Lower (4) Novus CX 2. HMXE8536 ..Flybar Assembly Novus CX 3. HMXE8537 ..Main Blade Grips (2) Novus CX 4. - Page 30 View...
- Page 31 12. HMXE7946 ..Battery Tray Novus FP 13. HMXE8431 ..Tail Rotor Gear Novus FP 14. HMXE8432 ..CF Tail Skid w/Tail Rotor Drive Shaft Novus FP 15. HMXE8433 ..Servo Frame Mount Novus FP 16.
- Page 32 Optional products available for the Novus CX CNC Main Blade Grips Upper & Lower Outer Shaft w CNC Retainer Collar HMXE7468 HMXE7469 CNC Head Block W Inner Rotor Shaft CNC Swashplate Assembly HMXE7470 HMXE7471...
- Page 33 Optional products available for the Novus FP Brushless ESC Brushless Motor HMXM3005 HMXG8013 RX2400BL Brushless Version Tail Motor Upgrade For Brushless Kit HMXM3006 HMXM8014 Brushless Upgrade Kit RX, ESC,Tail Motor, BL Motor HMXG8016...
- Page 34 Other fine products Heli-Max Axe ™ EZ EP Mini RTF HMXE05 ✱✱ Heli-Max Novus CX HMXE0803 Heli-Max AXE CPv3 Micro HMXE07 ✱✱ Heli-Max Axe CX Micro Coaxial RTF HMXE09 ✱✱...
- Page 35 Heli-Max Kinetic 50 ARF ™ HMXE0250 Heli-Max Novus FP HMXE0802 Heli-Max AXE 400 3D RTF HMXE0800 Heli-Max AXE 400 3D RxR HMXE0801...
Need help?
Do you have a question about the Novus FP and is the answer not in the manual?
Questions and answers