Table of Contents
Advertisement
Quick Links
Advertisement
Table of Contents

Related Manuals for AVer SF2121-BHR-30


Summary of Contents for AVer SF2121-BHR-30
- Page 1 AVer Rugged Bullet type Camera Installation Guide...
-
Page 2: Table Of Contents
Table of Contents Important Safeguard ............... 1 Package Contents................2 The following items are included in the package......2 Optional Accessories ..............2 Bullet IP Camera Parts ..............3 Mounting the IP Camera ................. 4 Deploying Network .................. 4 Network Connection via Ethernet Switch .......... -
Page 3: Important Safeguard
Impor tant Safe guard - Do not use power supply with different - Do not submerge the unit in the water. voltage other than DC12V/PoE. - Unplug the power of this unit as soon as - Unplug the power supply before cleaning. smoke or unusual odor is detected. -
Page 4: Package Contents
Packa ge Contents The following items are included in the package. AVer rugged bullet type camera Software & Manual CD 2 L-type Wrenches Sun Shield 2 Sun Shield Bolts Torx Pin Head Bolt Wall Mount Bracket Alignment Sticker 3 Screws... -
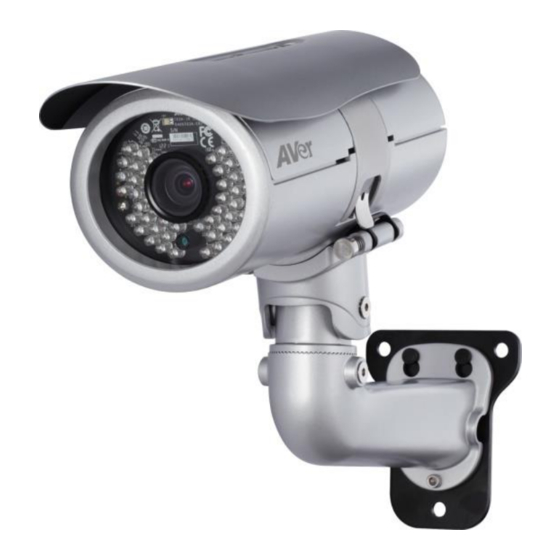
Page 5: Bullet Ip Camera Parts
Bullet IP Camer a Par ts (10) Function Sun Shield Camera Lens Light Sensor Latch Power Jack BNC Jack (Video Out) RJ45 Ethernet Jack I/O Terminal Block Phone Jack (Audio In) (10) Phone Jack (Audio Out) -
Page 6: Mounting The Ip Camera
M o u n t i n g t h e I P C a m e r a This section provides useful tips on how to adjust the IP camera to meet your needs. Dep lo yi ng N etw ork Network Connection via Ethernet Switch ... -
Page 7: Power Over Ethernet Connection
Power over Ethernet Connection Ruggedb bullet type casmera is fully complies with PoE standard. It allows you to use PoE enabled switch or PoE injector to transmit data and power thru single Ethernet cable. PoE Enabled Switch Connection Diagram PoE Switch ... -
Page 8: Connecting External Devices To I/O Terminal Block
Conn e ctin g E xt er na l Dev i c es to I /O Te rm in al B lo ck Function Power 12V Digital Output Digital Input Ground Note: Maximum power output is 12V/100mA Pow e r LE D Status (1) Steady Red Heating... -
Page 9: Mounting The Ip Camera
M ounting th e I P C a m er a Use the supplied 2 sun shield bolts and secure the sun shield on the IP camera. Place the sticker on the wall surface. Then spot the mark and drill the 4 holes indicated on the sticker. -
Page 10: Focusing The Ip Camera With Bnc Monitor
Focusing the IP Camera with BNC Monitor The IP camera is supported with BNC analog video out jack which allows you to connect an analog display devices such as an LCD BNC monitor for you to adjust the camera focus and zoom. -
Page 11: Insert Microsd Card To System
Inser t microSD Card to System Open up the IP camera case. Insert microSD card We recommend to use industrial grade microSD card (support operating temp from -40°C to 85°C ) for extreme temperature condition. -
Page 12: Hardware Reset
Hard ware Reset Open the IP camera case. Short PJ1 pins around 10 seconds. Warning!! This will cause all the configuration settings back to factory default. Technical Specifications SF 2 12 1H - B HR - 3 0 / SF 21 2 1H - BH R- 50 Lens spec. - Page 13 H 121.2°(W)~38.1°(T) View Angle V 62.1°(W)~21.3°(T) Camera image 0.2 Lux in day mode (IR off) Min. illumination 0 Lux in night mode (IR on) Built-in LED 50M, 48-piece IR LED (SF2121H-BHR-50) IR distance 30M, 32-piece IR LED (SF2121H-BHR-30) Built-in mechanical ICR Auto IRIS Video Compression...
-
Page 14: Federal Communications Commission Statement (Class B)
BNC Video output Built-in storage option Micro SDHC card (32GB max.) External microphone input External Audio output General Power supply DC 12V/PoE PoE (TYP.): 7.3W (LED/Heater off) 8.7W (LED on, Heater off) 20.7W (LED off, Heater on) 22.1W (LED/Heater on) Power consumption DC-IN (TYP.) 5.2W (LED/Heater off) -
Page 15: Class B (Emc)
You as the original purchaser. Except for the foregoing, the Product is provided “AS IS.” In no event does AVer warrant that You will be able to operate the Product without problems or interruptions, or that the Product is suitable for your purposes. Your exclusive remedy and the entire liability of AVer under this paragraph shall be, at AVer’s option, the repair or replacement of... -
Page 16: Limitations Of Warranty
AVer specifications, (iii) use of the Product with any accessories or options not furnished by AVer or its authorized agents, or (iv) installation, alteration, or repair of the Product by anyone other than AVer or its authorized agents.
Need help?
Do you have a question about the SF2121-BHR-30 and is the answer not in the manual?
Questions and answers