
Related Manuals for AQUALUX AQLXC-5RO


Summary of Contents for AQUALUX AQLXC-5RO
-
Page 1: Operating Manual
Aqualux 5-Stage Reverse Osmosis System Operating Manual Aqualux 5-Stage System Aqualux 5-Stage with Booster Pump SKU: AQLXC-5RO SKU: AQLXC-5RO-BP Aqualux 5-Stage with Permeate Pump SKU: AQLXC-5RO-PP... -
Page 2: Pre-Installation Inspection
FACTORY PREPARATION This reverse osmosis unit is thoroughly tested before shipment. Test procedures include: Quality test of the product water produced to assure that minimum standards of impurity rejection are met. Test of all components to assure correct function. Flow rate measurement to assure that efficiency specifications are met. WARNING The feed water supply must comply with the following conditions for the warranty to remain valid. -
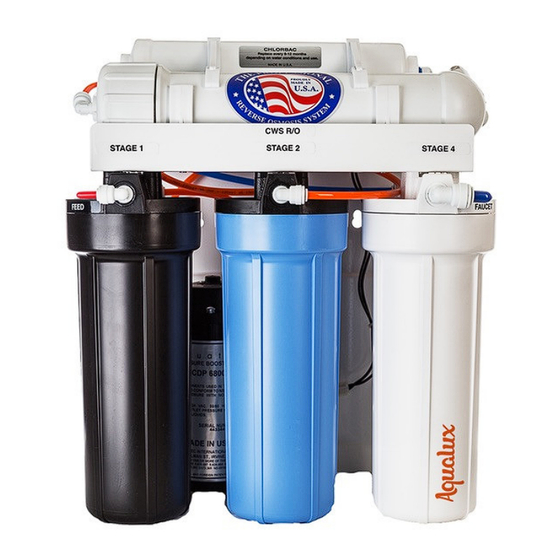
Page 3: General Description Of System
INSTALLATION TOOL LIST (NOT SUPPLIED) 3/8” VSR Drill • Channel Locks • ½” Open End Wrench • 9/16” Open End Wrench • ½” Carbide Drill Bit w/ 3/8” Shaft • ¼” Drill Bit • Flat Head and a Philips Head Screwdriver •... -
Page 4: Preparation For Installation
INSTALLATION PROCEDURE This reverse osmosis unit is designed to operate at water pressure in the range from 40 psi to 70 psi. At lower pressures the reverse osmosis membrane will produce lower quantity and quality drinking water and severe damage to the system may result. Low pressure boost pumps are available from your dealer and will quietly supply the required pressure to the reverse osmosis unit for optimum performance and life. -
Page 5: Installation Of Water Supply Connector
INSTALLATION OF WATER SUPPLY CONNECTOR WARNING: CONNECT TO COLD WATER ONLY. CONNECTING THE REVERSE OSMOSIS HEAD ASSEMBLY TO HOT WATER WILL DAMAGE THE MODULE AND VOID THE WARRANTY. Turn off the cold water supply to the sink faucet by locating the round or oblong handle on the right side of the sink cabinet and turning clockwise until water supply is off. - Page 6 INSTALLATION OF SADDLE VALVE ASSEMBLY TO INSTALL THE “SADDLE TAPPING VALVE” ON COPPER TUBE CAUTION: Do not turn handle before or while installing the saddle valve. Also confirm the piercing lance does not protrude beyond the rubber gasket. Locate the cold water shut off valve on the cold water line under your sink. Assemble the saddle valve on copper tube.
-
Page 7: Installation Of Drain Saddle
TO INSTALL THE SADDLE VALVE ON STEEL OR BRASS PIPE Shut off water supply and drain the line. Drill a 3/16” hole in pipe. Use a hand drill to avoid shock hazard. Turn handle to expose lance beyond the rubber gasket no more than 3/16” Place body of valve over hole so that lance fits into the hole. - Page 8 INSTALLATION OF LONG REACH FAUCET NOTE: This system includes a standard sink top long reach faucet without an air-gap. In localities where plumbing codes require installation of an air-gap, contact the distributor to obtain an air-gap faucet. It is recommended that the system representative be consulted for proper tools, techniques and other assistance in performing the following procedure.
- Page 9 Assemble the faucet as shown: The faucet shown has two operating positions. The black handle can be pushed downward for intermittent water flow or lifted up into a locking position for continuous flow. MOUNTING THE REVERSE OSMOSIS HEAD ASSEMBLY Using the bracket as a template, mark the screw location at the desired position. Screw two hex screws into the sidewall leaving enough protruding to allow the bracket to slide over them.
- Page 10 CONNECTING THE FITTINGS The following types of fitting for tubing connections may be found upon the reverse osmosis drinking water system. BRASS COMPRESSION - To complete the tubing connections using brass compression fittings: Slide the compression nut onto the tubing Slip a white plastic onto the tubing with the small beveled end towards the end of the tubing.
- Page 11 QUICK CONNECT FITTINGS - To complete the tubing connections using quick connect fittings: Confirm the tubing ends are cut squarely not at an angle and without burrs. Firmly insert the end of the tubing into the quick connect fitting until the tubing bottoms. The tubing will insert into the fitting approximately 5/8”.
-
Page 12: Start-Up Procedure
START-UP PROCEDURE Check to see all connections are made. Check that all of the pre-filter and postfilter housings are secure. Slowly turn on the water by turning the needle valve counterclockwise. The valve handle on top of the tank should be in the open position, parallel to the valve body. The black handle of the long reach faucet should be perpendicular to the spigot (closed). -
Page 13: Troubleshooting Guide
TROUBLE SHOOTING GUIDE SYMPTOM PROBABLE CAUSE SOLUTION No water Water supply is turned off Turn water on Not enough water Low water pressure Unit will not operate at less than 35 psi household line pressure Water supply blocked Clear restriction, rotate valve handle on tap water feed assembly Storage tank depleted Consider adding additional tank... - Page 14 REVERSE OSMOSIS SYSTEM WARRANTY POLICY TWO-YEAR WARRANTY ON ENTIRE UNIT* FOR A PERIOD OF TWO YEARS THE MANUFACTURER WILL REPLACE OR REPAIR ANY PART OF THE REVERSE OSMOSIS UNIT WHICH WE FIND TO BE DEFECTIVE IN OPERATION BECAUSE OF FAULTY MATERIALS OR WORKMANSHIP. YOU PAY ONLY FREIGHT AND LOCAL LABOR CHARGES.
Need help?
Do you have a question about the AQLXC-5RO and is the answer not in the manual?
Questions and answers